Oki PRO8432WT Pro8432WT - User Guide - Page 24
Put your finger in the recess of the, slot and fix it by pushing it toward
 |
View all Oki PRO8432WT manuals
Add to My Manuals
Save this manual to your list of manuals |
Page 24 highlights
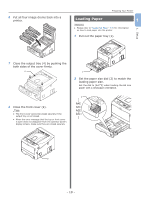
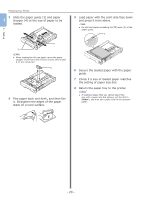
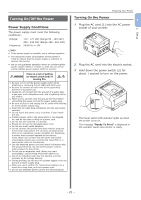
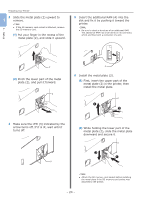
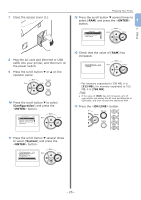
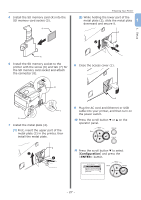
Preparing Your Printer 3 Slide the metal plate (2) upward to 1 remove. Note ●● If the SD memory card socket is attached, remove the SD memory card. (1) Put your finger in the recess of the metal plate (2), and slide it upward. 5 Insert the additional RAM (4) into the slot and fix it by pushing it toward the printer. Note ●● Be sure to check a direction of an additional RAM. The additional RAM has small dents on its connector, which are fitted with a connector of a slot. 1. Setup 2 (2) Pinch the lower part of the metal plate (2), and pull it forward. 2 4 6 Install the metal plate (2). (1) First, insert the upper part of the metal plate (2) in the printer, then install the metal plate. 2 4 Make sure the LED (3) indicated by the arrow turns off. If it is lit, wait until it turns off. (2) While holding the lower part of the metal plate (2), slide the metal plate downward and secure it. 2 3 Note ●● Attach the SD memory card socket before installing the metal plate if the SD memory card socket was attached to the printer. - 24 -
-
 1
1 -
2
-
3
-
4
-
5
-
6
-
7
-
8
-
9
-
10
-
11
-
12
-
13
-
14
-
15
-
16
-
17
-
18
-
 19
19 -
 20
20 -
 21
21 -
 22
22 -
 23
23 -
 24
24 -
 25
25 -
 26
26 -
 27
27 -
 28
28 -
 29
29 -
30
-
31
-
32
-
33
-
34
-
35
-
36
-
37
-
38
-
39
-
40
-
41
-
42
-
43
-
44
-
45
-
46
-
47
-
48
-
49
-
50
-
51
-
52
-
53
-
54
-
55
-
56
-
57
-
58
-
59
-
60
-
61
-
62
-
63
-
64
-
65
-
66
-
67
-
68
-
69
-
70
-
71
-
72
-
73
-
74
-
75
-
76
-
77
-
78
-
79
-
80
-
81
-
82
-
83
-
84
-
85
-
86
-
87
-
88
-
89
-
90
-
91
-
92
-
93
-
94
-
95
-
96
-
97
-
98
-
99
-
100
-
101
-
102
-
103
-
104
-
105
-
106
-
107
-
108
-
109
-
110
-
111
-
112
-
113
-
114
-
115
-
116
-
117
-
118
-
119
-
120
-
121
-
122
-
123
-
124
-
125
-
126
-
127
-
128
 |
 |
