Olympus E520 E-520 Instruction Manual (English) - Page 80
Light box display, Playback functions, Press the, button during single-frame playback., Press
 |
UPC - 050332163997
View all Olympus E520 manuals
Add to My Manuals
Save this manual to your list of manuals |
Page 80 highlights
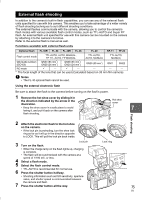
Light box display You can view the playback image and another image together on the left and right sides of the monitor. This is useful if you want to compare images you recorded using bracketing. 1 Press the P button during single-frame playback. MENU button j • The frame being viewed is displayed on the left side of the monitor, and the next frame is displayed on the right < button side. The image is displayed at the same magnification of the image being viewed. • The image on the left is the benchmark image. 2 Press p to select the image on the right. • You can protect, erase or copy the image on the right. 3 Press the P button. • The camera returns to single-frame playback of the image on the left at the magnification being viewed. INFO button i button P button Playback functions Benchmark image Operations during light box display 8 • Pressing the i button replaces the image on the left with the image on the right and becomes the new benchmark image. • You can use the control dial to change the magnification of both images at the same time. • Pressing the < button or INFO button allows you to move the position of the image on the right with the p button. Pressing the < button or INFO button again allows you to move the positions of both images with the p button. p : Selects the right image p : Scrolls the right image p : Scrolls both images in synchronization * * * * You can also use the INFO button in the same way for this procedure. 80 EN
-
 1
1 -
2
-
3
-
4
-
5
-
6
-
7
-
8
-
9
-
10
-
11
-
12
-
13
-
14
-
15
-
16
-
17
-
18
-
19
-
20
-
21
-
22
-
23
-
24
-
25
-
26
-
27
-
28
-
29
-
30
-
31
-
32
-
33
-
34
-
35
-
36
-
37
-
38
-
39
-
40
-
41
-
42
-
43
-
44
-
45
-
46
-
47
-
48
-
49
-
50
-
51
-
52
-
53
-
54
-
55
-
56
-
57
-
58
-
59
-
60
-
61
-
62
-
63
-
64
-
65
-
66
-
67
-
68
-
69
-
70
-
71
-
72
-
73
-
74
-
 75
75 -
 76
76 -
 77
77 -
 78
78 -
 79
79 -
 80
80 -
 81
81 -
 82
82 -
 83
83 -
 84
84 -
 85
85 -
86
-
87
-
88
-
89
-
90
-
91
-
92
-
93
-
94
-
95
-
96
-
97
-
98
-
99
-
100
-
101
-
102
-
103
-
104
-
105
-
106
-
107
-
108
-
109
-
110
-
111
-
112
-
113
-
114
-
115
-
116
-
117
-
118
-
119
-
120
-
121
-
122
-
123
-
124
-
125
-
126
-
127
-
128
-
129
-
130
-
131
-
132
-
133
-
134
-
135
-
136
-
137
-
138
-
139
-
140
-
141
-
142
-
143
-
144
-
145
-
146
-
147
-
148
 |
 |
