Onkyo 8222 Owner Manual
Onkyo 8222 - TX Receiver Manual
 |
UPC - 751398007040
View all Onkyo 8222 manuals
Add to My Manuals
Save this manual to your list of manuals |
Onkyo 8222 manual content summary:
- Onkyo 8222 | Owner Manual - Page 1
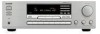
Stereo Receiver TX-8522/ TX-8222 Instruction Manual Contents Introduction 2 Connections 12 Enjoying Audio Sources 20 Thank you for purchasing an Onkyo Stereo Receiver. Please read this manual thoroughly before making connections and plugging in the unit. Following the instructions in this - Onkyo 8222 | Owner Manual - Page 2
REMOVE COVER (OR BACK). NO USER-SERVICEABLE PARTS INSIDE. REFER SERVICING TO QUALIFIED SERVICE PERSONNEL. WARNING AVIS RISK OF ELECTRIC SHOCK RISQUE DE 's instructions. 8. Do not install near any heat sources such as radiators, heat registers, stoves, or other apparatus (including amplifiers - Onkyo 8222 | Owner Manual - Page 3
which is marked with the letter N or coloured black. The wire which is coloured brown must be Models Declaration of Conformity We, ONKYO EUROPE ELECTRONICS GmbH LIEGNITZERSTRASSE 6, 82194 GROEBENZELL, GERMANY declare in own responsibility, that the ONKYO product described in this instruction manual - Onkyo 8222 | Owner Manual - Page 4
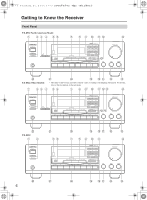
to Know the Receiver 6 Front Panel 6 Rear Panel 8 Display 9 Remote Controller 10 Using the Remote Controller 10 Connections Connecting Your Speakers 12 Speaker Connection Precautions 12 Connecting the Speaker Cables 12 Configuring the Speaker Impedance (TX-8522 North American model only 13 - Onkyo 8222 | Owner Manual - Page 5
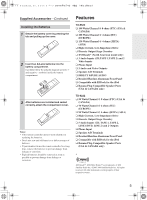
model only) ❑ 3 Audio Inputs (CD,TAPE 1,TAPE 2) and 2 Video Inputs ❑ Phono Input ❑ 2 Audio and Video Outputs ❑ Speaker A/B Terminals ❑ DIRECT &PURE AUDIO ❑ Brushed Hairline Aluminum Front Panel ❑ Compatible with RI Dock for the iPod ❑ Banana Plug-Compatible Speaker Posts (USA & CANADA only) TX-8222 - Onkyo 8222 | Owner Manual - Page 6
Panel TX-8522 North American Model 1 23 4 56 7 8 9 J KL N V U T S RQ P O TX-8522 Other Models * The name of the buttons and other controls varies according to the shipping destination. For details, refer to the description on the next page. 1 23 4 56 7 8 9* J K* L M N V TX-8222 12 - Onkyo 8222 | Owner Manual - Page 7
. Refer to the description corresponding to your model. For detailed information, see the pages in parentheses. A STANDBY/ON button (20) Sets the receiver to On or Standby. B SPEAKERS A and B switches (21) Turn speaker sets A and B on or off. C PURE AUDIO button and indicator (23) Selects the Pure - Onkyo 8222 | Owner Manual - Page 8
Getting to Know the Receiver-Continued Rear Panel TX-8522 1 B 345 67 8 9 JK L M N TX-8222 1B 5 67 8 9 JK L OP A REMOTE CONTROL jacks These (Remote Interactive) jacks can be connected to the jacks on your other Onkyo audio components. The receiver's remote controller can then be used - Onkyo 8222 | Owner Manual - Page 9
signal, and stereo (FRONT) jacks for connecting the analog audio signals. N VIDEO IN/OUT The VIDEO inputs and outputs can be used to connect a VCR, cable/satellite receiver, set-top box, etc. O LINE 1/DVD This analog audio input is for connecting a component's analog audio output (DVD, RI Dock, etc - Onkyo 8222 | Owner Manual - Page 10
Remote Controller TX-8522 North American model (RC-664S) TX-8522 Other models (RC-665S) TX-8222 All models ( Remote Controller Point the remote controller toward the remote control sensor. Remote control sensor About 5 m (16 feet) Notes: • The remote controller may not work reliably if the receiver - Onkyo 8222 | Owner Manual - Page 11
menu. G Arrow and ENTER buttons (26) North American model only For AM and FM, the Up and Down [ on an HDD component. Q DECK A/HDD (DOCK) buttons Pause [ ]/Reverse Play [ ]: Pauses receiver. U VOL [ ]/[ ] buttons (21) Adjusts the volume of the receiver regardless of the currently selected remote - Onkyo 8222 | Owner Manual - Page 12
two sets of speakers to both speaker terminal posts and output sound only from either speaker set, use speakers whose impedance is between 4 and 16 ohms. For the North American model TX-8522, when the speaker impedance is 4 or 6 ohms, set the speaker impedance setting on the receiver to 6 ohms (see - Onkyo 8222 | Owner Manual - Page 13
Speaker Impedance (TX-8522 North American model only) In this model, the factory default for speaker impedance is "8 ohms." When you change the speaker impedance setting, read "Speaker on the receiver 4 before configuring the speaker impedance. 1 Press the SETUP button on the remote controller to - Onkyo 8222 | Owner Manual - Page 14
for indoor use only. 1 Attach the FM antenna, as shown. I North American Model 2 Connect both wires of the AM loop antenna to the AM push terminals, as reception. Keep the antenna as far away as possible from your receiver, TV, speaker cables, and power cords. If you cannot achieve good reception - Onkyo 8222 | Owner Manual - Page 15
It's best not to use the same antenna for both FM and TV reception, as this can cause interference problems. If circumstances demand it, use a TV/FM antenna splitter, as shown. Outdoor AM antennas work best electrical shock hazards. TV/FM antenna splitter To the receiver To TV (or VCR) 15 - Onkyo 8222 | Owner Manual - Page 16
• Always refer to the instructions that came with the component that you are connecting. • Do not plug in the power cord until all connections have been properly made. • Do not bind audio cables with power cords and speaker cables. Doing so may adversely affect the sound quality. • To prevent - Onkyo 8222 | Owner Manual - Page 17
cable to connect the TX-8222's LINE 1/DVD IN L/R jacks to the analog audio output jacks on the DVD player. MONITOR OUT V DVD IN V IN L R DVD VIDEO IN L R AUDIO OUT VIDEO OUT TAPE 1 Remote Interactive Dock R ---- L AUDIO OUT Note: If you use the Onkyo Remote Interactive Dock (DS-A1), flip - Onkyo 8222 | Owner Manual - Page 18
. For the TX-8222, use an analog audio cable to connect the TX-8222's LINE 1/DVD IN L/R or LINE 2 IN L/R jacks to the analog audio output jacks on the connected component. IN L R L R AUDIO OUT Connecting Components If you connect other Onkyo components to the receiver with the appropriate - Onkyo 8222 | Owner Manual - Page 19
to another manufacturer's component may cause the receiver to malfunction. • Some components may not support all functions. See the manuals supplied with your other Onkyo components for more information. e.g. TX-8222 European models e.g. TX-8522 North American model Caution: • Make sure that the - Onkyo 8222 | Owner Manual - Page 20
display name to "HDD," you can operate the RI Dock using the remote controller supplied with the receiver (see pages 10, 11). 1, 2 1, 2 1 TX-8522 or Press the appropriate input selector button. The selected input name appears in the display. TX-8222 or 2 Press and hold down the input selector - Onkyo 8222 | Owner Manual - Page 21
Enjoying Audio Sources Input selector buttons SPEAKERS A/B MASTER VOLUME INPUT SELECTOR VOLUME / 1 Receiver (ex. TX-8522 North American model) Press the input selector button to select the component that you want to listen to. Remote controller 4 Receiver Remote controller To adjust the - Onkyo 8222 | Owner Manual - Page 22
Audio Sources-Continued SLEEP DIMMER (TX-8522 Other than North American model) DIMMER PHONES DIMMER (TX-8222) MUTING Muting the receiver (remote controller only) You can temporarily mute the output of the receiver. 1 Receiver Press the remote controller's [MUTING] button. The receiver - Onkyo 8222 | Owner Manual - Page 23
sources individually. Enjoying the Pure Audio Sound (TX-8522 only) Pressing the [PURE AUDIO] button activates the Pure Indicator Audio listening mode and turns on the PURE AUDIO indicator. The Pure Audio listening mode allows you to enjoy purer sound by disabling the video signal output - Onkyo 8222 | Owner Manual - Page 24
OUT or VIDEO OUT jacks. For the TX-8222, you can record an audio signal on a recording component connected to the TAPE 1 OUT or TAPE 2 OUT jacks. When you record an audio signal on a recording component connected to the TAPE 2 OUT jacks, you can monitor the recorded sound. For details, refer to the - Onkyo 8222 | Owner Manual - Page 25
, etc.) The signal flow in monitoring the sound before recording TX-8522/TX-8222 TAPE 2 T2 MONITOR OFF button Amplifier PLAY REC Input source (CD, FM, etc.) Recording Audio and Video from Separate Sources (TX-8522 only) You can overdub audio onto your video recordings by simultaneously recording - Onkyo 8222 | Owner Manual - Page 26
in stereo sound. Manual Tuning To activate this mode, press the [TUNING MODE] button to turn off the "AUTO" indicator. In this mode, you will receive the broadcast in monaural sound. Press the TUNING [ DOWN] or [UP ] button. You can also use the remote controller's TUNING/CH [ ]/[ ] buttons - Onkyo 8222 | Owner Manual - Page 27
and XM channels. I Selecting Presets 1 Receiver Remote controller To select a preset, use the number buttons on the receiver, or the remote controller's PRESET [ ]/[ ] buttons. For the TX-8522 other than North American model, the PRESET [ ]/[ ] buttons on the receiver also can be used to select - Onkyo 8222 | Owner Manual - Page 28
type (e.g., news, sport, rock, etc.). The receiver supports four types of RDS information: PS (Program Service) When tuned to an RDS station that's Country music National music Oldies music Folk music Documentary Alarm test Alarm Display NONE NEWS AFFAIRS INFO SPORT EDUCATE DRAMA CULTURE SCIENCE - Onkyo 8222 | Owner Manual - Page 29
PTY/TP Press the [RT/PTY/TP] button once. The RT information scrolls across the display. Notes: • The message "Waiting" may appear while the receiver waits for the RT information. • If the message "No Text Data" appears on the display, no RT information is available. Finding Stations by Type (PTY - Onkyo 8222 | Owner Manual - Page 30
the [CHARACTER] button on the front panel. The frequency in the display goes off and the cursor ( _ ) flashes. TX-8222 Other than European 3 TX-8222 Other than European model Continue pressing the [5MNO] button until "O" is displayed. With each press of the button, the character that appears in - Onkyo 8222 | Owner Manual - Page 31
sensed. IR IN Connecting block IR Receiver TX-8522/ TX-8222 Remote controller In the cabinet Main room : Signal flow Example for the remote zone The IR IN input allows you to control the receiver from the remote zone with the remote controller even though the remote zone may be on the other - Onkyo 8222 | Owner Manual - Page 32
Troubleshooting If you have any trouble using the receiver, look for a solution in this section. If you can't resolve the issue yourself, try resetting the receiver before contacting your Onkyo dealer. [TX-8522] To reset the receiver to its factory defaults, turn it on and, while holding down the - Onkyo 8222 | Owner Manual - Page 33
receiver is not subjected to direct sunshine or inverter-type florescent lights. Relocate if necessary (page 10). Can't control other components • If you've connected an -capable Onkyo DS-A1 Remote Interactive Dock to the TAPE 1 or VIDEO jacks on the TX-8522 (or TAPE 1 or LINE 2 jacks on the TX-8222 - Onkyo 8222 | Owner Manual - Page 34
Specifications (TX-8522) Amplifier Section Rated Output Power (FTC) (North American) All DVD, VIDEO I Video Outputs Composite VIDEO I Audio Inputs Analog Inputs PHONO, CD, TAPE 1, TAPE 2, DVD, VIDEO I Audio Outputs Analog Outputs TAPE 1, TAPE 2, VIDEO Speaker Outputs SPEAKERS A SPEAKERS - Onkyo 8222 | Owner Manual - Page 35
TX-8222) Ampli - 108.0 MHz Stereo: 22.2 dBf (75 Ω IHF) Mono: 15.2 dBf (75 Ω IHF) Stereo: 67 dB (IHF-A) Mono: 73 dB (IHF-A) Stereo: 0.5 % (1 Audio Inputs Analog Inputs PHONO, CD, TAPE 1, TAPE 2, LINE 1, LINE 2 I Audio Outputs Analog Outputs TAPE 1, TAPE 2 Speaker Outputs SPEAKERS A SPEAKERS - Onkyo 8222 | Owner Manual - Page 36
Sales & Product Planning Div. : 2-1, Nisshin-cho, Neyagawa-shi, OSAKA 572-8540, JAPAN Tel: 072-831-8023 Fax: 072-831-8124 ONKYO U.S.A. CORPORATION 18 Park Way, Upper Saddle River, N.J. 07458, U.S.A. Tel: 201-785-2600 Fax: 201-785-2650 http://www.us.onkyo.com/ ONKYO 1494-680452 ONKYO CHINA LIMITED
-
 1
1 -
 2
2 -
 3
3 -
 4
4 -
 5
5 -
 6
6 -
 7
7 -
8
-
9
-
10
-
11
-
12
-
13
-
14
-
15
-
16
-
17
-
18
-
19
-
20
-
21
-
22
-
23
-
24
-
25
-
26
-
27
-
28
-
29
-
30
-
31
-
32
-
33
-
34
-
35
-
36
 |
 |

E
n
Stereo Receiver
TX-8522/
TX-8222
Instruction Manual
Thank you for purchasing an Onkyo Stereo Receiver.
Please read this manual thoroughly before making
connections and plugging in the unit.
Following the instructions in this manual will enable
you to obtain optimum performance and listening
enjoyment from your new Stereo Receiver.
Please retain this manual for future reference.
Contents
Introduction
....................................
2
Connections
.................................
12
Enjoying Audio Sources
..............
20
Others
Troubleshooting
..............................
32
Specifications
..................................
34
TX-85228222_En.book 1 ページ 2006年5月4日
木曜日
午前11時51分