Onkyo 8222 Owner Manual - Page 7
Continued - stereo receiver
 |
UPC - 751398007040
View all Onkyo 8222 manuals
Add to My Manuals
Save this manual to your list of manuals |
Page 7 highlights
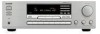
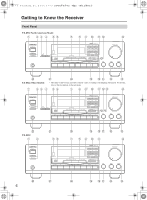
Getting to Know the Receiver-Continued Some button number sections (such as 9 and K) contain multiple button descriptions because the name and function vary according to the model or shipping destination. Refer to the description corresponding to your model. For detailed information, see the pages in parentheses. A STANDBY/ON button (20) Sets the receiver to On or Standby. B SPEAKERS A and B switches (21) Turn speaker sets A and B on or off. C PURE AUDIO button and indicator (23) Selects the Pure Audio listening mode. The indicator lights up and the display disappears when this mode is selected. D DIRECT button (23) Outputs the original sound source without applying any effects. E Remote-control sensor (10) Receives control signals from the remote controller. F DISPLAY (30) Displays various information about the currently selected input source. G TUNING UP/DOWN buttons (26, 29) When AM, FM or SAT RADIO is selected, the TUNING [UP ]/[ DOWN] buttons are used for radio tuning. H DIRECT TUNING button (26) When you know the frequency for the station you want to listen to, you can select the station by entering the frequency directly using this button and number buttons. When SAT RADIO is selected, you can select the channel number. I CATEGORY button Used to select a category for Satellite Radio stations. PRESET [ ] button (27) Selects a station from ones you preset. CHARACTER button Used to label the FM or AM station preset number. RT/PTY/TP button (29) On the European model, this is the RT/PTY/TP button, and it's used with RDS (Radio Data System). See "Using RDS (European Models Only)" on page 28. J Number buttons (26, 27, 30) Used to select a station by entering the frequency directly or to label the station preset number. K ENTER button Used to select satellite radio stations. PRESET [ ] button (27) Selects a station from ones you preset. DIMMER button (22) Adjusts the display brightness. SCAN button (29) Used to find a station in RDS broadcasting. L CHARACTER button Used to label the FM or AM station preset number. M DIMMER button (22) Adjusts the display brightness. N MASTER VOLUME control (21) Sets the volume of the receiver. O BALANCE control (23) This control is for adjusting the sound level balance between the left and right channel for speakers and headphones. P TREBLE control (23) This control is for adjusting the level of treble sounds. Q BASS control (23) This control is for adjusting the level of bass sounds. R TUNING MODE button (26, 27) Selects the Auto or Manual tuning mode for AM and FM radio. S MEMORY button (27) Used when storing or deleting radio presets. T Input selector buttons (21, 24, 26) Select the input sources. The TAPE 2 button is also used to monitor the recorded sound. U STANDBY indicator (20) Lights up when the receiver is on Standby and flashes while a signal is being received from the remote controller. V PHONES jack (22) This 1/4-inch phone jack is for connecting a standard pair of stereo headphones for private listening. 7
-
 1
1 -
 2
2 -
 3
3 -
 4
4 -
 5
5 -
 6
6 -
 7
7 -
 8
8 -
 9
9 -
 10
10 -
 11
11 -
 12
12 -
13
-
14
-
15
-
16
-
17
-
18
-
19
-
20
-
21
-
22
-
23
-
24
-
25
-
26
-
27
-
28
-
29
-
30
-
31
-
32
-
33
-
34
-
35
-
36
 |
 |
