Onkyo A-9010 Instruction Manual
Onkyo A-9010 Manual
 |
View all Onkyo A-9010 manuals
Add to My Manuals
Save this manual to your list of manuals |
Onkyo A-9010 manual content summary:
- Onkyo A-9010 | Instruction Manual - Page 1
A-9010 Integrated Amplifier Instruction Manual Connections 6 Operations 11 Troubleshooting 14 To return to the default setting 14 Thank you for purchasing an Onkyo product. Please read this manual thoroughly before making any connections and plugging in your new Onkyo product. Following the - Onkyo A-9010 | Instruction Manual - Page 2
important operating and maintenance (servicing) instructions in the literature accompanying the appliance. Important safety instructions 1. Read these instructions. 2. Keep these instructions. 3. Heed all warnings. 4. Follow all instructions. 5. Do not use this apparatus near water. 6. Clean - Onkyo A-9010 | Instruction Manual - Page 3
checked by your Onkyo dealer. 8. Handling Notes 0 If you need to transport this unit, use the original packaging . NOTE: This equipment has been tested and found to comply with the limits uses and can radiate radio frequency energy and, if not installed and used in accordance with the instructions - Onkyo A-9010 | Instruction Manual - Page 4
supply cord of this unit should be performed only by qualified service personnel. IMPORTANT The wires in the mains lead are coloured to the terminal which is marked with the letter N or coloured black. The wire which is coloured brown must be connected to the onkyo.com/manual/weee/weee.pdf En-4 - Onkyo A-9010 | Instruction Manual - Page 5
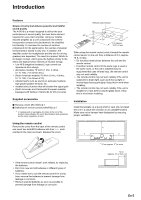
. Using our reliable discrete amplifier as a core component, the A-9010 incorporates compact circuitry thanks to its simplified functionality. To minimise the number of switcher components for the signal paths, the number of speaker terminal sets is limited to only one. In addition, the amplifier - Onkyo A-9010 | Instruction Manual - Page 6
switch (North American and Continental European models): Used to set the link function with the Onkyo equipment with RI terminal. DIGITAL IN COAXIAL . This is used to record an audio from the reproduction equipment connected to this unit. SPEAKERS terminals: Connect speakers. Cables used to connect - Onkyo A-9010 | Instruction Manual - Page 7
in accordance with the connecting terminal of the reproduction equipment to be used. A PCM digital audio can be enjoyed with this unit. Do not linked when connecting to an Onkyo equipment with RI terminal. For the connecting and setting methods, refer to "Connecting Onkyo equipment with RI terminal" - Onkyo A-9010 | Instruction Manual - Page 8
the equipment turn off automatically. Remote Control: You can use the unit's remote control to control your other RI-capable Onkyo equipment, pointing the remote control at the unit's remote control sensor instead of the equipment. For information on remote control operation, see "Operating with the - Onkyo A-9010 | Instruction Manual - Page 9
to a tuner via LINE: Connect the audio pin cable to the LINE IN 3 jack. Connect the RI cable to the REMOTE CONTROL jack. 0 (North American and Continental European models) The link function of RI is not supported when a tuner is connected via DIGITAL. Do not connect the RI cable. En-9 - Onkyo A-9010 | Instruction Manual - Page 10
left hand side to the SPEAKERS terminal (L). Important: Connect speakers with 4 h to 16 h impedance. Connecting a speaker with a lower impedance may damage the unit. Connections 0 (North American models) When using commercially available banana plugs, tighten the speaker terminals to the end and - Onkyo A-9010 | Instruction Manual - Page 11
UK models) Í ON/STANDBY button Remote control sensor Volume control Input source LEDs MUTING LED ASB (Auto Standby) LED INPUT selector BASS control TREBLE control BALANCE control input source LED will go off. 0 The power of Onkyo equipment connected via RI will be automatically turned off when the - Onkyo A-9010 | Instruction Manual - Page 12
Using headphones Turn down the volume, then connect your stereo headphones with a standard plug (ø 6.3 mm, 1/4q) to the PHONES jack. The speakers approximately 2 seconds. (UK models) On: ASB LED will light up. Off: ASB LED will go off. ∫ BASS Adjusts the bass. 1. Turn the BASS control. 0 BASS is - Onkyo A-9010 | Instruction Manual - Page 13
LED blinks. (UK models) MUTING LED used with the Onkyo equipment that is connected via RI For the operation of each button, refer to the instruction manual remote control may not work, or only partially. 0 To control the equipment, an RI connection is required. For detail, refer to "Connecting Onkyo - Onkyo A-9010 | Instruction Manual - Page 14
be connected. See the instruction manual for the connected device. speakers output no sound. 0 There may be a loose contact when no sound is output from headphone, so check the connection. 0 (North America and Continental European models) The unit does not support digital formats other than Onkyo - Onkyo A-9010 | Instruction Manual - Page 15
Frequency response: 10 Hz - 100 kHz/i1 dB, j3 dB (LINE 1) Tone control characteristics: ±10 dB, 100 Hz (BASS) ±10 dB, 10 kHz (TREBLE) Signal to noise ratio: 97 dB (LINE, IHF-A) 77 dB (PHONO MM, IHF-A) Speaker impedance: 4 h - 16 h Power supply: AC 120 V, 60 Hz (North American) - Onkyo A-9010 | Instruction Manual - Page 16
Chuo-ku, OSAKA 541-0041, JAPAN http://www.onkyo.com/ The Americas 18 Park Way, Upper Saddle River, N.J. 07458, U.S.A. For Dealer, Service, Order and all other Business Inquiries: Tel: 201-785-2600 Fax: 201-785-2650 http://www.us.onkyo.com/ For Product Support Team Only: 1-800-229-1687 http://www.us
-
 1
1 -
 2
2 -
 3
3 -
 4
4 -
 5
5 -
 6
6 -
 7
7 -
8
-
9
-
10
-
11
-
12
-
13
-
14
-
15
-
16
 |
 |

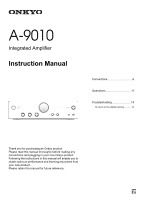
A-9010
Integrated Amplifier
Instruction Manual
Thank you for purchasing an Onkyo product.
Please read this manual thoroughly before making any
connections and plugging in your new Onkyo product.
Following the instructions in this manual will enable you to
obtain optimum performance and listening enjoyment from
your new product.
Please retain this manual for future reference.
Connections
................................
6
Operations
.................................
11
Troubleshooting
........................
14
To return to the default setting
............
14