Onkyo TX-8250 User Manual English etc - Page 8
Step1: Connect the Speakers
 |
View all Onkyo TX-8250 manuals
Add to My Manuals
Save this manual to your list of manuals |
Page 8 highlights
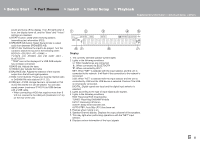
> Before Start > Part Names > Install > Initial Setup > Playback Supplementary information | Advanced Setup | Others Step1: Install Connect the Speakers 1/2˝ (12 mm) a a * You can connect two systems, Speaker A and Speaker B, as the Speaker System. When connecting only one set, connect to the SPEAKERS A terminals. With one set, use speakers with 4 ≠ to 16 ≠ impedance. Note that when connecting to both SPEAKERS A and B terminals, connect speakers with 8 ≠ to 16 ≠ impedance to both A and B. Connect the speaker cable so the wires do not protrude from the speaker jacks. If the exposed wires of the speakers touch the rear panel or the + and - wires touch each other, the protection circuit will be activated. Setup 0 When connected as a Speaker B System, you can output the same audio as Speaker A System by switching with A/B/A+B. Press SPEAKER A/B on the remote control to switch. The selection changes in the order SPEAKER A, SPEAKER B, SPEAKER A+B with each press. 0 If any of the connected speakers have an impedance of 4 ≠ or more to less than 6 ≠, or when speaker systems are connected to both of the SPEAKERS A/B terminal, after completing Initial Setup, you need to make some settings in the Setup menu. Press SETUP on the remote controller, and set "3. Hardware" - "SpImpedance" to "4≠". (P31) (*)You can also connect a subwoofer with a built-in amplifier to the SUBWOOFER PRE OUT jack to boost bass playback even more. Use a subwoofer cable for connection. When only Speaker B is outputting audio, there will be no audio output from the powered subwoofer. Right Left Speaker A Right Left Speaker B a Speaker Cable 8
-
 1
1 -
2
-
 3
3 -
 4
4 -
 5
5 -
 6
6 -
 7
7 -
 8
8 -
 9
9 -
 10
10 -
 11
11 -
 12
12 -
 13
13 -
14
-
15
-
16
-
17
-
18
-
19
-
20
-
21
-
22
-
23
-
24
-
25
-
26
-
27
-
28
-
29
-
30
-
31
-
32
-
33
-
34
-
35
-
36
-
37
-
38
-
39
-
40
-
41
-
42
-
43
-
44
-
45
-
46
-
47
-
48
-
49
-
50
-
51
-
52
-
53
-
54
-
55
-
56
-
57
-
58
-
59
-
60
-
61
-
62
-
63
-
64
-
65
-
66
-
67
-
68
-
69
-
70
-
71
-
72
-
73
-
74
-
75
-
76
-
77
-
78
-
79
-
80
-
81
-
82
-
83
-
84
-
85
-
86
-
87
-
88
-
89
-
90
-
91
-
92
-
93
-
94
-
95
-
96
-
97
-
98
-
99
-
100
-
101
-
102
-
103
-
104
-
105
-
106
-
107
-
108
-
109
-
110
-
111
-
112
-
113
-
114
-
115
-
116
-
117
-
118
-
119
-
120
-
121
-
122
-
123
-
124
-
125
-
126
-
127
-
128
-
129
-
130
-
131
-
132
 |
 |
