Onkyo TX-RZ820 Basic/Advanced Manual English - Page 4
> Before Start, > Install, > Initial Setup, > Playback, Advanced Manual, > Part Names
 |
View all Onkyo TX-RZ820 manuals
Add to My Manuals
Save this manual to your list of manuals |
Page 4 highlights
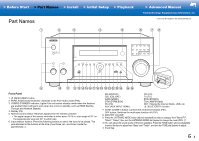
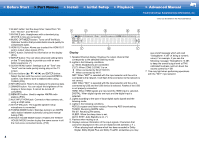
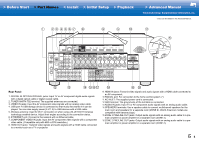
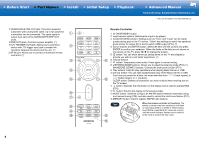
> Before Start > Part Names > Install > Initial Setup > Playback > Advanced Manual Troubleshooting | Supplementary Information, etc. (*)You can find details in the Advanced Manual. 12.SLEEP button: Set the sleep timer. Select from "30 min", "60 min", and "90 min". 13.PHONES jack: Headphones with a standard plug (Ø1/4"/6.3 mm) are connected. 14.MUSIC OPTIMIZER button: Turns on/off the Music Optimizer function that provides better sound quality for compressed audio. 15.HDMI OUT button: Allows you to select the HDMI OUT jack to output video signals (P16). 16.INFO button: Switches the information on the display (P33). 17.SETUP button: You can show advanced setting items on the TV and display to provide you with an even better experience. (*) 18.QUICK MENU button: Settings such as "Tone" and "Level" can be made quickly during play on the TV screen. 19.Cursor buttons (S / T / W / X) and ENTER button: Select the item with the cursors and press ENTER to confirm. Use them to tune to stations when using TUNER (P29). 20.RETURN button: Returns the display to the previous state. 21.DIMMER button: You can adjust the brightness of the display in three steps. It cannot be turned off completely. 22.MEMORY button: Used to register AM/FM radio stations (P30). 23.AUX INPUT HDMI jack: Connect a video camera, etc., using a HDMI cable. 24.SETUP MIC jack: The supplied speaker setup microphone is connected. 25.TUNING MODE button: Switches tuning to an AM/FM radio station between automatic tuning and manual tuning (P29). 26.WHOLE HOUSE MODE button: Enables the WHOLE HOUSE MODE function to play the same source in all the multi-zone connected rooms. (P32) Display 1. Speaker/Channel display: Displays the output channel that corresponds to the selected listening mode. 2. Lights in the following conditions. Ë: When headphones are connected. Z2/Z3: When ZONE 2/ZONE 3 is on. : When connected by BLUETOOTH. : When connected by Wi-Fi. NET: When "NET" is selected with the input selector and the unit is connected to the network. It will flash if the connection to the network is not correct. USB: When "NET" is selected with the input selector and the unit is connected by USB and the USB device is selected. Flashes if the USB is not properly connected. HDMI: When HDMI signals are input and the HDMI input is selected. DIGITAL: When digital signals are input and the digital input is selected. 3. Lights according to the type of input digital audio signals and the listening mode. 4. Lights in the following conditions. RDS (European and Asian models): Receiving RDS broadcasting. TUNED: Receiving AM/FM radio. FM ST: Receiving FM stereo. SLEEP: When the sleep timer is set. AUTO STBY: Auto Standby is on. (*) 5. Flashes when muting is on. 6. Displays various information of the input signals. Characters that cannot be displayed on this unit are replaced with asterisks ( ˎ ). 0 When playing back software which has been encoded in Dolby Digital, Dolby Digital Plus and Dolby TrueHD, sometimes you may see a brief message which will read "DialogNorm: X dB" (X being a numeric value). For example, if you see the following message: "DialogNorm:+4 dB", to keep the overall output level at THX calibrated loudness, just turn down the volume control by 4 dB. 7. This may light when performing operations with the "NET" input selector. 4
-
 1
1 -
 2
2 -
 3
3 -
 4
4 -
 5
5 -
 6
6 -
 7
7 -
 8
8 -
 9
9 -
 10
10 -
11
-
12
-
13
-
14
-
15
-
16
-
17
-
18
-
19
-
20
-
21
-
22
-
23
-
24
-
25
-
26
-
27
-
28
-
29
-
30
-
31
-
32
-
33
-
34
-
35
-
36
-
37
-
38
-
39
-
40
-
41
-
42
-
43
-
44
-
45
-
46
-
47
-
48
-
49
-
50
-
51
-
52
-
53
-
54
-
55
-
56
-
57
-
58
-
59
-
60
-
61
-
62
-
63
-
64
-
65
-
66
-
67
-
68
-
69
-
70
-
71
-
72
-
73
-
74
-
75
-
76
-
77
-
78
-
79
-
80
-
81
-
82
-
83
-
84
-
85
-
86
-
87
-
88
-
89
-
90
-
91
-
92
-
93
-
94
-
95
-
96
-
97
-
98
-
99
-
100
-
101
-
102
-
103
-
104
 |
 |
