Panasonic AG-AC90APJ Operating Instructions Advanced - Page 90
Detail Level], Detail Coring], Chroma Level], Chroma Phase], Touch [v Detail Level].
 |
View all Panasonic AG-AC90APJ manuals
Add to My Manuals
Save this manual to your list of manuals |
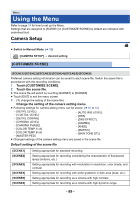
Page 90 highlights
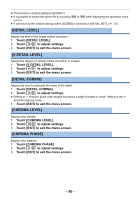
≥ This function's default setting is [SCENE1]. ≥ It is possible to switch the scene file by touching SCN1 to SCN6 while displaying the operation icons. (l 64) ≥ It will return to the default settings when [SCENE] is selected in [INITIAL SET]. (l 109) [DETAIL LEVEL] Adjusts the level of the image outline correction. 1 Touch [DETAIL LEVEL]. 2 Touch / to adjust settings. 3 Touch [EXIT] to exit the menu screen. [V DETAIL LEVEL] Adjusts the degree of vertical outline correction in images. 1 Touch [V DETAIL LEVEL]. 2 Touch / to adjust settings. 3 Touch [EXIT] to exit the menu screen. [DETAIL CORING] Adjusts the level to eliminate the noise of the detail. 1 Touch [DETAIL CORING]. 2 Touch / to adjust settings. ≥ Setting to s direction gives crisp images but allows a slight increase in noise. Setting in the r direction reduces noise. 3 Touch [EXIT] to exit the menu screen. [CHROMA LEVEL] Adjusts color density. 1 Touch [CHROMA LEVEL]. 2 Touch / to adjust settings. 3 Touch [EXIT] to exit the menu screen. [CHROMA PHASE] Adjusts color balance. 1 Touch [CHROMA PHASE]. 2 Touch / to adjust settings. 3 Touch [EXIT] to exit the menu screen. - 90 -
-
 1
1 -
2
-
3
-
4
-
5
-
6
-
7
-
8
-
9
-
10
-
11
-
12
-
13
-
14
-
15
-
16
-
17
-
18
-
19
-
20
-
21
-
22
-
23
-
24
-
25
-
26
-
27
-
28
-
29
-
30
-
31
-
32
-
33
-
34
-
35
-
36
-
37
-
38
-
39
-
40
-
41
-
42
-
43
-
44
-
45
-
46
-
47
-
48
-
49
-
50
-
51
-
52
-
53
-
54
-
55
-
56
-
57
-
58
-
59
-
60
-
61
-
62
-
63
-
64
-
65
-
66
-
67
-
68
-
69
-
70
-
71
-
72
-
73
-
74
-
75
-
76
-
77
-
78
-
79
-
80
-
81
-
82
-
83
-
84
-
 85
85 -
 86
86 -
 87
87 -
 88
88 -
 89
89 -
 90
90 -
 91
91 -
 92
92 -
 93
93 -
 94
94 -
 95
95 -
96
-
97
-
98
-
99
-
100
-
101
-
102
-
103
-
104
-
105
-
106
-
107
-
108
-
109
-
110
-
111
-
112
-
113
-
114
-
115
-
116
-
117
-
118
-
119
-
120
-
121
-
122
-
123
-
124
-
125
-
126
 |
 |
