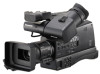
Panasonic AG-HMC80PJ Editing AVCHD with iMovie 09 - Page 3
The Avchd Workflow On Apple Computers, Editing & Outputting Avchd With Apple Imovie '09, - avccam
 |
View all Panasonic AG-HMC80PJ manuals
Add to My Manuals
Save this manual to your list of manuals |
Page 3 highlights
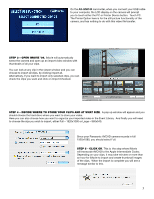
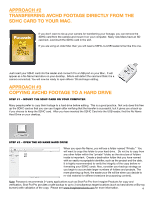
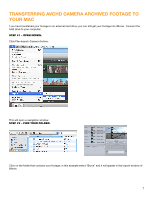
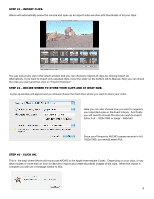
The AVCHD Workflow on apple computers Apple Intel-based Mac computers (MacBookPro Laptops, iMac or Mac Pro Towers) work really well with Panasonic AVCCAM cameras shooting AVCHD footage. Working on a Mac platform presents four editing solutions, based on your budget and the complexity of your final edit. The four editing applications are: iMovie '(08 or '09), Final Cut Express 4, Final Cut Pro (v.6.05 or higher, Part of Final Cut Studio) and Adobe Premier Pro as part of CS4. This paper will discuss a typical AVCHD workflow for editing with and outputting from iMovie'09, part of iLife'09. For detailed information on editing with iMovie please see: www. apple.com/support/imovie Editing & outputting avcHD with apple iMovie '09 KEY POINT #1. To edit AVCHD in iMOVIE '09 you must have an Intel based MAC computer One of the fastest and easiest ways to edit AVCHD footage on a Mac computer is with iMovie '09 software (part of the iLife '09 bundle). Although this application is not as sophisticated as Final Cut Express 4, Final Cut Pro or Adobe CS4, for simple editing it is quite good. Like the other Apple editing tools, iMovie does not recognize AVCHD natively, it will transcode your footage using Apple's Intermediate Codec. It is quite fast, but does require additional storage on your hard drive. Transferring AVCHD footage to your MAC. When you are ready to transfer your AVCHD footage from your camera to your computer, there are basically three different approaches you can take. The fastest and easiest method is to simply place your camera in PC mode and connect to MAC via USB cable. If you don't want to tie up your camera, you can remove your SDHC card from the camera and mount in on the computer using an external SDHC card reader. And finally, you can copy your footage to an external hard drive for later editing. We will look at each approach. 3
-
 1
1 -
 2
2 -
 3
3 -
 4
4 -
 5
5 -
 6
6 -
 7
7 -
 8
8 -
 9
9 -
10
-
11
-
12
-
13
 |
 |