Panasonic AG-HMC80PJ Editing AVCHD with iMovie 09 - Page 5
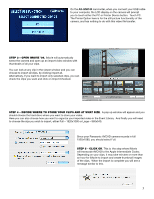
Step 3 - Open Imovie '09., Step 4 - Decide Where To Store Your Clips And At What Size, Step 5 -
 |
View all Panasonic AG-HMC80PJ manuals
Add to My Manuals
Save this manual to your list of manuals |
Page 5 highlights
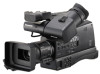
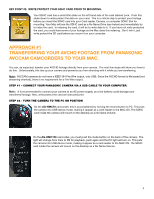
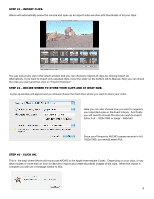
On the AG-HMC40 camcorder, when you connect your USB cable to your computer, the LCD display on the camera will prompt you to touch either the PC or Printer Device button. Touch PC. The Printer Option here is for the still picture functionality of the camera, and has nothing to do with this video file transfer. Step 3 - Open iMOVIE '09. iMovie will automatically sense the camera and open up an import video window with thumbnails of all your clips. You can look at any clip in the viewer window and you can choose to import all clips, by clicking import all. Alternatively, if you want to import only selected clips, you can check the clips you want and click on Import Checked. Step 4 - Decide where to store Your clips and at what size. A pop up window will appear and you should choose the hard drive where you want to store your video. Here you can also choose how you want to organize your imported video in the Event Library. And finally you will need to choose the size you wish to import, either Full - 1920x1080 or Large - 960x540. Since your Panasonic AVCHD camera records in full 1920x1080, you should select Full. Step 5 - Click OK. This is the step where iMovie will transcode AVCHD to the Apple Intermediate Codec. Depending on your clips, it may take minutes or more than an hour for iMovie to import and create thumbnail images of the clips. When the import is complete you will see a message similar to this. 5
-
 1
1 -
 2
2 -
 3
3 -
 4
4 -
 5
5 -
 6
6 -
 7
7 -
 8
8 -
 9
9 -
 10
10 -
 11
11 -
12
-
13
 |
 |
