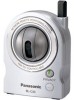
Panasonic BL-C30A Network Camera
Panasonic BL-C30A - Wireless 802.11 b/g Network Camera Manual
 |
UPC - 037988809721
View all Panasonic BL-C30A manuals
Add to My Manuals
Save this manual to your list of manuals |
Panasonic BL-C30A manual content summary:
- Panasonic BL-C30A | Network Camera - Page 1
Operating Instructions Network Camera Model No. BL-C30A Please read this manual before using and save this manual for future reference. Panasonic Network Camera Website: http://www.panasonic.com/netcam for customers in the USA or Puerto Rico - Panasonic BL-C30A | Network Camera - Page 2
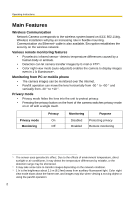
Operating Instructions Main Features Wireless Communication Network Camera corresponds to the wireless system based on IEEE 802.11b/g. Wireless installation will play an increasing role in flexible mounting. Communication via Ethernet® cable is also available. Encryption establishes the security on - Panasonic BL-C30A | Network Camera - Page 3
case, the router needs to be configured manually. Ask the router manufacturer how to configure it. See Panasonic Network Camera support website at http://panasonic.co.jp/pcc/products/en/netwkcam/ for more information. Supporting Viewnetcam.com service Viewnetcam.com service allows you to access the - Panasonic BL-C30A | Network Camera - Page 4
is recommended.) Protocol TCP/IP protocol (HTTP, TCP, UDP, IP, DNS, ARP, ICMP) Interface 10/100 Mbps network interface installed Web Browser Internet Explorer 6.0 or later (Not included on the Setup CDROM) Note See Panasonic Network Camera support website at http://panasonic.co.jp/pcc/products - Panasonic BL-C30A | Network Camera - Page 5
unauthorized individuals from accessing the camera. If you choose to disable this tool, and choose not to limit access by use of a User Name and Password, this may result in access to the camera by unauthorized individuals. (see page 46) SAVE THESE INSTRUCTIONS [For assistance, please call: 1-800 - Panasonic BL-C30A | Network Camera - Page 6
the Camera to Your Network 30 2.3 Using Wireless LAN 34 2.4 Using UPnP (Universal Plug and Play 37 2.5 Registering with the Viewnetcam.com service 38 2.6 Setting Date and Time 40 2.7 Changing Camera Settings 42 2.8 Changing Authentication Setting and Administrator User Name and Password 46 - Panasonic BL-C30A | Network Camera - Page 7
page 78 Confirming the Status 79 Confirming the Wireless Status 79 Restarting the Camera 80 Updating the Camera Firmware 81 Creating Configuration File 84 Loading Settings from a Configuration File 85 Resetting the Camera to Factory Default 86 Support page 87 Seeing Help page 87 Seeing - Panasonic BL-C30A | Network Camera - Page 8
253 (or http://XXXXX.viewnetcam.com) • When port number is 80 (default), you do not need to enter port number. See page 32 for details about port number, and page 11 in the Installation/ Troubleshooting. • If the Internet access to the camera is desired, the port number will be changed in the order - Panasonic BL-C30A | Network Camera - Page 9
D E F Operating Instructions G Select a language to display. A To Single Camera page (page 10) C To Buffered Image page (page 23) E To Maintenance page (page 78) G To log in to the camera (page 49) B To Multi-Camera page (page 21) D To Setup page (page 27) F To Support page (page 87) Note - Panasonic BL-C30A | Network Camera - Page 10
Operating Instructions 1.2 Viewing Single Camera page 1. Access the camera (see page 8). • The Top page is displayed. 2. Click the [Single] tab at the top of the page. • When Security Warning window is displayed, see page 11. Capture Image Button (see page 14) Operation Bar (see page 15) Click to - Panasonic BL-C30A | Network Camera - Page 11
the wireless communication can be disconnected depending on the environment. Security Warning window To view a video (Motion JPEG), ActiveX® Controls must be installed. When trying to display a video for the first time, Security Warning window will be displayed. When using Windows XP or Windows 2000 - Panasonic BL-C30A | Network Camera - Page 12
situation we suggest: • Contact your network administrator. • Try using regularly refreshed images. The Banner When the camera accesses the Internet, the banner displays product information about cameras or announcements about the latest firmware, etc. from Panasonic. Whether or not to display the - Panasonic BL-C30A | Network Camera - Page 13
Operating Instructions 1.2.1 Image Auto Centering (Click to Center) When you click a certain point on the camera image, the point is centered on the image. 1. Move the cursor to the desired point. Cursor 2. Click it. • The clicked point is centered. • See page - Panasonic BL-C30A | Network Camera - Page 14
Operating Instructions 1.2.2 Capturing a Still Image A still image can be saved on your PC. 1. Operate pan/tilt and select a resolution to display an image. 2. Click the capture image button. Capture Image Button • The camera image opens in another window. 3. Right-click the image, and select [Save - Panasonic BL-C30A | Network Camera - Page 15
1.2.3 Using Operation Bar Operating Instructions End Display When the pan/tilt has reached the good clarity. • [Standard] keeps the standard quality. (default) • [Favor Motion] optimizes the image for motion display. Note When the camera image is not displayed correctly, click [Refresh] at the - Panasonic BL-C30A | Network Camera - Page 16
Operating Instructions Pan/Tilt Operation Pan/tilt scan buttons automatically move the lens horizontally from -50 ° to +50 ° and vertically from to +50 ˚ Tilt: -40 ˚ to +10 ˚ Note Do not apply pressure to the pan/tilt portion of the camera. Any forced movement can damage the internal mechanism. 16 - Panasonic BL-C30A | Network Camera - Page 17
Operating Instructions 1.2.4 Setting Home Position/Sensor Position/Preset Button The home position, sensor saving Position changes. 2. Pan and tilt the camera to a desired Pan/Tilt position. 3. Click the home position button or the Program sensor position button. 4. Click [Save]. • The - Panasonic BL-C30A | Network Camera - Page 18
Operating Instructions Registering a Preset Button 1. Click [Program]. • [Program] switches to [Cancel]. Click [Cancel] to quit without saving changes. 2. Pan and tilt the camera to a desired position. Pan/Tilt 3. Click a preset button (1-8) to register. E.g.: Setting "Middle" for the preset 5. - Panasonic BL-C30A | Network Camera - Page 19
Viewing the Image Operating Instructions 1. Click the home position, sensor position or registered preset button. • The camera takes each position, and the image is displayed. Home Position Pan/Tilt Putting the cursor displays the preset name. Sensor Position UpperLeft [For - Panasonic BL-C30A | Network Camera - Page 20
Operating Instructions Changing or Deleting the Settings 1. Click [Program]. • [Program] switches to [Cancel]. Click [Cancel] to quit without saving changes. 2. Pan and tilt the camera to a desired position. 3. Click the home position, sensor position or a preset button (1-8). 4. Click [Save] after - Panasonic BL-C30A | Network Camera - Page 21
Operating Instructions 1.3 Viewing Multi-Camera page To view multiple cameras on the Multi-Camera page, you need to configure each camera on the Multi-Camera Setup page (see page 55). 1. Access the camera (see page 8). • The Top page is displayed. 2. Click the [Multi] tab at the top of the page. • - Panasonic BL-C30A | Network Camera - Page 22
users] on the Security: Administrator page • An authentication window is displayed in camera access. Enter the administrator's or the general user's user name and password. • When you view the images on the Multi-Camera page, all authentication windows of the configured cameras are displayed. Enter - Panasonic BL-C30A | Network Camera - Page 23
Operating Instructions 1.4 Viewing Buffered Image page To buffer the images on the internal memory, you need to set up image transfer settings (see page 57 or page 64). You can view buffered images on this Buffered Image page. 1. Access the camera (see page 8). • The Top page is displayed. 2. Click - Panasonic BL-C30A | Network Camera - Page 24
Operating Instructions 4. Display images clicking buttons below. Date and time of the delete all buffered images. • Turning off the camera. • Saving the Date and Time page. • Restarting, updating firmware or resetting the camera to factory default. • Changing the Enable/Disable settings of Image - Panasonic BL-C30A | Network Camera - Page 25
port number is set to 80 (default), it is not required. E.g. http://XXX.XXX.XXX.XXX:50000/mobile (or XXXXX.viewnetcam.com:50000/mobile) • When an authentication window is displayed, enter the administrator's or the general user's user name and password. • A still image is displayed. (Video [Motion - Panasonic BL-C30A | Network Camera - Page 26
Security: Administrator page (see page 46), an authentication window is displayed. Log in to the camera as Panasonic Network Cameras. Some phones may allow viewing only on port 80, and some may not support password authentication. See the Panasonic Network Camera support website at http://panasonic - Panasonic BL-C30A | Network Camera - Page 27
Operating Instructions 2.1 Using Camera Features 1. Access the camera (see page 8). Notes • When [Allowing unregistered users] is set on the Security: Administrator page, click [login] tab and log in as an administrator. • When users other than an administrator are accessing the camera, the [Setup - Panasonic BL-C30A | Network Camera - Page 28
Operating Instructions Basic (1) Network Configures the network settings such as connection mode to connect the camera to the network (see page 30). (2) Wireless Configures wireless network (see page 34). (3) UPnP Enables automatic port forwarding or shortcut to the camera (see page 37). (4) - Panasonic BL-C30A | Network Camera - Page 29
Operating Instructions (13) Indicator Control (14) Privacy Mode Sets indicator display (see page 76). Enables privacy mode (see page 77). [For assistance, please call: 1-800-272-7033] 29 - Panasonic BL-C30A | Network Camera - Page 30
Operating Instructions 2.2 Connecting the Camera to Your Network The Network page offers three options to configure the camera. • [Automatic Setup] automatically assigns an unused IP address to the camera, and uses UPnP to configure your router. • [Static] allows the user to use a specific IP - Panasonic BL-C30A | Network Camera - Page 31
(see page 79). 5. Click [Restart]. • The camera restarts, and the Top page is displayed. Note When you do not know the camera IP address while setting [Automatic Setup] or [DHCP Setup], you can search the camera IP address by using the Setup Program (see page 100). [For assistance, please call - Panasonic BL-C30A | Network Camera - Page 32
. You can set the camera port number (80 by default). When you use multiple cameras with a router on your network, each camera must be assigned its own port number (see page 11 "1.5 Connecting the Camera to a Router Not Supporting UPnP" in the Installation/Troubleshooting). Do not set the following - Panasonic BL-C30A | Network Camera - Page 33
• Normally, Select [Auto Negotiation]. For the wireless connection, [Auto Negotiation] must be selected. If you cannot access the camera, see page 20 "The Top page is not displayed." in the Installation/Troubleshooting. *1 If you automatically obtain the IP address from the DHCP server, you do not - Panasonic BL-C30A | Network Camera - Page 34
widely prevalent, so "802.11b" is useful when using your existing wireless devices. "802.11b/g" supports both 802.11b and 802.11g wireless LAN standards. It is the communication mode that is easy to install on your existing wireless LAN. "802.11g exclusive" communicates using 802.11g only. It does - Panasonic BL-C30A | Network Camera - Page 35
3. Set each parameter for the Encryption. Operating Instructions Setting Description Cipher • Select encrypting or not encrypting. • To prevent unauthorized users from reading data, selecting [WEP] is recommended. WEP Selection • Checked WEPKey is used - Panasonic BL-C30A | Network Camera - Page 36
Operating Instructions Notes • Some wireless devices do not support the WEP 152 bit. • The camera supports only the open system authentication. If the router or access point is set to shared key authentication, set it to auto or open system. 4. Click [ - Panasonic BL-C30A | Network Camera - Page 37
to use this feature, your router needs to support this feature and it must be enabled. Most router manufacturers disable this feature as the default setting. See http://panasonic.co.jp/pcc/products/en/netwkcam/technic/rtr_setup for details and see your router manual for how to enable UPnP. After the - Panasonic BL-C30A | Network Camera - Page 38
when your ISP changes the IP address. Panasonic Communications recommends you to register with it for the Internet access to the camera. See http://www.viewnetcam.com for details about the Viewnetcam.com service. 1. Click [Viewnetcam.com] on the Setup page. 2. Check [Enable]. • Clicking [Cancel - Panasonic BL-C30A | Network Camera - Page 39
Operating Instructions Notes • When the Viewnetcam.com registration website is not your network (your PC and camera) is connected to the Internet. • Personal (Camera) URL is available after you registered with the Viewnetcam.com service. • If port forwarding is not enabled or your network is - Panasonic BL-C30A | Network Camera - Page 40
Operating Instructions 2.6 Setting Date and Time The Date and Time page allows you to set date and time the date and time settings deletes all buffered images. 1. Click [Date and Time] on the Setup page. 2. Set each parameter. • Clicking [Cancel] cancels your settings without saving changes. 40 - Panasonic BL-C30A | Network Camera - Page 41
Instructions Automatic Time • Adjustment • • NTP (Network Time Protocol) server synchronizes the camera's internal clock. It adjusts automatically every day. Check the box to enable it. Set the NTP server IP address, set - Panasonic BL-C30A | Network Camera - Page 42
Operating Instructions 2.7 Changing Camera Settings The Camera page allows you to set the camera name, white balance, AC power source frequency and pan/tilt range. 1. Click [Camera] on the Setup page. 2. Set each parameter. • Clicking [Cancel] cancels your settings without saving changes. 42 - Panasonic BL-C30A | Network Camera - Page 43
Instructions Setting Camera Name White Balance AC Power Source Frequency Pan Range*1 Description • The camera name is displayed on the Single Camera light. Select 60 Hz for the United States. • 50 Hz • 60 Hz (default) Select from the following options. • Minimum - Current settings, -50-+50 • - Panasonic BL-C30A | Network Camera - Page 44
Operating Instructions Setting Tilt Range*1 Description Select from the following options. • Minimum - Current settings, -40-+10 • Home . • New settings are saved. If the home position is changed, the camera turns to the home position. • When finished, "Success!" is displayed. 4. Click [Go to - Panasonic BL-C30A | Network Camera - Page 45
Operating Instructions Specifying Pan/Tilt Range 1. Access the camera (see page 8), and click [Single] at the top of the Top page. 2. Open another web browser, and display the Camera page (see page 42). 3. Align the Single Camera page and the Camera page side to side. 4. Set the pan/tilt range. • - Panasonic BL-C30A | Network Camera - Page 46
Operating Instructions 2.8 Changing Authentication Setting and Administrator User Name and Password The Security: Administrator page allows you to change authentication, administrator user name and password. The authentication window is displayed, and allows the registered users to access the camera - Panasonic BL-C30A | Network Camera - Page 47
(see page 49), you can access the Setup page and the Maintenance page. User Name/ Password • If you set [Do not permit access from guest users], the camera displays authentication window in camera access. Users must enter the user name and password. • User Name (6 to 15 characters): Enter the - Panasonic BL-C30A | Network Camera - Page 48
Operating Instructions 4. Click [Go to Security: Administrator page]. • The Security: Administrator page is displayed. Notes • When the user name and password have been changed, the camera displays an authentication window. Enter the user name and password, and click [OK]. Administrator/General - Panasonic BL-C30A | Network Camera - Page 49
Operating Instructions 2.9 Logging in to the Camera If you set [Permit access from guest users] on the Security: Administrator page, [Login] is displayed at the top of the page. After you log in as an administrator, you can access the Setup page and the Maintenance page. 1. Click [Login] at the top - Panasonic BL-C30A | Network Camera - Page 50
level is set for each general user. If you set [Permit access from guest users] on the Security: Administrator page, the access level can be set for guest users. 1. Click [General Users] on the Setup page. 2. If you create a general user, click [Create]. • When setting [Do not permit • When setting - Panasonic BL-C30A | Network Camera - Page 51
Instructions Setting User ID List User Name/ Password Access Level Description • Up to 50 general users can be registered. • The list is used to modify or delete general user settings. • User Name (6 to 15 characters): Enter the user name. • Password (6 to 15 characters): Enter the password - Panasonic BL-C30A | Network Camera - Page 52
Operating Instructions 2.11 Changing Initial Settings on the Single Camera page or the Multi-Camera page The Image Display page allows you to change initial settings (display settings when a user accesses the camera) of image resolution, image quality and refresh interval. Motion JPEG display time - Panasonic BL-C30A | Network Camera - Page 53
you select other language, the Setup, Maintenance and Support pages are displayed only in English. Banner Display • When the camera accesses the Internet, the banner displays product information about cameras or announcements about the latest firmware, etc. from Panasonic. Checking [Display] for - Panasonic BL-C30A | Network Camera - Page 54
Operating Instructions • When finished, "Success!" is displayed. 4. Click [Go to Image Display page]. • The Image Display page is displayed. 54 - Panasonic BL-C30A | Network Camera - Page 55
Instructions 2.12 Configuring Multiple Cameras The Multi-Camera Setup page allows you to configure the camera IP addresses and camera names to view multiple images on the Multi-Camera page (maximum 12 cameras). These configurations are required to use the Multi-Camera page. 1. Click [Multi-Camera - Panasonic BL-C30A | Network Camera - Page 56
on your local network, use each camera's local IP address and port number. • If you intend to access your camera from the Internet, you must use each cameras global IP address and respective port number. 4. Click [Save] when finished. • New settings are saved. • The Multi-Camera Setup page is - Panasonic BL-C30A | Network Camera - Page 57
Instructions 2.13 Buffering or Transferring Images by Timer The Image Buffer/Transfer page allows you to enable image buffer/transfer by Email or FTP. 1. Click [Buffer/Transfer] on the Setup enables the camera to buffer/transfer the image by timer. • Selecting [Sensor] enables the camera to buffer/ - Panasonic BL-C30A | Network Camera - Page 58
Operating Instructions 4. Set the time, and click [Next>]. Note The timer works by an internal clock. Set the date and time before using timer buffer/transfer (see - Panasonic BL-C30A | Network Camera - Page 59
Operating Instructions Setting Image Resolution Image Quality Description • Select image resolution (640 x 480, 320 x 240 (default) or 160 x 120 pixels) to buffer or transfer. • Select the image quality. [Favor Clarity] optimizes for good quality. [Standard] offers standard quality. [Favor Motion] - Panasonic BL-C30A | Network Camera - Page 60
Operating Instructions 7. Select the transfer method, and click [Next>]. • Clicking [ - Panasonic BL-C30A | Network Camera - Page 61
. If your ISP requires a login ID, set it (0-63 characters). If your ISP requires a password, set it (0-63 characters). Select the login timing to an FTP server. If you set [One Time] during 1-minute transfer, the camera logs in to the server only once, and can reduce the time to log in - Panasonic BL-C30A | Network Camera - Page 62
changes. Note The camera works only with an SMTP (Simple Mail Transfer Protocol) server. It does not work with mail servers like "Hotmail®" using a web browser. Setting SMTP Server IP • Address or Host Name POP3 Server IP • Address or Host Name Login ID*1 • Password*1 • Reply E-mail • Address - Panasonic BL-C30A | Network Camera - Page 63
Operating Instructions Setting Subject Text Description • Enter a subject with ASCII characters ( following. • Turning off the camera. • Saving the settings of Image Buffer/Transfer or Date and Time. • Executing [Restart], [Update Firmware] or [Reset to Factory Default]. • Clicking [Delete Buffered - Panasonic BL-C30A | Network Camera - Page 64
Instructions 2.14 Buffering or Transferring Images by Sensor The Image Buffer/Transfer page allows you to enable image buffer/transfer by Email or FTP. 1. Click [Buffer/Transfer] on the Setup • Selecting [Timer] enables the camera to buffer/transfer the image by timer. • Selecting [Sensor] enables - Panasonic BL-C30A | Network Camera - Page 65
Set the time, and click [Next>]. Operating Instructions Note The timer works by an internal clock. Set Next>]. Note If you enable the Lens Position When Triggered setting, buffer/transfer starts after the camera turns to the sensor position. • Clicking [ - Panasonic BL-C30A | Network Camera - Page 66
Operating Instructions Setting Lens Position • When Triggered Description Set [Move to sensor . Setting Image Resolution Image Quality Description • Select image resolution (640 x 480, 320 x 240 (default) or 160 x 120 pixels) to buffer or transfer. • Select the image quality. [Favor Clarity - Panasonic BL-C30A | Network Camera - Page 67
Operating Instructions 7. Set the image buffer frequencies and non detection time, and click [Next>]. quality or what object you view. • Check the box to enable the setting. The camera buffers or transfers the image right after the pyroelectric infrared sensor detects temperature differences. • Set - Panasonic BL-C30A | Network Camera - Page 68
Operating Instructions Setting Non detection time Description • Set the length of time during which the sensor cannot be triggered after saving images temporarily or transmitting them. This - Panasonic BL-C30A | Network Camera - Page 69
, and click [Next>]. Operating Instructions • Clicking [ - Panasonic BL-C30A | Network Camera - Page 70
. If your ISP requires a login ID, set it (0-63 characters). If your ISP requires a password, set it (0-63 characters). Select the login timing to an FTP server. If you set [One Time] during 1-minute transfer, the camera logs in to the server only once, and can reduce the time to log in - Panasonic BL-C30A | Network Camera - Page 71
changes. Note The camera works only with an SMTP (Simple Mail Transfer Protocol) server. It does not work with mail servers like "Hotmail" using a web browser. Setting SMTP Server IP • Address or Host Name POP3 Server IP • Address or Host Name Login ID*1 • Password*1 • Reply E-mail • Address - Panasonic BL-C30A | Network Camera - Page 72
Operating Instructions Setting Subject Text Description • Enter a subject with ASCII characters ( to step 10. Setting Disable Enable Description • The camera does not send an E-mail notification when buffering or transferring image. • The camera sends an E-mail notification (up to 3 destinations) - Panasonic BL-C30A | Network Camera - Page 73
Operating Instructions 11. Click [Go to Image Buffer/Transfer page]. • The Image Buffer/ following. • Turning off the camera. • Saving the settings of Image Buffer/Transfer or Date and Time. • Executing [Restart], [Update Firmware] or [Reset to Factory Default]. • Clicking [Delete Buffered Images - Panasonic BL-C30A | Network Camera - Page 74
Operating Instructions 2.15 Specifying Operation Time The Operation Time page allows you to limit the operation time. The camera image turns to a gray screen outside the operation time. 1. Click [Operation Time] on the Setup page. 2. Click [No.] to set the operation time. Note If No. 1-7 are - Panasonic BL-C30A | Network Camera - Page 75
Operating Instructions 4. Click [Save] when finished. • New settings are saved. • The Operation Time page is if Monday or Tuesday is disabled in a setting but enabled in other settings, the camera can be operated on both Monday and Tuesday. [For assistance, please call: 1-800-272-7033] 75 - Panasonic BL-C30A | Network Camera - Page 76
when the camera is accessed. • Turn the indicator on during sensor reaction. • Always off 1. Click [Indicator Control] on the Setup page. 2. Select indicator option. • Clicking [Cancel] cancels your settings without saving changes. Notes • See page 7 in the Installation/Troubleshooting for indicator - Panasonic BL-C30A | Network Camera - Page 77
on the Setup page. 2. Click [Save] when finished. • Selecting [Enable] and clicking [Save] turn the camera into privacy camera into privacy mode. Notes • To turn the camera into normal operation, press the privacy button on the front of the camera (see page 7 in the Installation/Troubleshooting - Panasonic BL-C30A | Network Camera - Page 78
(see page 80). (18) Update Firmware Updates the camera firmware (see page 81). (19) Save Settings Creates a configuration file (see page 84). (20) Load Settings Loads settings from a configuration file (see page 85). (21) Reset to Factory Resets the camera to its default settings (see page 86 - Panasonic BL-C30A | Network Camera - Page 79
Operating Instructions 3.1.1 Confirming the Status The Status page allows you to check the status of the camera. The status information provides support for troubleshooting. Clicking [Status] displays the following page. Note See Panasonic Network Camera support website at http://panasonic.co.jp/ - Panasonic BL-C30A | Network Camera - Page 80
Operating Instructions 3.1.3 Restarting the Camera The camera restarts by disconnecting the plug of the AC cord from the outlet and reconnecting it again. The camera can also be restarted on the Restart page. Note When the camera restarts, the buffered images will be deleted. 1. Click [Restart] on - Panasonic BL-C30A | Network Camera - Page 81
, install it into the camera. Notes • Do not turn off the power during firmware update. • All buffered images will be deleted after the firmware update. • The firmware version is displayed on the Top page and the Status page. 1. Download the new firmware on the Panasonic Network Camera support - Panasonic BL-C30A | Network Camera - Page 82
file name is displayed. 6. Confirm the firmware file name, and click [Update Firmware]. • Clicking [Cancel] takes you back to the Top page without firmware update. • The next message is displayed during update. • The camera restarts automatically after update. • The Top page is displayed in about - Panasonic BL-C30A | Network Camera - Page 83
Operating Instructions 7. Confirm that the version number on the Top page is updated. Updated version • If the version number is updated, the firmware update is complete. [For assistance, please call: 1-800-272-7033] 83 - Panasonic BL-C30A | Network Camera - Page 84
it, the settings cannot be loaded. • If you try to updating the camera, create a configuration file after updating the firmware. If there is a firmware version difference between the camera that you create a configuration file from and the camera that you try to load settings to, the settings may - Panasonic BL-C30A | Network Camera - Page 85
. If you reset the camera to factory default, the camera can load its settings from the configuration file. Notes • The configuration file has network settings. When the settings are loaded, the network settings are also loaded as they were saved. • If there is a firmware version difference between - Panasonic BL-C30A | Network Camera - Page 86
then turns off for 10 seconds. • All camera settings (user name, password, IP address, subnet mask etc.) are reset to factory default. • If the camera is reset to factory default, the network connection mode changes to [Automatic Setup]. Reconfigure the camera seeing the Getting Started. Notes • The - Panasonic BL-C30A | Network Camera - Page 87
Support page Operating Instructions (22) (23) (24) (25) Support (22) Help (23) Wireless Help (24) Product Information (25) Support Information Displays the Help page (see page 87). Displays the Wireless Help page (see page 88). Displays product information website (see page 88). Displays support - Panasonic BL-C30A | Network Camera - Page 88
Wireless Cipher configuration and Wireless Status. Clicking [Wireless Help] on the Support page displays the next page. Note [Wireless Help] is displayed only when logging in as an administrator. 3.2.3 Seeing Product Information You can see product information on the Panasonic Network Camera support - Panasonic BL-C30A | Network Camera - Page 89
Instructions 3.3 FACTORY DEFAULT RESET Button The camera has a FACTORY DEFAULT RESET button on the bottom. Press the button with a pointed object. Pressing the FACTORY DEFAULT RESET button resets the camera to factory default. If you lose your user name and password, use this button to reset - Panasonic BL-C30A | Network Camera - Page 90
Operating Instructions 3.4 Default Setting List Basic Items Default Required Notes Network Connection Mode Automatic Setup - Automatic Setup/ Static/DHCP Allow Access from the No - - Internet (Automatic Setup only) Network Configuration Enable - - from Setup Program (Static/DHCP - Panasonic BL-C30A | Network Camera - Page 91
Operating Instructions Items Default Required Notes Wireless Communication mode 802.11b/g - - (Channel) Auto - - SSID BLC30AXXX - Up Port Forwarding Disable - - Display Shortcut Icon in Enable - - My Network Places Viewnet Enable cam.com No check - - Date and Time Setting - Panasonic BL-C30A | Network Camera - Page 92
Operating Instructions Items Camera Camera Name White Balance Default Network Camera Auto AC Power Source Frequency 60 Hz Pan Range (Minimum) -50 degrees (Home Position) 0 degrees (Maximum) +50 degrees Tilt Range (Minimum) -40 degrees (Home Position) 0 - Panasonic BL-C30A | Network Camera - Page 93
Instructions Items Default Required Notes Security: General Do not permit - - Administrator Authentication access from guest users User Name [Blank] When setting 6-15 characters administrator *3 Password [Blank] When setting 6-15 characters administrator *3 Retype Password - Panasonic BL-C30A | Network Camera - Page 94
Operating Instructions Advanced Image Display Items Single Camera Image Resolution Single Camera Image Quality Default 320 x 240 Standard Single Camera Refresh Interval Multi-Camera Image Resolution Multi-Camera Image Quality Motion 320 x 240 Standard Multi-Camera Refresh Interval Motion - Panasonic BL-C30A | Network Camera - Page 95
Operating Instructions MultiCamera Items Multi-Camera Display IP Address or Host Name Port No. Camera Name Change Camera Order Default Required Notes [Blank] - - Checked When setting - Multi-Camera [Blank] When setting IP address*1 Multi-Camera Host name*5 is 1-255 characters. [ - Panasonic BL-C30A | Network Camera - Page 96
Operating Instructions Buffer/ Transfer Items Default Status Off Trigger Timer Active Time of Privacy Mode Privacy Button Privacy Mode No Transfer, No Memory Overwrite - Always Turn indicator on when camera is on Checked Disable Required - - - - When selecting sensor - - - Notes - - Panasonic BL-C30A | Network Camera - Page 97
Preset Buttons Items Preset Preset 1 Buttons Preset 2 Preset 3 Preset 4 Operating Instructions Default UpperLeft UpperRight LowerLeft LowerRight Required - Notes - *1 Set 4 digits (0-255) and 3 periods such as "192.168.0.253". But "0.0.0.0" and "255.255.255.255" are not available. *2 - Panasonic BL-C30A | Network Camera - Page 98
Operating Instructions 3.5 Cleaning Clean the camera after the camera is turned off. 3.5.1 Cleaning the Main Unit Clean the unit with a dry and soft cloth. Notes • Do not use alcohol, polishing powder, cleanser, benzine, thinner, wax, petroleum products or hot water to wipe the camera. Also avoid - Panasonic BL-C30A | Network Camera - Page 99
, log in as an administrator to access the TCP/IP Properties window. 2. Enter IP address and subnet mask. 3. Click [OK]. • In Windows Me or Windows 98SE, the PC needs to be restarted to enable the settings. Local IP Address Local IP address is the network ID that is not used on the Internet. They - Panasonic BL-C30A | Network Camera - Page 100
your PC. • If the Network Camera Setup window does not appear, click "setup.exe" on the Setup CD-ROM. 3. Click [Camera Setup]. Displays version information about this program. Sets up the camera. Displays the camera manuals. If your PC does not have Adobe® Acrobat® Reader, install it from the Adobe - Panasonic BL-C30A | Network Camera - Page 101
Operating Instructions Notes • If you try to find multiple cameras, each MAC address beside the Ethernet (LAN) port verifies which camera you are setting up. • See page 12 in the Installation/Troubleshooting for the setup from the MAC address. [For assistance, please call: 1-800-272-7033] 101 - Panasonic BL-C30A | Network Camera - Page 102
] on the Camera List window shown on page 100. 2. Click each button to execute the program. Sets up Local Access. Sets up Internet Access. Starts the Manual Setup. Displays the Setup page (see page 27). Notes • For the first time installation or after pressing the Factory Default Reset button, you - Panasonic BL-C30A | Network Camera - Page 103
. Notes • A proxy server is used to protect your network connected to the Internet. • If the camera is accessed via a proxy server, problems may occur. Consult your network administrator before installing the camera. • If the camera is accessed via a proxy server, the refresh interval may - Panasonic BL-C30A | Network Camera - Page 104
Operating Instructions 3. Click the [Connections] tab, and click [LAN Settings]. 4. See if the Use a proxy server check box is checked or not. If checked, click [Advanced...]. See - Panasonic BL-C30A | Network Camera - Page 105
Operating Instructions 5. Enter the camera IP address into the Do not use proxy server for addresses beginning with data field. (Example: 192.168.0.253) 6. Click [OK]. [For assistance, please call: 1-800-272-7033] 105 - Panasonic BL-C30A | Network Camera - Page 106
] ( [Settings]) [Control Panel] [Add or Remove Programs] [Add/Remove Windows Components] Select [Networking Services] Check [Universal Plug and Play] [OK] [Next] Complete [Start] [Settings] [Control Panel] [Add/Remove Programs] [Windows Setup] tab Select [Communication] [Detail] Check [Universal - Panasonic BL-C30A | Network Camera - Page 107
ASCII Character Table 0 @ P ` 1 A Q a 2 B R b 3 C S c 4 5 D E T U d e 6 F V f 7 G W g 8 H X h 9 I Y i : J Z j ; K [ k < L \ l = M ] m > N ^ n ? O _ o Operating Instructions p q r s t u v w x y z { | } ~ [For assistance, please call: 1-800 - Panasonic BL-C30A | Network Camera - Page 108
Operating Instructions 3.10 File Size and Number of Buffered Images The following table shows the relationship between the file size of the image and the maximum number - Panasonic BL-C30A | Network Camera - Page 109
Instructions 3.11 Specifications Network Camera Items Pan/Tilt Angle Number of Pixels Illuminance White Balance Focus Caliber Ratio (F No.) Horizontal Viewing Angle Exposure Specifications Pan: -50 ° to +50 °, Tilt: -40 ° to +10 ° 1/4-inch CMOS Sensor 320,000 pixels 1-10,000 lx Auto/Manual - Panasonic BL-C30A | Network Camera - Page 110
x 1 Wireless: IEEE 802.11b/g (Embedded) Sensor Detection Method Pyroelectric Infrared Sensor Sensor Range Horizontally About 30 °, Vertically About 85 °, Distance About 5 m (16.4 feet) (When the temperature is 20 °C [68 °F]) Indicator Display Power/Network Communication/Camera operation - Panasonic BL-C30A | Network Camera - Page 111
Index Operating Instructions 111 - Panasonic BL-C30A | Network Camera - Page 112
Login 49 R Reset to Factory Default page 86 Restart page 80 S Save Settings page 84 Security: Administrator page 46 Sensor Image Buffer/Transfer 64 Sensor Position 17 Setup page 27 Setup Program 100 Single Camera page 10 Specifications 109 Status page 79 Support Information page 88 Support page 87 - Panasonic BL-C30A | Network Camera - Page 113
Top page 9 U Update Firmware page 81 UPnP page 37 V Viewnetcam.com Service 38 W Web Browser 4 Wireless 34 Wireless Help page 88 Operating Instructions 113 - Panasonic BL-C30A | Network Camera - Page 114
For product service Panasonic Servicenters are listed in the servicenter directory. Call 1-800-272-7033 for the location of an authorized servicenter. This Network Camera is designed for use in the United States of America. Sale or use of this product in other countries/areas may violate local laws
-
 1
1 -
 2
2 -
 3
3 -
 4
4 -
 5
5 -
 6
6 -
 7
7 -
8
-
9
-
10
-
11
-
12
-
13
-
14
-
15
-
16
-
17
-
18
-
19
-
20
-
21
-
22
-
23
-
24
-
25
-
26
-
27
-
28
-
29
-
30
-
31
-
32
-
33
-
34
-
35
-
36
-
37
-
38
-
39
-
40
-
41
-
42
-
43
-
44
-
45
-
46
-
47
-
48
-
49
-
50
-
51
-
52
-
53
-
54
-
55
-
56
-
57
-
58
-
59
-
60
-
61
-
62
-
63
-
64
-
65
-
66
-
67
-
68
-
69
-
70
-
71
-
72
-
73
-
74
-
75
-
76
-
77
-
78
-
79
-
80
-
81
-
82
-
83
-
84
-
85
-
86
-
87
-
88
-
89
-
90
-
91
-
92
-
93
-
94
-
95
-
96
-
97
-
98
-
99
-
100
-
101
-
102
-
103
-
104
-
105
-
106
-
107
-
108
-
109
-
110
-
111
-
112
-
113
-
114
 |
 |

Operating Instructions
Network Camera
Model No.
BL-C30A
Please read this manual before using and save this manual for future reference.
Panasonic Network Camera Website: http://www.panasonic.com/netcam
for customers in the USA or Puerto Rico