Panasonic FV11VF2 FV11VH2 User Guide - Page 8
Installation, Between Joist Mounting
 |
View all Panasonic FV11VF2 manuals
Add to My Manuals
Save this manual to your list of manuals |
Page 8 highlights
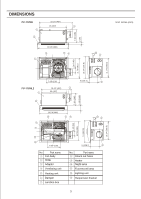
INSTALLATION (BETWEEN JOIST MOUNTING) Illustrations in this manual common use the image of FV-11VHL2. 1. Before installation, remove warning lable and the tape that is securing the adapter and the damper. (Fig.1) Suspension bracket Fig.11 (Select the suspension bracket according to spacing A as shown below.) B Fan body Suspension bracket Suspension bracket Fig.11 Spacing A on center joists B 16 inches 13 1/4 ~ 15 1/2 (336~394) 19.2 inches horizontal joists 14 3/4 ~ 16 3/4 (374~425) 19.2 inches vertical joists 16 1/2 ~ 18 3/4 (419~476) Fig.12 Keep the distance C (1/2 inch, 12.7 mm) for the thickness of ceiling board. Fan body Suspension bracket C Joists Adaptor Junction box Fig.12
-
 1
1 -
2
-
 3
3 -
 4
4 -
 5
5 -
 6
6 -
 7
7 -
 8
8 -
 9
9 -
 10
10 -
 11
11 -
 12
12
 |
 |

Fig.11
Fig.12
Fig.12
Fig.11
Illustrations in this manual common use the image of
FV-11VHL2.
INSTALLATION
(BETWEEN JOIST MOUNTING)
Suspension
bracket
Suspension
bracket
Suspension
bracket
Fan body
Fan body
Joists
Adaptor
Junction box
Suspension bracket
C
B
(Select the suspension bracket according to spacing A
as shown below.)
Spacing A on center joists
16 inches
19.2 inches horizontal joists
19.2 inches vertical joists
B
13 1/4 ~ 15 1/2 (336~394)
14 3/4 ~ 16 3/4 (374~425)
16 1/2 ~ 18 3/4 (419~476)
1. Before installation, remove warning lable and the tape
that is securing the adapter and the damper. (Fig.1)
Keep the distance C (1/2 inch, 12.7 mm) for the
thickness of ceiling board.