Panasonic Handheld P2 HD Camcorder with AVC-ULTRA Recording Operating Instruct - Page 21
Front side, rear side, Description of Parts - Front side
 |
View all Panasonic Handheld P2 HD Camcorder with AVC-ULTRA Recording manuals
Add to My Manuals
Save this manual to your list of manuals |
Page 21 highlights
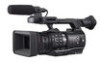
Front side, rear side Chapter 2 Description of Parts - Front side, rear side 1231 12 13 14 15 16 6 7 17 8 18 19 20 21 22 23 4 5 9 10 11 1 Built-in microphone (page 64) This is the built-in stereo microphone. 2 Light sensor Detects indoor and outdoor light. 3 Front tally lamp (page 43) Lights during shooting. This lamp will blink when the battery level becomes low. 4 Recording button (front side) (page 45) Press this button to start recording. Press it again to stop recording. The operation of this button can be forbidden by the main menu → [SW MODE] → [FRONT REC]. 5 button (page 52) Press this button to adjust the white balance. Press it for two seconds or more to adjust the white balance and then black balance. 6 Eye sensor (page 42) Bring your eyes closer to display the screen on the viewfinder. @@NOTE tt The eye sensor may not work properly depending on the shape of glasses in use, how you hold the camera, or by hitting the strong light around the eye piece. 7 Viewfinder (page 42) 8 terminal (XLR, 3-pin) (page 31) Connect the audio equipment or the microphone. 9 Rear tally lamp (page 43) Light during shooting. This lamp will blink when the battery level becomes low. 10 Battery attachment (page 27) 11 Battery release button (page 27) Remove the battery. 12 microP2 memory card 1 access LED (page 35) Indicate the access status of recording and playback of the card inserted in the microP2 memory card slot 1. 13 microP2 memory card slot 1 (page 34) 14 microP2 memory card 2 access LED (page 35) Indicate the access status of recording and playback of the card inserted in the microP2 memory card slot 2. 15 microP2 memory card slot 2 (page 34) 16 P2 memory card slot (page 34) 17 P2 memory card access LED (page 35) Indicate the access status of recording and playback of the card inserted in the P2 memory card slot. 18 terminal (page 164) Output audio signals recorded to audio channel 1/2. 19 terminal (host) (page 166) Connect external hard disk drive, etc. 20 terminal (device) (page 166) Connect to a computer with the USB 2.0 cable to transfer data. 21 (monitor output) terminal (page 164) This is the output terminal of the video for monitor. - 21 -
-
 1
1 -
2
-
3
-
4
-
5
-
6
-
7
-
8
-
9
-
10
-
11
-
12
-
13
-
14
-
15
-
 16
16 -
 17
17 -
 18
18 -
 19
19 -
 20
20 -
 21
21 -
 22
22 -
 23
23 -
 24
24 -
 25
25 -
 26
26 -
27
-
28
-
29
-
30
-
31
-
32
-
33
-
34
-
35
-
36
-
37
-
38
-
39
-
40
-
41
-
42
-
43
-
44
-
45
-
46
-
47
-
48
-
49
-
50
-
51
-
52
-
53
-
54
-
55
-
56
-
57
-
58
-
59
-
60
-
61
-
62
-
63
-
64
-
65
-
66
-
67
-
68
-
69
-
70
-
71
-
72
-
73
-
74
-
75
-
76
-
77
-
78
-
79
-
80
-
81
-
82
-
83
-
84
-
85
-
86
-
87
-
88
-
89
-
90
-
91
-
92
-
93
-
94
-
95
-
96
-
97
-
98
-
99
-
100
-
101
-
102
-
103
-
104
-
105
-
106
-
107
-
108
-
109
-
110
-
111
-
112
-
113
-
114
-
115
-
116
-
117
-
118
-
119
-
120
-
121
-
122
-
123
-
124
-
125
-
126
-
127
-
128
-
129
-
130
-
131
-
132
-
133
-
134
-
135
-
136
-
137
-
138
-
139
-
140
-
141
-
142
-
143
-
144
-
145
-
146
-
147
-
148
-
149
-
150
-
151
-
152
-
153
-
154
-
155
-
156
-
157
-
158
-
159
-
160
-
161
-
162
-
163
-
164
-
165
-
166
-
167
-
168
-
169
-
170
-
171
-
172
-
173
-
174
-
175
-
176
-
177
-
178
-
179
-
180
-
181
-
182
-
183
-
184
-
185
-
186
-
187
-
188
-
189
-
190
-
191
-
192
-
193
-
194
-
195
-
196
-
197
-
198
-
199
-
200
-
201
-
202
-
203
-
204
-
205
-
206
-
207
-
208
-
209
-
210
-
211
-
212
-
213
-
214
-
215
-
216
-
217
 |
 |
