Panasonic PTDZ8700U PTDS8500U User Guide - Page 17
Preparation, About Your Projector, Remote control
 |
UPC - 885170010963
View all Panasonic PTDZ8700U manuals
Add to My Manuals
Save this manual to your list of manuals |
Page 17 highlights
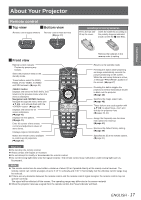
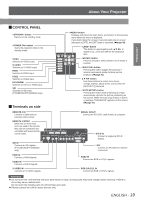
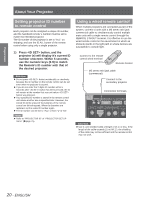
About Your Projector Remote control JJTop view JJBottom view Remote control signal emitters Remote control wired terminal (Æpage 20) Installing/removing batteries Press the tab and lift up the cover. Insert the batteries according to the polarity diagram indicated inside. (insert the side first). Preparation JJFront view Remote control indicator Flashes by pressing any buttons. Starts the projection while in the standby mode. These buttons select the RGB1, RGB2, DVI-D, VIDEO, S-VIDEO and SDI terminals. (Æpage 46) button Displays and clears the main menu, and returns to the previous menu when the menu is displayed. Navigation and buttons Navigate through the menu items with and activate them with the button. (Æpage 49) Displays and clears the on screen indications. (Æpage 46) Displays the test pattern. (Æpage 47) Enter ID number of the remote control and adjustment values of menu items. Displays projector information. Makes the remote control available to control any ID projectors. (Æpage 20) Remove the batteries in the reverse order to setting. Returns to the standby mode. Pressing this button while projecting an image automatically corrects the picture positioning on the screen. While the auto setup feature is active, a message "PROGRESS" appears on the screen. (Æpage 47) Pressing this button toggles the projector's internal mechanical shutter to black out the projector. (Æpage 46) Switches the image aspect ratio. (Æpage 48) These buttons are used together with to adjust focus, zoom and shift by the projection lens. (Æpages 39, 41) Assign the frequently use functions from options for shortcut. (Æpage 47) Restores the default factory setting. (Æpage 49) Specifies the ID of the remote control. (Æpage 20) Attention zzDo not drop the remote control. zzAvoid contact with liquids or moisture. zzDo not attempt to modify or disassemble the remote control. zzDo not let strong light shine onto the signal receptor. The remote control may malfunction under strong light such as fluorescent. Note zzThe remote control can be used within a distance of about 30 m if pointed directly at the remote control receiver. The remote control can control at angles of up to ± 15 °C vertically and ± 30 °C horizontally, but the effective control range may be reduced. zzIf there are any obstacles between the remote control and the remote control signal receptor, the remote control may not operate correctly. The signal will be reflected off the screen. The operating range may differ due to the screen material. zzWhen the projector receives a signal from the remote control, the Power indicator will flash. ENGLISH - 17
-
 1
1 -
2
-
3
-
4
-
5
-
6
-
7
-
8
-
9
-
10
-
11
-
 12
12 -
 13
13 -
 14
14 -
 15
15 -
 16
16 -
 17
17 -
 18
18 -
 19
19 -
 20
20 -
 21
21 -
 22
22 -
23
-
24
-
25
-
26
-
27
-
28
-
29
-
30
-
31
-
32
-
33
-
34
-
35
-
36
-
37
-
38
-
39
-
40
-
41
-
42
-
43
-
44
-
45
-
46
-
47
-
48
-
49
-
50
-
51
-
52
-
53
-
54
-
55
-
56
-
57
-
58
-
59
-
60
-
61
-
62
-
63
-
64
-
65
-
66
-
67
-
68
-
69
-
70
-
71
-
72
-
73
-
74
-
75
-
76
-
77
-
78
-
79
-
80
-
81
-
82
-
83
-
84
-
85
-
86
-
87
-
88
-
89
-
90
-
91
-
92
-
93
-
94
-
95
-
96
-
97
-
98
-
99
-
100
-
101
-
102
-
103
-
104
-
105
-
106
-
107
-
108
-
109
-
110
-
111
-
112
-
113
-
114
-
115
-
116
-
117
-
118
-
119
-
120
-
121
-
122
-
123
-
124
-
125
-
126
-
127
-
128
-
129
 |
 |
