Panasonic PTDZ8700U PTDS8500U User Guide - Page 37
Removing/attaching the projection lens (optional), How to install the projection lens, How to remove - lenses
 |
UPC - 885170010963
View all Panasonic PTDZ8700U manuals
Add to My Manuals
Save this manual to your list of manuals |
Page 37 highlights
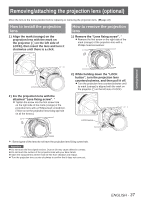
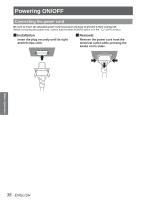
Getting Started Removing/attaching the projection lens (optional) Move the lens to the home position before replacing or removing the projection lens. (Æpage 43) How to install the projection lens 1111 Align the mark (orange) on the projection lens with the mark on the projector ( on the left side of LOCK), then insert the lens and turn it clockwise until there is a click. How to remove the projection lens 1111 Remove the "Lens fixing screw". zzRemove the first screw on the right side of the mark (orange) of the projection lens with a Phillips-head screwdriver. 2222 Fix the projection lens with the attached "Lens fixing screw". zzTighten the screw into the first screw hole on the right side of the mark (orange) of the projection lens with a Phillips-head screwdriver. (There is not the projection lens fixing tap hole on all the lenses.) 2222 While holding down the "LOCK button", turn the projection lens counterclockwise, and then pull it off. zzTurn the projection lens counterclockwise until its mark (orange) is aligned with the mark on the projector ( on the left side of LOCK). LOCK button ½½½ Some types of the lens do not have the projection lens fixing screw hole. Attention zzDo not touch the lens signal receiver. Dust or dirt may cause defective contact. zzDo not touch the surface of the projection lens with your bare hands. zzStore the replaced lens where it will be free from vibration and impact. zzTurn the projection lens counter clockwise to confirm that it does not come out. ENGLISH - 37
-
 1
1 -
2
-
3
-
4
-
5
-
6
-
7
-
8
-
9
-
10
-
11
-
12
-
13
-
14
-
15
-
16
-
17
-
18
-
19
-
20
-
21
-
22
-
23
-
24
-
25
-
26
-
27
-
28
-
29
-
30
-
31
-
 32
32 -
 33
33 -
 34
34 -
 35
35 -
 36
36 -
 37
37 -
 38
38 -
 39
39 -
 40
40 -
 41
41 -
 42
42 -
43
-
44
-
45
-
46
-
47
-
48
-
49
-
50
-
51
-
52
-
53
-
54
-
55
-
56
-
57
-
58
-
59
-
60
-
61
-
62
-
63
-
64
-
65
-
66
-
67
-
68
-
69
-
70
-
71
-
72
-
73
-
74
-
75
-
76
-
77
-
78
-
79
-
80
-
81
-
82
-
83
-
84
-
85
-
86
-
87
-
88
-
89
-
90
-
91
-
92
-
93
-
94
-
95
-
96
-
97
-
98
-
99
-
100
-
101
-
102
-
103
-
104
-
105
-
106
-
107
-
108
-
109
-
110
-
111
-
112
-
113
-
114
-
115
-
116
-
117
-
118
-
119
-
120
-
121
-
122
-
123
-
124
-
125
-
126
-
127
-
128
-
129
 |
 |
