Panasonic PTDZ8700U PTDS8500U User Guide - Page 41
Projecting, Selecting the input signal, How to adjust the focus, zoom and shift
 |
UPC - 885170010963
View all Panasonic PTDZ8700U manuals
Add to My Manuals
Save this manual to your list of manuals |
Page 41 highlights
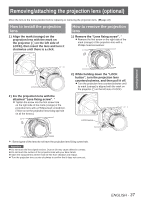
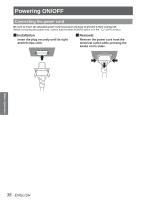
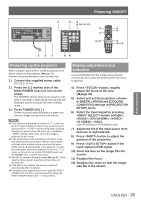
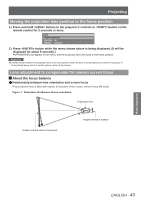
Projecting Check the connections of the peripheral devices, installation of the projection lens (Æpage 37), and connection of the power cord (Æpage 38) and switch on the power (Æpage 39) to start the projector. Select the input signal and adjust the image. Selecting the input signal Select an input signal. The image selected with button is projected. (Æpage 46) Attention zzImages may not be projected properly depending on the connected device and DVD, video tape, etc. to be played. Select a system format that is suitable for the input signal using the [SYSTEM SELECTOR] in the [PICTURE] menu (Æpage 57). zzCheck the aspect ratios of the screen and the image and select the optimum aspect ratio using [ASPECT] in the [PICTURE] menu (Æpage 58). How to adjust the focus, zoom and shift Use the Lens Shift, Zoom, and Focus controls to properly frame the image on the screen. JJAt the projector 1111 Press button on the control panel. zzPressing the button changes the setup screen in the order of [FOCUS], [ZOOM] and [SHIFT]. 2222 Press to select an item and adjust it. JJUsing the remote control 1111 Press (FOCUS, ZOOM, SHIFT) button on the remote control. zzPress button : Adjust focus. zzPress button : Adjust zoom. zzPress button : Adjust focus. 2222 Press to select an item and adjust it. Note zzBe careful not to catch your fingers between the lens and shroud when shifting the lens. zzThe zoom adjustment menu will be displayed only when a lens with zoom function is installed. zzWhen using ET-D75LE5, set the shift to the home position. zzThe adjustment can be performed faster by pressing and holding the for about 7 seconds or more. zzIt is recommended that the images are projected continuously for at least 30 minutes before the focus is adjusted. zzIf the power is turned off during focus or shift adjustment, the LENS CALIBRATION must be performed when the power is turned on next time. zzIf the main power is turned off during focus adjustment, the LENS CALIBRATION will be performed automatically when the focus is adjusted next time. zzIf the main power is turned off during shift adjustment, "LENS CALIBRATION ERROR" is displayed when the shift is adjusted next time. Please perform the [LENS CALIBRATION] from the menu (Æpage 5) zzIf "LENS CALIBRATION ERROR" is still displayed after the LENS CALIBRATION is performed, ask your dealer for repair. Basic Operation ENGLISH - 41
-
 1
1 -
2
-
3
-
4
-
5
-
6
-
7
-
8
-
9
-
10
-
11
-
12
-
13
-
14
-
15
-
16
-
17
-
18
-
19
-
20
-
21
-
22
-
23
-
24
-
25
-
26
-
27
-
28
-
29
-
30
-
31
-
32
-
33
-
34
-
35
-
 36
36 -
 37
37 -
 38
38 -
 39
39 -
 40
40 -
 41
41 -
 42
42 -
 43
43 -
 44
44 -
 45
45 -
 46
46 -
47
-
48
-
49
-
50
-
51
-
52
-
53
-
54
-
55
-
56
-
57
-
58
-
59
-
60
-
61
-
62
-
63
-
64
-
65
-
66
-
67
-
68
-
69
-
70
-
71
-
72
-
73
-
74
-
75
-
76
-
77
-
78
-
79
-
80
-
81
-
82
-
83
-
84
-
85
-
86
-
87
-
88
-
89
-
90
-
91
-
92
-
93
-
94
-
95
-
96
-
97
-
98
-
99
-
100
-
101
-
102
-
103
-
104
-
105
-
106
-
107
-
108
-
109
-
110
-
111
-
112
-
113
-
114
-
115
-
116
-
117
-
118
-
119
-
120
-
121
-
122
-
123
-
124
-
125
-
126
-
127
-
128
-
129
 |
 |