Panasonic PV GS12 Digital Video Camcorder - Page 16
POWER SUPPLY, Using the AC Adaptor, Using the Battery - reset button
 |
UPC - 037988977727
View all Panasonic PV GS12 manuals
Add to My Manuals
Save this manual to your list of manuals |
Page 16 highlights
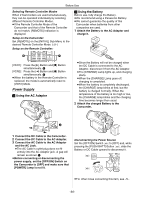
Before Use Selecting Remote Controller Modes When 2 Camcorders are used simultaneously, they can be operated individually by selecting different Remote Controller Modes. ≥If the Remote Controller Mode of the Camcorder and that of the Remote Controller do not match, [REMOTE] Indication is displayed. Setup on the Camcorder: Set [REMOTE] on the [INITIAL] Sub-Menu to the desired Remote Controller ModeT . (-23-) Setup on the Remote Controller: W 61 5 2 STILL ADV PAUSE STILL ADV E ; D 1 INDEX STOP INDEX P.B. ZOOM K ∫ L SELECT [VCR1]: Press the [D] Button and [∫] Button simultaneously. 1 [VCR2]: Press the [E] Button and [∫] Button simultaneously. 2 ≥When the battery in the Remote Controller is replaced, the mode is automatically reset to [VCR1] Mode. Power Supply ª Using the AC Adaptor ª Using the Battery Before use, fully charge the Battery. ≥We recommend using a Panasonic Battery. ≥We cannot guarantee the quality of this Camcorder when batteries from other companies are used. 1 Attach the Battery to the AC Adaptor and charge it. ≥Since the Battery will not be charged when the DC Cable is connected to the AC Adaptor, disconnect it from the AC Adaptor. ≥The [CHARGE] Lamp lights up, and charging starts. ≥When the [CHARGE] Lamp goes off, charging is completed. ≥When the battery is completely discharged, the [CHARGE] lamp blinks at first, but the battery is charged normally. When the temperature of the battery is too high or low, the [CHARGE] lamp blinks and the charging time becomes longer than usual. 2 Attach the charged Battery to the Camcorder. 1 1 Connect the DC Cable to the Camcorder. 2 Connect the DC Cable to the AC Adaptor. 3 Connect the AC Cable to the AC Adaptor and the AC Jack. ≥The AC Cable's outlet plug does not fit entirely into the AC Adaptor jack. A gap will remain as shown 1. ≥Before connecting or disconnecting the power supply, set the [OFF/ON] Switch on the Camcorder to [OFF] and make sure that [POWER] Lamp is not lit. Disconnecting the Power Source Set the [OFF/ON] Switch (43) to [OFF] and, while pressing the [PUSH BATT] Button (50), slide the Battery or DC Cable upward to disconnect it. (50) PUSH BATT ON (43) OFF ≥For other notes concerning this item, see -71-. -16-
-
 1
1 -
2
-
3
-
4
-
5
-
6
-
7
-
8
-
9
-
10
-
 11
11 -
 12
12 -
 13
13 -
 14
14 -
 15
15 -
 16
16 -
 17
17 -
 18
18 -
 19
19 -
 20
20 -
 21
21 -
22
-
23
-
24
-
25
-
26
-
27
-
28
-
29
-
30
-
31
-
32
-
33
-
34
-
35
-
36
-
37
-
38
-
39
-
40
-
41
-
42
-
43
-
44
-
45
-
46
-
47
-
48
-
49
-
50
-
51
-
52
-
53
-
54
-
55
-
56
-
57
-
58
-
59
-
60
-
61
-
62
-
63
-
64
-
65
-
66
-
67
-
68
-
69
-
70
-
71
-
72
-
73
-
74
-
75
-
76
-
77
-
78
-
79
-
80
-
81
-
82
-
83
-
84
-
85
-
86
-
87
-
88
-
89
-
90
-
91
-
92
-
93
-
94
-
95
-
96
-
97
-
98
-
99
-
100
-
101
-
102
-
103
-
104
-
105
-
106
-
107
-
108
-
109
-
110
-
111
-
112
-
113
-
114
-
115
-
116
-
117
-
118
-
119
-
120
-
121
-
122
-
123
-
124
-
125
-
126
-
127
-
128
-
129
-
130
-
131
-
132
-
133
-
134
-
135
-
136
-
137
-
138
-
139
-
140
-
141
-
142
-
143
-
144
-
145
-
146
-
147
-
148
-
149
-
150
-
151
-
152
-
153
-
154
-
155
-
156
-
157
-
158
-
159
-
160
-
161
-
162
-
163
-
164
-
165
-
166
-
167
-
168
-
169
-
170
-
171
-
172
-
173
-
174
-
175
-
176
-
177
-
178
-
179
-
180
-
181
-
182
-
183
-
184
-
185
-
186
-
187
-
188
-
189
-
190
-
191
-
192
-
193
-
194
-
195
-
196
 |
 |
