Panasonic SAPM16 SAPM16 User Guide - Page 8
Front Panel Controls - phones
 |
View all Panasonic SAPM16 manuals
Add to My Manuals
Save this manual to your list of manuals |
Page 8 highlights
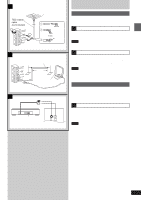
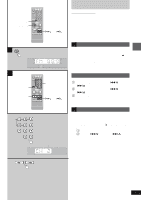
Before use 1 OPEN 2 3 4 AC IN POWER 9 ! 5 AUX 6 7 8 FF REW CD CHECK REC S.SOUND EQ STOP DEMO CD 1 TUNER BAND TAPE VOLUME CD CD 2 CD 3 CD 4 CD 5 DOWN OPEN/CLOSE UP CD CHANGE PHONES " # $ % & ( ) ~ + , Front panel controls Main unit 1Cassette lid 2Cassette open button (c OPEN 17 3AC supply indicator (AC IN) This indicator lights when the unit is connected to the AC 4mains supply. Standby/on switch ( POWER) Press to switch the unit from on to standby mode or vice versa. In standby mode, the unit is still consuming a small amount of power. 5Aux button (AUX 20 6CD skip/search, tape fast-forward/rewind/TPS, tune/ preset channel select, time adjust buttons (f 3 /FF, g 4/REW 10, 11, 12, 17, 22 7CD check button (CD CHECK 13 8CD trays 9Tape indicator This indicator changes in the following manner: a Orange (when no cassette is inserted.) b Green (when cassette is inserted.) c Red (when in recording mode.) ÄDisplay ÅRecording start/pause button ([/ J REC 19 ÇSuper sound EQ button (S.SOUND EQ 20 ÉVolume control (VOLUME DOWN, UP) ....... 10, 12, 17 ÑCD tray open/close button (c OPEN/CLOSE) ....... 12 ÖCD change button (c CD CHANGE 13 ÜHeadphone jack (PHONES 20 áStop/program clear and demonstration button (STOP L, -DEMO 12, 16, 17, 19, 21 àTuner/band select button (TUNER/BAND 10 âCassette play button (TAPE 2 17 äCD play/pause button (CD 2/ J 12 ãDisc direct play buttons (CD 1~CD 5 12 STOP DEMO CD 1 TUNER BAND TAPE CD CD 2 CD 3 CD 4 CD 5 - 8 RQT6683
-
 1
1 -
2
-
 3
3 -
 4
4 -
 5
5 -
 6
6 -
 7
7 -
 8
8 -
 9
9 -
 10
10 -
 11
11 -
 12
12 -
 13
13 -
14
-
15
-
16
-
17
-
18
-
19
-
20
-
21
-
22
-
23
-
24
-
25
-
26
-
27
-
28
 |
 |
