Panasonic SC-BTT195 SCBTT190 User Guide - Page 38
Speaker installation option, Attaching to a wall
 |
View all Panasonic SC-BTT195 manuals
Add to My Manuals
Save this manual to your list of manuals |
Page 38 highlights
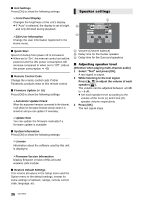
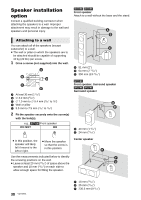
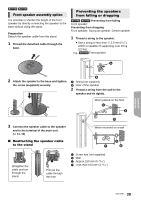
Speaker installation option Consult a qualified building contractor when attaching the speakers to a wall. Improper attachment may result in damage to the wall and speakers and personal injury. Attaching to a wall You can attach all of the speakers (except subwoofer) to a wall. ≥ The wall or pillar on which the speakers are to be attached should be capable of supporting 10 kg (22 lbs) per screw. 1 Drive a screw (not supplied) into the wall. A At least 30 mm (1 3/16q) B ‰ 4.0 mm (5/32q) C ‰ 7.0 mm to ‰ 9.4 mm (9/32q to 3/8q) D Wall or pillar E 5.5 mm to 7.5 mm (7/32q to 5/16q) 2 Fit the speaker securely onto the screw(s) with the hole(s). e.g., [BTT196] Front speaker DO NOT DO [BTT196] [BTT195] Front speaker Attach to a wall without the base and the stand. A 51 mm (2q) B 64 mm (2 17/30q) C 350 mm (13 25/32q) [BTT190] Front speaker, Surround speaker [BTT196] [BTT195] Surround speaker D 40 mm (1 9/16q) E 24 mm (15/16q) ≥ In this position, the ≥ Move the speaker Center speaker speaker will likely so that the screw is fall if moved to the left or right. in this position. Use the measurements indicated below to identify the screwing positions on the wall. ≥ Leave at least 20 mm (25/32q) of space above the speaker and 10 mm (13/32q) on each side to allow enough space for fitting the speaker. 38 VQT3X51 F 18 mm (23/32q) G 25 mm (31/32q) H 230.5 mm (9 1/16q)
-
 1
1 -
2
-
3
-
4
-
5
-
6
-
7
-
8
-
9
-
10
-
11
-
12
-
13
-
14
-
15
-
16
-
17
-
18
-
19
-
20
-
21
-
22
-
23
-
24
-
25
-
26
-
27
-
28
-
29
-
30
-
31
-
32
-
 33
33 -
 34
34 -
 35
35 -
 36
36 -
 37
37 -
 38
38 -
 39
39 -
 40
40 -
 41
41 -
 42
42 -
 43
43 -
44
-
45
-
46
-
47
-
48
-
49
-
50
-
51
-
52
 |
 |
