Panasonic SC-HT56 Home Theater - Page 11
STEP 4 Auto speaker setup
 |
UPC - 037988982295
View all Panasonic SC-HT56 manuals
Add to My Manuals
Save this manual to your list of manuals |
Page 11 highlights
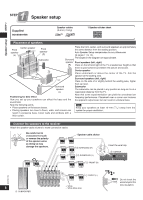
STEP 4 Auto speaker setup Auto speaker setup • Turn off all components before making any connections. • Peripheral equipment and cables sold separately unless otherwise indicated. • To connect equipment, refer to the appropriate operating instructions. Auto speaker setup allows you to achieve a satisfactory listening environment easily with the use of the supplied calibration microphone as a detector of sound signals. The unit will first perform automatic speaker detection, then checks and adjusts the following settings. DETECTION • Checks which speakers you have connected. DISTANCE • Checks the distance of each speaker from the listening position and adjusts the timing of each channel automatically. FREQUENCY • Makes any further corrections to the frequency response. LEVEL • Checks and adjusts each speaker level automatically. Loud test tones are output from the speakers during setup, so keep children out of the room. Before setup Conduct the auto speaker setup in a quiet environment. A noisy background will give unsatisfactory results. Process for auto speaker setup Turn on the unit. Press . • The standby indicator goes off when you turn on the unit. Connect the calibration microphone to the [SETUP MIC] jack on the front panel. Placing of calibration microphone. Note The calibration microphone is sensitive to heat. Keep it away from direct sunlight and do not place it on top of the unit. Calibration microphone (included) • Place on a flat surface at the seating area. • Set calibration microphone position at your ear height. RQTX0175 11
-
 1
1 -
2
-
3
-
4
-
5
-
 6
6 -
 7
7 -
 8
8 -
 9
9 -
 10
10 -
 11
11 -
 12
12 -
 13
13 -
 14
14 -
 15
15 -
 16
16 -
17
-
18
-
19
-
20
-
21
-
22
-
23
-
24
 |
 |
