Panasonic SCHTB15 SCHTB15 User Guide - Page 10
Step 2 Assembling the speakers, When placing the speakers on a wall
 |
View all Panasonic SCHTB15 manuals
Add to My Manuals
Save this manual to your list of manuals |
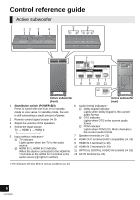
Page 10 highlights
Step 2 Assembling the speakers When placing the speakers on a wall Place the speakers horizontally ∏ 1 Speaker (L) ∏ 1 Speaker joint ∏ 1 Speaker (R) ∏ 4 Screws A (Large) ∏ 2 Speaker cables (L): WHITE (R): RED ≥For a safety measure to prevent the speakers from falling, refer to page 16. ≥To prevent damage or scratches, lay down a soft cloth and perform the assembly on it. Match the L/R indicator A on the speaker with the L/R indicator B on the speaker joint, then insert the metal part of the speaker joint fully into C. ≥ Do not connect the left speaker to the right speaker joint or vice versa. Be sure to verify the orientation of the speaker with the label on the rear of the speaker. A L/R indicator on the speaker label B L/R indicator on the speaker joint C " " shaped slit Use screws A to secure the speakers to the speaker joint. ≥ Keep the screws out of reach of children to prevent swallowing. 1 3 42 10 D Screw A (supplied) ≥ Be sure to insert the screws following the order as indicated in the illustration. VQT3Q59
-
 1
1 -
2
-
3
-
4
-
 5
5 -
 6
6 -
 7
7 -
 8
8 -
 9
9 -
 10
10 -
 11
11 -
 12
12 -
 13
13 -
 14
14 -
 15
15 -
16
-
17
-
18
-
19
-
20
-
21
-
22
-
23
-
24
-
25
-
26
-
27
-
28
-
29
-
30
-
31
-
32
 |
 |
