Panasonic SVAP10U SVAP10U User Guide
Panasonic SVAP10U - SD PRINTER Manual
 |
View all Panasonic SVAP10U manuals
Add to My Manuals
Save this manual to your list of manuals |
Panasonic SVAP10U manual content summary:
- Panasonic SVAP10U | SVAP10U User Guide - Page 1
R Digital Photo Printer Operating Instructions Model No. SV-AP10U Before use, please read these instructions completely. Please retain this manual for continuing reference. For USA assistance. please call:1-800-211-PANA(7262) or send e-mail to:[email protected] For Canadian assistance. - Panasonic SVAP10U | SVAP10U User Guide - Page 2
instructions are trademarks or registered trademarks of the companies concerned. ≥Avoid using a cell phone near the Photo Printer because software, including the information recorded or described on the CD-ROM, instruction manuals, and any other media provided to Licensee (collectively "Software - Panasonic SVAP10U | SVAP10U User Guide - Page 3
using the Photo Printer with a PC Card (Especially Hard Disk Type card), temperature on the surface of the card may rise and it may become hot. Turn off the power and remove the card after a while. FCC Caution: To assure continued compliance, follow the attached installation instructions and use - Panasonic SVAP10U | SVAP10U User Guide - Page 4
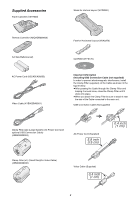
Supplied Accessories Paper Cassette (VXA7602) Stand for Vertical Layout (VYQ2551) Remote Controller (N2QADB000006) AA Size Batteries (x2) AC Power Cord (K2CA2EA00002) Video Cable (K1EA02BA0001) Feet for Horizontal Layout (VKA0376) CD-ROM (VFF0170) Important Information (Including USB Connection - Panasonic SVAP10U | SVAP10U User Guide - Page 5
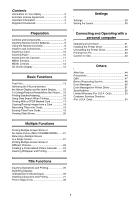
Use 43 Others After Use 44 Precautions 44 Q&A 47 Before Requesting Service 48 Error Messages 50 Error Messages for Printer Driver 51 Specifications 52 Limited Warranty (For U.S.A. Only 53 Customer Services Directory (For U.S.A. Only 54 Multiple Functions Printing Multiple Screen Shots of - Panasonic SVAP10U | SVAP10U User Guide - Page 6
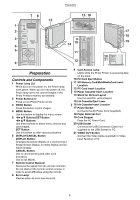
control receiver in order to avoid difficulties using the remote. 8 Error Lamp Flashes when an error has occurred. 9 Card Access Lamp Lights while the Photo Printer is accessing data on the Card. 10 PC Card Eject Button 11 SD Memory Card/MultiMediaCard Insert Location 12 PC Card Insert Location 13 - Panasonic SVAP10U | SVAP10U User Guide - Page 7
4 5 TITLE DATE COPY 11 6 NUMBER DPOF/ALL SELECT 12 7 PRINT MULTI The buttons below have the same functions as ones of the Photo Printer. (The same numbers as the main unit are used.) 2 Power Button [Í], 3 PRINT Button, 4 MENU Button, 5 2134 Buttons, 5 SET Button, and 6 DISPLAY/CANCEL - Panasonic SVAP10U | SVAP10U User Guide - Page 8
. -+ +- 3 Cover is returned. Precautions for Battery Replacement The service life of the batteries is approximately 1 year. However, it varies considerably of used batteries according to the manufacturer's instructions. ≥Distance from the Photo Printer: Within approximately 23 feet (7 m) ≥Angle - Panasonic SVAP10U | SVAP10U User Guide - Page 9
, see page 31. THE SOCKET OUTLET SHALL BE INSTALLED NEAR THE EQUIPMENT AND SHALL BE EASILY ACCESSIBLE. ª Paper That Can Be Used For Printing The Photo Printer can use the following types of paper. Use Ink Cassette/Paper Sets that bear the mark. (Print Sets that bear the µ mark, the ∂ mark, or - Panasonic SVAP10U | SVAP10U User Guide - Page 10
the white (print) side of the paper up, and insert under 4 (5 is the perforation line). 3 While opening the paper cassette door 6 and pushing the Photo Printer with your hand, insert the paper cassette all the way into 7. ≥Insert up to 25 sheets of 4" x 5-7/8" (100 x 148 mm) printing paper, or up - Panasonic SVAP10U | SVAP10U User Guide - Page 11
be reused. 2 1 2 BASIC FUNCTION A EFFECT DPOF Input Batch DPOF Search Album Card Slide OPTION 3 MENU Interface 1 MENU Categories The Photo Printer is divided into 4 major categories. 2 MENU Contents Select the specific MENU you desire here. 3 Description/Control Display The selected MENU - Panasonic SVAP10U | SVAP10U User Guide - Page 12
Preparation MENU Controls PRINT PRINT SET ERROR MENU Use the MENU Mode as follows. CA B DISPLAY/ B SET C 1:Press A to display the MENU screen. 2:Use the 21 Buttons B to switch between MENU categories and A MENU CANCEL DD DISPLAY/ CANCEL MENU contents. 2 3 3:Use the 2134 Buttons B - Panasonic SVAP10U | SVAP10U User Guide - Page 13
Cassette and the Ink Cassette are 11 BASIC 7 5 3 2 Number Date FUNCTION A EFFECT Layout Trim Picture all inserted. ≥Insert a card into the Photo Printer. ≥Turn on the power. 1 Select [Layout] under [OPTION] on the MENU screen, and press A (SET Button). 2 Select [Vertical] or [Horizontal - Panasonic SVAP10U | SVAP10U User Guide - Page 14
is displayed. ≥The number of prints increases when pressing C. ≥The Photo Printer can continuously print up to 10 copies of the same image. ≥The . The error message will disappear and printing will continue. ≥If you have trouble removing the paper, turn the power off, and then back on again. Proceed - Panasonic SVAP10U | SVAP10U User Guide - Page 15
Basic Functions Switching the Pictures between the Album MENU Display and the Index Display A Í ALBUM ZOOM IN CARD SELECT ROTATE ZOOM OUT PRINT SET 1 SMTWT F S 12345 6 7 8 9 10 11 12 13 14 15 16 17 18 19 20 21 22 23 24 25 26 27 28 29 30 31 SET A You can display the pictures where a date - Panasonic SVAP10U | SVAP10U User Guide - Page 16
be verified on the TV Screen. Using Date Search When Printing Dates are recorded for pictures that were recorded on cards with Digital Movie Cameras or Digital Cameras. Using this information, pictures taken on the designated date(s) can be printed. ≥Select the INPUT method. 1 Select [Search] under - Panasonic SVAP10U | SVAP10U User Guide - Page 17
a Digital Video Camera or a Digital Camera, this adds printing information to stored pictures on cards so they can be applied to DPOF systems. ≥When you insert a card for which DPOF setting is not made, all the pictures are printed by pressing [PRINT (DPOF/ALL)] Button. ≥The Photo Printer cannot - Panasonic SVAP10U | SVAP10U User Guide - Page 18
PRINT MENU SET A DISPLAY/ CANCEL BB MENU SET DISPLAY/ CANCEL A 1 BASIC FUNCTION A EFFECT DPOF Input Batch DPOF Search Album Card Slide OPTION 2 Picture Card Title 3 Copy Card Delete Basic Functions Copying/Erasing Images from a Card Images can be mutually copied to or erased from - Panasonic SVAP10U | SVAP10U User Guide - Page 19
PRINT SET A Recording Titles onto Cards MENU The Photo Printer can create titles through Title Functions menu SET deleted. ≥Titles on separately sold MultiMediaCards cannot be deleted. ≥Titles locked on Digital Video Camera cannot be erased. 3 Card Record to SD / MMC Record to PC - Panasonic SVAP10U | SVAP10U User Guide - Page 20
Batch DPOF Search Album Card Slide OPTION Slide All pictures Selected pictures Album DPOF Basic Functions Viewing Slide Shows The Photo Printer can automatically display a continuous show of A selected pictures within a card. ≥To view DPOF configured pictures, insert a card with DPOF settings - Panasonic SVAP10U | SVAP10U User Guide - Page 21
/ALL SELECT PRINT MULTI 2 B A PRINT ERROR MENU SET DISPLAY/ CANCEL Printing Multiple Screen Shots of the Same Picture (MULTI FRAME MODE) The Photo Printer can divide the screen into 2, 4, 9 or 16 sections, and print multiple screen shots of the same picture. A ≥Select the INPUT method. ≥Select - Panasonic SVAP10U | SVAP10U User Guide - Page 22
Printing Multiple Screen Shots of Different PRINT SET D A PRINT Pictures D ERROR E MENU DISPLAY/ CANCEL TITLE DATE COPY E C MENU SET The Photo Printer can divide the screen into 2, 4, 9 or 16 sections, and print multiple screen shots of different pictures. A ≥Select the INPUT method - Panasonic SVAP10U | SVAP10U User Guide - Page 23
Multiple Functions Selecting a Large Number of Pictures and Printing Multiple SELECT as batches 1 Select all necessary pictures in Step 1, and press E to go to the MENU screen. 2 Select [Batch] under [BASIC] on the MENU screen, and choose [Selected pictures]. ≥e.g. Selecting [4 pictures] and 8 - Panasonic SVAP10U | SVAP10U User Guide - Page 24
12 13 14 15 16 17 18 19 20 21 22 23 24 25 26 27 28 29 30 31 Creating a Personalized Picture Calendar The Photo Printer can insert a picture and create a 1-month, 2-month or 12-month personalized calendar. You can also change the colors of A holidays or special days and dates - Panasonic SVAP10U | SVAP10U User Guide - Page 25
SELECT ROTATE ZOOM OUT PRINT SET C D A G F PRINT ERROR MENU Inserting Wallpaper and Printing You can insert Wallpaper stored within the Photo Printer onto pictures and print. SET A ≥Select the INPUT method. (P13) F MENU 1 DISPLAY/ CANCEL BB DISPLAY/ CANCEL BASIC Standard Copy Select - Panasonic SVAP10U | SVAP10U User Guide - Page 26
CANCEL BASIC a?A FUNCTION Illust Type Stamp Sepia A EFFECT Display OPTION Inserting Illustrations and Printing You can insert illustrations stored within the Photo Printer or within cards A onto pictures and print. ≥Select the INPUT method. ≥Select the picture you wish to print and make the - Panasonic SVAP10U | SVAP10U User Guide - Page 27
SELECT ROTATE ZOOM OUT PRINT SET B CF AE PRINT ERROR MENU Inserting Characters and Printing You can insert characters stored within the Photo Printer onto pictures and print. E G MENU DISPLAY/ CANCEL TITLE DATE COPY SET DISPLAY/ CANCEL A ≥Select the INPUT method. ≥Select the picture you - Panasonic SVAP10U | SVAP10U User Guide - Page 28
Title Functions B PRINT PRINT SET AB ERROR MENU C Print in Sepia Tone The Photo Printer can print pictures in Sepia tone. C D MENU DISPLAY/ CANCEL TITLE DATE COPY SET DISPLAY/ CANCEL A ≥Select the INPUT method. ≥Display the picture you wish to - Panasonic SVAP10U | SVAP10U User Guide - Page 29
] and press A. ≥You cannot confirm the date on TV Screen. ≥When saving the picture file on PC, the saved date is displayed. ª Trimming The Photo Printer can trim the horizontal or vertical edges of a picture and stretch it so that the picture fills up the entire print space. 1 Select [Trim] under - Panasonic SVAP10U | SVAP10U User Guide - Page 30
PRINT MENU 1 SET A DISPLAY/ CANCEL MENU SET DISPLAY/ CANCEL A BASIC 7 5 3 2 Number Date FUNCTION A EFFECT Layout Trim Picture OPTION 2 1 2 3 4 5 6 COLOR C·BALANCE BRIGHT CONTRAST SHARP AWB 1 2 BASIC 7 5 3 2 Number Date FUNCTION A EFFECT Layout Trim Picture OPTION Layout - Panasonic SVAP10U | SVAP10U User Guide - Page 31
Connecting and Operating with a personal computer Operating environment Printer Driver can be installed in a PC/AT compatible personal ≥Although the screens in these Operating Instructions are shown in English for the sake of example, other languages are supported as well. ≥Microsoft® Windows® - Panasonic SVAP10U | SVAP10U User Guide - Page 32
the Photo Printer. 3 Connect the Printer to the PC using the USB connection cable. ≥The [Found New Hardware Wizard] screen appears. 4 Click the [Next] Button. ≥Confirm that the item [Install the software automatically] is selected. 5 Click the [Finish] Button when the Printer Driver Software - Panasonic SVAP10U | SVAP10U User Guide - Page 33
printer driver allows the Photo Printer to be used as a fullcolor printer. For Windows Me 1 Turn on the personal computer and install the supplied CD-ROM into the CD-ROM drive. 2 Turn on the Photo Printer. 3 Connect the Printer Finish] Button when the Printer Driver Software is detected. 6 [Add New - Panasonic SVAP10U | SVAP10U User Guide - Page 34
,13 Connecting and Operating with a personal computer Installing the Printer Driver (Cont.) For Windows 98SE/2000 1 Turn on the personal computer and install the supplied CD-ROM into the CD-ROM drive. 2 Turn on the Photo Printer. 3 Connect the Printer to the PC using the USB connection cable. ≥The - Panasonic SVAP10U | SVAP10U User Guide - Page 35
in the selection stage for the port, because the USB port is not set. Note that the [Add Printer] function can be used only when the Printer Driver is re-installed or when another printer using the USB port has been installed. ≥If the Plug and Play function activates the Install Wizard, install - Panasonic SVAP10U | SVAP10U User Guide - Page 36
Operating with a personal computer Installing the Printer Driver (Cont.) 10 Click [Have Disk]. 11 Select the folder where the Printer Driver is located. ≥If the CD-ROM drive is the [D: drive], select [D:\Win2K-XP] folder. 12 Click [OK]. 13 Check that [Panasonic SV-AP10] is displayed and click [Next - Panasonic SVAP10U | SVAP10U User Guide - Page 37
is activated, click [Next]. 6 Select [Local Printer] and click [Next]. 7 Click [Have Disk]. 8 Select the folder where the Printer Driver is located. ≥If the CD-ROM drive is the [D: drive], select [D:\Win9X-Me] folder. 9 Click [OK]. 10 Check that [Panasonic SV-AP10] is displayed and click [Next]. 11 - Panasonic SVAP10U | SVAP10U User Guide - Page 38
a personal computer Installing the Printer Driver (Cont.) For Windows 2000 1 Before installation, check that all applications have been exited. 2 Connect the printer to your personal computer with a USB cable and turn ON the printer. 3 Select [Start] >> [Settings] >> [Printers]. 4 Double-click the - Panasonic SVAP10U | SVAP10U User Guide - Page 39
Other Hardware] >> [Printers and Faxes]. 2 Right-click [Panasonic SV-AP10] and select [Delete]. ≥The Printer Driver is uninstalled. For Windows 98SE/Me/2000 1 Select [Start] >> [Settings] >> [Printers]. 2 Right-click [Panasonic SV-AP10] and select [Delete]. ≥The Printer Driver is uninstalled. 39 - Panasonic SVAP10U | SVAP10U User Guide - Page 40
the printer driver are explained. It is explained with [SD Viewer for Printer] in the supplied CD-ROM. To install [SD Viewer for Printer] 1 for Printer] ≥Click [Start] >> [Programs]/[All Programs] >> [Panasonic] >> [SD Viewer for Printer] >> [SD Viewer for Printer]. ≥Read the Operating Instructions ( - Panasonic SVAP10U | SVAP10U User Guide - Page 41
using 16 Pre-Cut Adhesive printing paper. For Windows Me/98SE After opening the detail setting on [Print], 1 Set the printer name to [Panasonic SV-AP10]. ≥Select [SV-AP10] from the printing menu when using it from the other application. 2 Click [Properties] and select [Paper] and [Division number - Panasonic SVAP10U | SVAP10U User Guide - Page 42
the property and select the paper and division number from [General] >> [Print Preferences] >> [Advanced]. ≥For Windows 98SE/Me Select [Start] >> [Settings] >> [Printers] to open the property and select the paper and division number from [Paper] and [Device Options]. When clicking [OK], setting is - Panasonic SVAP10U | SVAP10U User Guide - Page 43
printing, the status monitor may not be displayed. Click [Panasonic SV-AP10 USB0...] to display it. 2 The printer may not be connected or the other printer may be selected. Confirm the connection of the printer. 3 When printing with the printer connected, the old data may be printed. Printing data - Panasonic SVAP10U | SVAP10U User Guide - Page 44
on the part of Panasonic, we will replace the Ink Cassette/Paper Set with an equivalent Ink Cassette/Paper Set. Panasonic shall not bear any in poor quality prints, but also paper jams, malfunctions and breakdowns of the Photo Printer. ª Paper/Paper Cassette Notes ≥Do not fold or bend the paper. - Panasonic SVAP10U | SVAP10U User Guide - Page 45
off the power, remove the card, and re-insert it. ≥Some titles recorded to the cards are not displayed on the Digital Video Camera. ≥This Photo Printer is based on the DCF standards (Design rule for Camera File system) which were established by JEITA (Japan Electronics and Information Technology - Panasonic SVAP10U | SVAP10U User Guide - Page 46
using a synthetic cloth, follow the precautions in the cloth's usage instructions. ≥When the ventilation holes become dusty, remove the Ink Cassette, and get rid of the dust using a vacuum cleaner. If dust gets into the Photo Printer from the ventilation holes, the Ink Film becomes dusty and the - Panasonic SVAP10U | SVAP10U User Guide - Page 47
pictures have a length-width ratio of 1: 2. The length-width ratios of Digital Video Cameras are 3:4, so the top and bottom portions of pictures will be cut when printing on borderless paper. ª About the Photo Printer in General 4: What is the "thermal sublimation transfer printing system"? 4: This - Panasonic SVAP10U | SVAP10U User Guide - Page 48
Others Before Requesting Service If trouble persists even when the action suggested below has that which can be used by the Photo Printer is being used. e.g. SD/MMC/CF can be used. → Pictures from the card cannot be printed with the Photo Printer. 4: The printer does not print. 4-1: The Ink Cassette - Panasonic SVAP10U | SVAP10U User Guide - Page 49
PC. 17: Delete the data of the printing job if you do not need it. To delete the printing job data ≥Windows XP Select [Start] >> [Printers and Faxes]. [Printers and Faxes] may not be displayed depending on the PC used. Select the following orders. [Start] >> [Control Panel - Panasonic SVAP10U | SVAP10U User Guide - Page 50
the Photo Printer can use. SD/MMC/CF cards can be used. ≥The illustration is unreadable. → The illustration file is destroyed or does not correspond. ≥This function can't be used because the card is read only. → The card is set to write-protect. Refer to each card's manual for specific instructions - Panasonic SVAP10U | SVAP10U User Guide - Page 51
to this printer driver. Please abort printing. → Install the driver again. ≥Error occurred. Turn the printer's power off and then back on, and then click [Restart] for printing or click [Abort] to abort printing. → Restart the job or abort printing after turning the Photo Printer off and - Panasonic SVAP10U | SVAP10U User Guide - Page 52
Print, Title, Character Input, Sepia Print, Zoom, Batch Print/Index, Date Print, Date Search, Trimming, Card Storage, Card Erase, Card Copy, Slide Show, DPOF (Digital Print Order Format), Album Film thermal head, 10,20 dots/mm (259 dpi) Card: SD Memory Card/MultiMediaCard (Front:1), PC Card (TYPE II - Panasonic SVAP10U | SVAP10U User Guide - Page 53
AV Device, SD Mobile Printer, Digital Photo Printer (except items listed below service. Carry-In or Mail-In Service For Carry-In or Mail-In Service in the United States call 1-800-211-PANA (1-800-211-7262). For assistance in Puerto Rico call Panasonic a problem with this product develops during or after the - Panasonic SVAP10U | SVAP10U User Guide - Page 54
can purchase parts, accessories or locate your nearest servicenter by visiting our Web Site. Accessory Purchases: 1-800-332-5368 (Customer Orders Only) Panasonic Services Company 20421 84th Avenue South, Kent, WA 98032 (6 am to 5 pm Monday - Friday; 6 am to 10:30 am Saturday; PST) (Visa, MasterCard - Panasonic SVAP10U | SVAP10U User Guide - Page 55
55 - Panasonic SVAP10U | SVAP10U User Guide - Page 56
Consumer Electronics Company, Division of Matsushita Electric Corporation of America One Panasonic Way, Secaucus, NJ 07094 Panasonic Sales Company ("PSC") Division of Matsushita Electric of Puerto Rico, Inc. Ave. 65 de Infantería, Km. 9.5, San Gabriel Industrial Park, Carolina, Puerto Rico 00985
-
 1
1 -
 2
2 -
 3
3 -
 4
4 -
 5
5 -
 6
6 -
 7
7 -
8
-
9
-
10
-
11
-
12
-
13
-
14
-
15
-
16
-
17
-
18
-
19
-
20
-
21
-
22
-
23
-
24
-
25
-
26
-
27
-
28
-
29
-
30
-
31
-
32
-
33
-
34
-
35
-
36
-
37
-
38
-
39
-
40
-
41
-
42
-
43
-
44
-
45
-
46
-
47
-
48
-
49
-
50
-
51
-
52
-
53
-
54
-
55
-
56
 |
 |

R
Before use, please read these instructions completely.
Please retain this manual for continuing reference.
VQT0B55
Digital Photo Printer
Operating Instructions
Model No.
SV-AP10U
For USA assistance. please call:1-800-211-PANA(7262) or send e-mail to:[email protected]
For Canadian assistance. please call:1-800-561-5505 or visit us at www.panasonic.ca