Panasonic SVAP10U SVAP10U User Guide - Page 7
Controls and Components Cont., Remote Controller
 |
View all Panasonic SVAP10U manuals
Add to My Manuals
Save this manual to your list of manuals |
Page 7 highlights
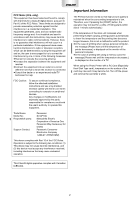
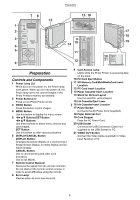
Preparation Controls and Components (Cont.) ª Remote Controller 1 11 MULTI (COPY) Button Press this button to select numbers of multiple screen shots of the same picture. 12 MULTI (SELECT) Button Press this button to select numbers of multiple screen shots of different pictures. 2 Í ALBUM ZOOM IN 3 CARD SELECT ROTATE ZOOM OUT PRINT SET 8 9 10 MENU DISPLAY/ CANCEL 4 5 TITLE DATE COPY 11 6 NUMBER DPOF/ALL SELECT 12 7 PRINT MULTI The buttons below have the same functions as ones of the Photo Printer. (The same numbers as the main unit are used.) 2 Power Button [Í], 3 PRINT Button, 4 MENU Button, 5 2134 Buttons, 5 SET Button, and 6 DISPLAY/CANCEL Button 1 Remote Control Transmitter 2 ALBUM Button Press this button to change the screen between the Album Display and Index Display. 3 CARD SELECT Button Press this button to change the input between SD Memory Card or MultiMediaCard and PC Card. 4 DATE Button Press this button to add the date when the picture was taken in the lower right corner. 5 TITLE Button Press this button to display the menu screen of [FUNCTION]. 6 NUMBER Button Press this button to select the copies to print. 7 PRINT (DPOF)/PRINT (ALL) Button PRINT (DPOF) Button: Press this button to print the pictures that were marked for DPOF. PRINT (ALL) Button: Prints all pictures when there are no pictures indicated with DPOF setting. 8 ZOOM IN Button Press this button to enlarge the picture and characters. 9 ZOOM OUT Button Press this button to reduce the picture and characters. 10 ROTATE Button Press this button to rotate the picture and characters. 7
-
 1
1 -
 2
2 -
 3
3 -
 4
4 -
 5
5 -
 6
6 -
 7
7 -
 8
8 -
 9
9 -
 10
10 -
 11
11 -
 12
12 -
13
-
14
-
15
-
16
-
17
-
18
-
19
-
20
-
21
-
22
-
23
-
24
-
25
-
26
-
27
-
28
-
29
-
30
-
31
-
32
-
33
-
34
-
35
-
36
-
37
-
38
-
39
-
40
-
41
-
42
-
43
-
44
-
45
-
46
-
47
-
48
-
49
-
50
-
51
-
52
-
53
-
54
-
55
-
56
 |
 |
