Panasonic WJ-HD616/1000 Operating Instructions - Page 53
Specify the time range, Filter by detection area or detection sensitivity
 |
View all Panasonic WJ-HD616/1000 manuals
Add to My Manuals
Save this manual to your list of manuals |
Page 53 highlights
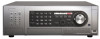
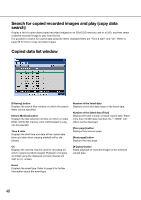
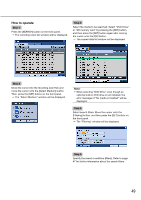
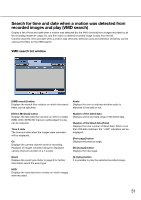
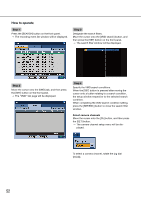
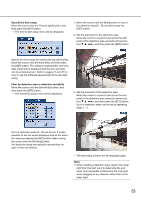
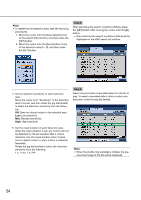
Specify the time range Move the cursor onto the [Time & date] button, and then press the [SET] button. → The time & date setup menu will be displayed. 1. Move the cursor onto the [Area] button of any of the detection area (A - D), and then press the [SET] button. 2. Set the start point of the detection area. Move the cursor to a point to be set as the start point of the detection area using the arrows button (C D A B), and then press the [SET] button. Specify the time range by rotating the jog dial (inside). Move the cursor onto the entry field, and then press the [SET] button. The software keyboard (for time and date entry) will be displayed and the time and date can be entered using it. Refer to pages 21 and 25 for how to use the software keyboard (for time and date entry). Filter by detection area or detection sensitivity Move the cursor onto the [Sensitivity] button, and then press the [SET] button. → The sensitivity setup menu will be displayed. 3. Set the end point of the detection area. Move the cursor to a point to be set as the end point of the detection area using the arrows button (C D A B), and then press the [SET] button. Up to 4 detection areas can be set by repeating steps 1 - 3. Up to 4 detection areas (A - D) can be set. It is also possible to set the whole displayed area as the detection area by pressing the [SET] button after moving the cursor onto the [All Area] button. Set detection areas and detection sensitivities for each of them as follows. → The area setup window will be displayed again. Note: • When creating a detection area, drag to the lower right from the start point to determine the end point. It is impossible to determine the end point when dragging to any direction other than to the lower right. 53
-
 1
1 -
2
-
3
-
4
-
5
-
6
-
7
-
8
-
9
-
10
-
11
-
12
-
13
-
14
-
15
-
16
-
17
-
18
-
19
-
20
-
21
-
22
-
23
-
24
-
25
-
26
-
27
-
28
-
29
-
30
-
31
-
32
-
33
-
34
-
35
-
36
-
37
-
38
-
39
-
40
-
41
-
42
-
43
-
44
-
45
-
46
-
47
-
 48
48 -
 49
49 -
 50
50 -
 51
51 -
 52
52 -
 53
53 -
 54
54 -
 55
55 -
 56
56 -
 57
57 -
 58
58 -
59
-
60
-
61
-
62
-
63
-
64
-
65
-
66
-
67
-
68
-
69
-
70
-
71
-
72
-
73
-
74
-
75
-
76
-
77
-
78
-
79
-
80
-
81
-
82
-
83
-
84
-
85
-
86
-
87
-
88
-
89
-
90
-
91
-
92
-
93
-
94
-
95
-
96
-
97
-
98
-
99
-
100
-
101
-
102
-
103
-
104
-
105
-
106
-
107
-
108
-
109
-
110
-
111
-
112
-
113
-
114
-
115
-
116
-
117
-
118
-
119
-
120
-
121
-
122
-
123
-
124
-
125
-
126
-
127
-
128
-
129
-
130
-
131
-
132
-
133
 |
 |