Panasonic WJHD316 WJHD309 User Guide - Page 68
Preparation for maintenance (HDD replacement, installation, etc.)
 |
View all Panasonic WJHD316 manuals
Add to My Manuals
Save this manual to your list of manuals |
Page 68 highlights
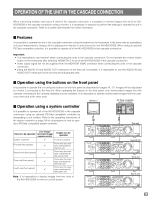
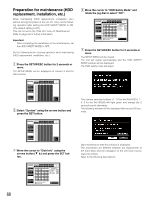
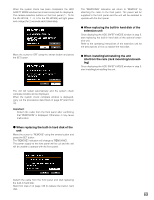
Preparation for maintenance (HDD replacement, installation, etc.) When maintaining (HDD replacement, installation, etc.) without turning the power of the unit off, carry out the following operation after setting the HDD SAFETY MODE to ON. (The default setting is ON.) This can be set on the "Disk Info" menu of "Maintenance". Refer to page 94 for further information. Important: After completing the installation or the maintenance, set the HDD SAFETY MODE to OFF. Do the following before starting operation when maintaining (HDD replacement, installation, etc.). z Press the SETUP/ESC button for 2 seconds or more. The SETUP MENU will be displayed on monitor 2 and the VGA monitor. SET UP MENU Maintenance Recording Switcher Display Event Comm Schedule System REC Rate Disk Info Version Info Disk End Mode Disk Capacity Date Delete Event Log Error Log Access Log CAM 1 CAM 2 CAM 3 CAM 4 CAM 5 CAM 6 CAM 7 CAM 8 CAM 9 CAM 10 CAM 11 CAM 12 CAM 13 CAM 14 CAM 15 CAM 16 MANU AUTO AUTO AUTO AUTO AUTO AUTO AUTO AUTO AUTO AUTO AUTO AUTO AUTO AUTO AUTO AUTO SCHE 1ips 1ips 1ips 1ips 1ips 1ips 1ips 1ips 1ips 1ips 1ips 1ips 1ips 1ips 1ips 1ips PRE EVT POST EVT 1ips 1ips 1ips 1ips 1ips 1ips 1ips 1ips 1ips 1ips 1ips 1ips 1ips 1ips 1ips 1ips 1ips 1ips 1ips 1ips 1ips 1ips 1ips 1ips 1ips 1ips 1ips 1ips 1ips 1ips 1ips 1ips EMR 1ips 1ips 1ips 1ips 1ips 1ips 1ips 1ips 1ips 1ips 1ips 1ips 1ips 1ips 1ips 1ips LIVE SUPER FINE FINE NORMAL EXTENDED x Select "System" using the arrows button and press the SET button. SET UP MENU Maintenance Recording Switcher Display Event Comm Schedule System REC Rate Disk Info Version Info Disk End Mode Disk Capacity Date Delete Event Log Error Log Access Log CAM 1 CAM 2 CAM 3 CAM 4 CAM 5 CAM 6 CAM 7 CAM 8 CAM 9 CAM 10 CAM 11 CAM 12 CAM 13 CAM 14 CAM 15 CAM 16 MANU AUTO AUTO AUTO AUTO AUTO AUTO AUTO AUTO AUTO AUTO AUTO AUTO AUTO AUTO AUTO AUTO SCHE 1ips 1ips 1ips 1ips 1ips 1ips 1ips 1ips 1ips 1ips 1ips 1ips 1ips 1ips 1ips 1ips PRE EVT POST EVT 1ips 1ips 1ips 1ips 1ips 1ips 1ips 1ips 1ips 1ips 1ips 1ips 1ips 1ips 1ips 1ips 1ips 1ips 1ips 1ips 1ips 1ips 1ips 1ips 1ips 1ips 1ips 1ips 1ips 1ips 1ips 1ips EMR 1ips 1ips 1ips 1ips 1ips 1ips 1ips 1ips 1ips 1ips 1ips 1ips 1ips 1ips 1ips 1ips LIVE SUPER FINE FINE NORMAL EXTENDED c Move the cursor to "Disk Info" using the arrows button (C D) and press the SET button. SETUP MENU Maintenance Switcher Recording Display Event Comm Schedule System LIVE REC Rate Disk Info Version Info Disk End Mode Disk Capacity Data Delete Event Log Error Log Access Log 1 MAIN 160GB 15000h EXT1 160GB 15000h EXT2 160GB 15000h EXT3 160GB 15000h EXT4 160GB 15000h EXT5 160GB 15000h EXT6 160GB 15000h EXT7 160GB 15000h 2 160GB 15000h 160GB 15000h 160GB 15000h 160GB 15000h 160GB 15000h 160GB 15000h 160GB 15000h 160GB 15000h 34 160GB 15000h 160GB 15000h 160GB 15000h 160GB 15000h 160GB 15000h 160GB 15000h 160GB 15000h 160GB 15000h 160GB 15000h 160GB 15000h 160GB 15000h 160GB 15000h 160GB 15000h 160GB 15000h Remaining Normal REC Area 1800GB Event REC Area 1200GB Copy Area 1000GB COPY 1 (Rear) 1000GB COPY 2 (Front) 1000GB I Warning for Disk Life Time I HDD Safety Mode 3000h OFF v Move the cursor to "HDD Safety Mode" and rotate the jog dial to select "ON ". SETUP MENU Maintenance Switcher Recording Display Event Comm Schedule System LIVE REC Rate Disk Info Version Info Disk End Mode Disk Capacity Data Delete Event Log Error Log Access Log 1 MAIN 160GB 15000h EXT1 160GB 15000h EXT2 160GB 15000h EXT3 160GB 15000h EXT4 160GB 15000h EXT5 160GB 15000h EXT6 160GB 15000h EXT7 160GB 15000h 2 160GB 15000h 160GB 15000h 160GB 15000h 160GB 15000h 160GB 15000h 160GB 15000h 160GB 15000h 160GB 15000h 3 160GB 15000h 160GB 15000h 160GB 15000h 160GB 15000h 160GB 15000h 160GB 15000h 160GB 15000h 4 160GB 15000h 160GB 15000h 160GB 15000h 160GB 15000h 160GB 15000h 160GB 15000h 160GB 15000h Remaining Normal REC Area 1800GB Event REC Area 1200GB Copy Area 1000GB Copy 1(Rear) Copy 2(Front) 1000GB 1000GB I Warning for Disk Life Time I HDD Safety Mode 3000h ON b Press the SETUP/ESC button for 2 seconds or more. The SETUP MENU will be closed. The unit will restart automatically and the HDD SAFETY MODE window will be displayed. The HDD safety mode will begin. The camera selection buttons (1 - 16 for the WJ-HD316, 1 9, 0 for the WJ-HD309) will light green and orange (for 2 seconds each) alternately. The following window will be displayed after around 30 seconds. Start maintenance after this window is displayed. The procedures are different between the replacement of the hard disks and the installation of the unit (rack mounting/unmounting). Refer to the following descriptions. 68
-
 1
1 -
2
-
3
-
4
-
5
-
6
-
7
-
8
-
9
-
10
-
11
-
12
-
13
-
14
-
15
-
16
-
17
-
18
-
19
-
20
-
21
-
22
-
23
-
24
-
25
-
26
-
27
-
28
-
29
-
30
-
31
-
32
-
33
-
34
-
35
-
36
-
37
-
38
-
39
-
40
-
41
-
42
-
43
-
44
-
45
-
46
-
47
-
48
-
49
-
50
-
51
-
52
-
53
-
54
-
55
-
56
-
57
-
58
-
59
-
60
-
61
-
62
-
 63
63 -
 64
64 -
 65
65 -
 66
66 -
 67
67 -
 68
68 -
 69
69 -
 70
70 -
 71
71 -
 72
72 -
 73
73 -
74
-
75
-
76
-
77
-
78
-
79
-
80
-
81
-
82
-
83
-
84
-
85
-
86
-
87
-
88
-
89
-
90
-
91
-
92
-
93
-
94
-
95
-
96
-
97
-
98
-
99
-
100
-
101
-
102
-
103
-
104
-
105
-
106
-
107
-
108
-
109
-
110
-
111
-
112
-
113
-
114
-
115
-
116
-
117
-
118
-
119
-
120
-
121
-
122
-
123
-
124
-
125
-
126
-
127
-
128
-
129
-
130
-
131
-
132
-
133
-
134
-
135
-
136
-
137
-
138
-
139
-
140
-
141
-
142
-
143
-
144
-
145
-
146
-
147
-
148
-
149
-
150
-
151
-
152
-
153
-
154
-
155
-
156
-
157
-
158
-
159
-
160
-
161
-
162
-
163
-
164
 |
 |
