Panasonic WVCW974 WVCW974 User Guide - Page 29
Electronic Sensitivity Enhancement SENS UP, Shutter Speed SHUTTER
 |
UPC - 791871505373
View all Panasonic WVCW974 manuals
Add to My Manuals
Save this manual to your list of manuals |
Page 29 highlights
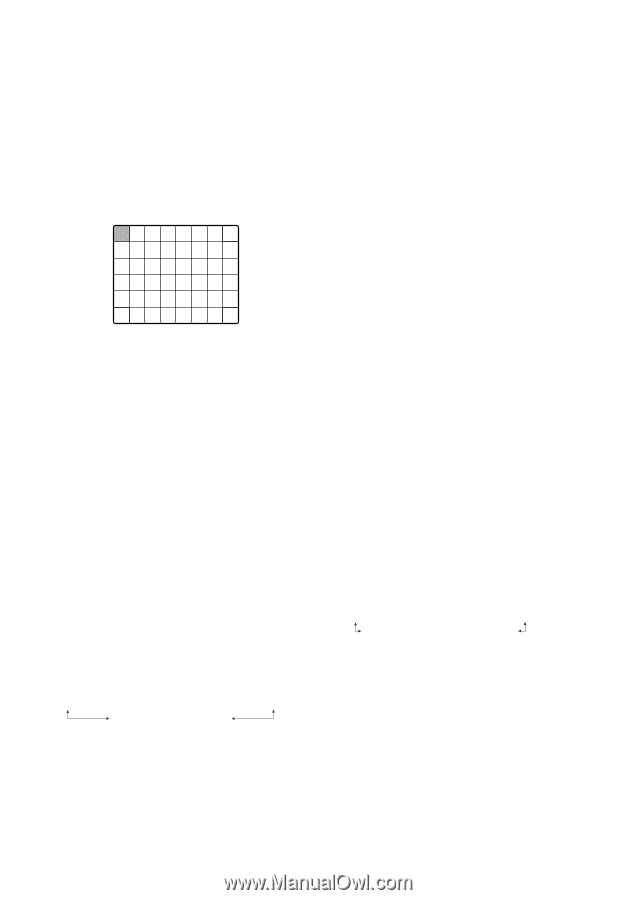
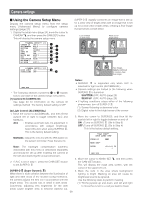
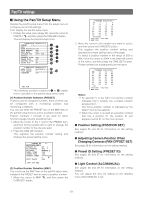
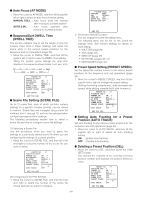
(2) Press the CAM (SET) button to mask the cell. Moving the cursor to a cell that is already masked causes the blinking pattern of the cursor to alternate between horizontal stripes and white. Pressing the CAM (SET) button while the cursor is located at a masked cell cancels the masking of the cell. To cancel all masking areas, press the F3 button. (3) After masking all of the cells you want, press the MON (ESC) button to return to the ALC CONT menu in step 1. Notes: • When AUTO is selected for the shutter setting, fluorescent lighting may cause flickering of the picture. If this happens, select OFF or 1/100 for the shutter speed setting. • AUTO is disabled when MANUAL is selected for light control (ALC/MANUAL) and FIX is selected for electronic sensitivity enhancement (SENS UP). (4) Gain Control (AGC) 1. Move the cursor to AGC, and then tilt the joystick left or right to select a gain control setting. ON (LOW) : Low gain ON (MID) : Medium gain. This is the factory default setting. ON (HIGH) : High gain OFF : Fixed gain Note: When AGC is turned on, the noise reduction function automatically activates under low illumination to reduce digital noise. This also, however, can cause afterimages to be generated by moving objects, and 6. Move the cursor to LEVEL, and then tilt the joystick left and right to adjust the picture output level by panning and tilting the camera. For more information, see the DNR setting (page 31). (picture contrast). If you selected ON in step 3 of this procedure, best results can be obtained by setting a contrast level that is somewhat high. A contrast level that is too high, however, may increase the tendency of afterimages and noise. (5) Electronic Sensitivity Enhancement (SENS UP) 1. Move the cursor to SENS UP, and then tilt the joystick left or right to select an electronic sensitivity enhancement setting. The electronic sensitivity enhancement setting can be changed only when OFF or AUTO is selected for Note: If operation of the system controller's IRIS (OPEN, CLOSE) button during operation is done after the menu is closed, the LEVEL on the CAMERA menu is reflected and stored for these the shutter speed (SHUTTER) setting. Tilting the joystick cycles through the settings display in the sequence shown below. The factory default setting is OFF. settings. However, if the camera is in a preset position, it is reflected as a parameter of the preset position. To return to the initial factory default level, execute the system controller's iris reset. When SUPER-D 3 is turned off OFF ↔ X2 AUTO ↔ X4 AUTO ↔ X6 AUTO ↔ X10 AUTO ↔ X16 AUTO X32 FIX X32 AUTO X16 FIX ↔ X10 FIX ↔ X6 FIX ↔ X4 FIX ↔ X2 FIX ↔ OFF (3) Shutter Speed (SHUTTER) 1. Move the cursor to SHUTTER, and then tilt the joystick left or right to select a shutter speed setting. Tilting the joystick cycles through the shutter speed When SUPER-D 3 is turned on OFF ↔ X2 AUTO ↔ X4 AUTO ↔ X6 AUTO X32 AUTO ↔ X16 AUTO ↔ X10 AUTO settings display in the sequence shown below. (unit: sec) Notes: • The following are the differences between AUTO When SUPER-D 3 is turned off OFF ↔ AUTO ↔ 1/100 ↔ 1/250 ↔ 1/500 ↔ 1/1000 1/10000 ↔ 1/4000 ↔ 1/2000 and FIX. AUTO: Selecting X32 AUTO, for example, automatically increases sensitivity, up to a maximum of 32 times. When SUPER-D 3 is turned on OFF ↔ AUTO FIX : Selecting X32 FIX, for example, increases sensitivity 32 times. The FIX settings cannot be selected when the AUTO: This setting, by moving the shutter automatically when necessary, provides a clearer picture of extremely bright objects shutter speed (SHUTTER) setting is 1/100. • SENS UP is set to 2x automatically if it is set higher than 2x when auto tracking starts. outdoors, etc. This is the factory default setting. OFF : Fixed at 1/60 seconds. -29- Caution: Turning on SENS UP can cause digital noise and white spots (blemish) to appear in the picture.
-
 1
1 -
2
-
3
-
4
-
5
-
6
-
7
-
8
-
9
-
10
-
11
-
12
-
13
-
14
-
15
-
16
-
17
-
18
-
19
-
20
-
21
-
22
-
23
-
 24
24 -
 25
25 -
 26
26 -
 27
27 -
 28
28 -
 29
29 -
 30
30 -
 31
31 -
 32
32 -
 33
33 -
 34
34 -
35
-
36
-
37
-
38
-
39
-
40
-
41
-
42
-
43
-
44
-
45
-
46
-
47
-
48
-
49
-
50
-
51
-
52
-
53
-
54
-
55
-
56
-
57
-
58
-
59
-
60
-
61
-
62
-
63
-
64
-
65
-
66
-
67
-
68
-
69
-
70
-
71
-
72
-
73
-
74
-
75
-
76
-
77
-
78
-
79
-
80
-
81
-
82
-
83
-
84
-
85
-
86
-
87
-
88
-
89
-
90
-
91
-
92
-
93
-
94
-
95
-
96
-
97
-
98
-
99
-
100
-
101
-
102
-
103
-
104
-
105
-
106
-
107
-
108
-
109
-
110
-
111
-
112
-
113
-
114
-
115
-
116
-
117
-
118
-
119
-
120
-
121
-
122
 |
 |