Pentax UC-1 UC-1 Manual
Pentax UC-1 Manual
 |
View all Pentax UC-1 manuals
Add to My Manuals
Save this manual to your list of manuals |
Pentax UC-1 manual content summary:
- Pentax UC-1 | UC-1 Manual - Page 1
PENTAX® OPERATING MANUAL PANRAM TJC-1 - Pentax UC-1 | UC-1 Manual - Page 2
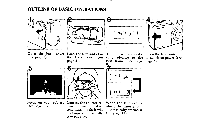
OF BASIC OPERATIONS '94 3 ; Open the back cover Load the film and close The film will automati- Open the lens protector (see page 7). the back cover , the flash will discharge automatically (see page 14). When the film is fin- ished, the camera will automatica❑y rewind it (see page 18). - Pentax UC-1 | UC-1 Manual - Page 3
loading, film speed setting, winding/rewinding, focus and exposure control-are automatic, you can take great pictures effortlessly. The DATE model makes it easy to remember the dates when you took pictures. • Please read this manual carefully before operating the camera to take consistenly superior - Pentax UC-1 | UC-1 Manual - Page 4
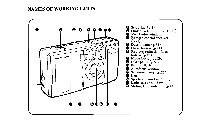
NAMES OF WORKING PARTS O el Strap lug (p.3) • Shutter release button (p.14) O Viewfinder window O Remote control receiver (p.28) oO Date button (p.33) Drive button (p.21) O Red-eye reduction flash button (p.20) 43 Mode button (p.20) O LCD panel (p.51) O Built-in flash ® Autofocus window Self-timer - Pentax UC-1 | UC-1 Manual - Page 5
or hair. • Avoid leaving the camera for extended periods in places where repaired under the terms of the warranty. Therefore, handle the camera with great care. • Never use solvents such as paint thinner, alcohol or benzine to clean the camera. PRECAUTIONS FOR BATTERY The misuse of a battery - Pentax UC-1 | UC-1 Manual - Page 6
battery check 3. How to hold the camera TAKING 3 4 5 TAKING PHOTOGRAPHS I. Usable film 6 2. Film Battery exhaustion warning 36 Installing/Replacing the battery 37 Flash effective ranges 39 Red-eye phenomenon 39 Taking care of your camera 40 Practical shooting guide 42 Troubleshooting - Pentax UC-1 | UC-1 Manual - Page 7
PREPARATIONS BEFORE TAKING PHOTOGRAPHS For optimum performance you should familiarize yourself with certain fundamentals before taking any photographs. STRAP ATTACHMENT Fit the strap on the camera as illustrated. Use the illustrated part of the strap to open the battery chamber cover. 3 - Pentax UC-1 | UC-1 Manual - Page 8
, open the lens protector until it clicks. The lens extends slightly. The camera is now ready to shoot. To switch off, close the lens protector. When not in use, make sure that the lens protector is closed. • Use one 3V lithium battery, type CR I23A or the equivalent. Do not remove the - Pentax UC-1 | UC-1 Manual - Page 9
the picture will be blurred.) Try to brace your elbows against your body, or support yourself and the camera against a stable, stationary object, such as a wall. When using the flash with the camera positioned vertically, hold the camera so that the flash is above the lens. Note: • Make sure not to - Pentax UC-1 | UC-1 Manual - Page 10
4110" USABLE FILM TAKING PHOTOGRAPHS DX FILM Perforations Film cart idge After reading this instruction manual you should be familiar with the functions available on the camera, and you're ready to insert the film. Notes: • When buying DX-coded films, ensure that the package bears the "DX" mark. - Pentax UC-1 | UC-1 Manual - Page 11
of the rewind shaft first and then slide the top end into the camera. 3 Pull the film leader out far enough from the cartridge to reach the take-up spool 0. Align the tip of the film with the film leader end mark 0. Notes : • Make sure the film is placed properly be- tween the guide rails 9. • If - Pentax UC-1 | UC-1 Manual - Page 12
winding. The indication appears as shown above. If ( i ) does not appear on the LCD panel, it indicates that the film is not properly loaded. If this occurs, reload the film. If the film is not properly loaded, ( E ) blinks on the LCD panel. • The exposure counter indication will remain on even if - Pentax UC-1 | UC-1 Manual - Page 13
the subject is closer than lm, the picture area is automatically changed and compensated. Autofocus is referred to as "AF". Shooting ranges (effective camera-to-subject distance) • The ordinary setting and panoramic mode allow a shooting range from co (infinity) to 0.3m (lft). • Subjects closer than - Pentax UC-1 | UC-1 Manual - Page 14
Close distance compensation frame Ordinary photography (Standard format) Panoramic format picture C II C II The shooting range from approx. 0.6m l.2ft) to Im (3.3ft). The shooting range from approx. 0.3m (l ft) to 0.6m (2ft). C II • When the close distance compensation frame appears in the - Pentax UC-1 | UC-1 Manual - Page 15
Ale LAMP INDICATIONS 1=1. .1= (oopa p&p arC When you depress the shutter release button halfway down, the lamps 0 and/or 0 light up or blink. OGreen lamp : When the subject is in focus, it will light up to indicate that you can take the picture ; when the subject is out of focus, it will blink, - Pentax UC-1 | UC-1 Manual - Page 16
When the power is switched on by opening the lens protector, the camera automatically selects the Auto and Single-Frame Shooting modes. These modes are used modes. • When the built-in flash automatically discharges, the camera uses a shutter speed of approx. 1/40th of a second when ISO l00 - Pentax UC-1 | UC-1 Manual - Page 17
button halfway down. When the subject is in focus, the green lamp will light up. The green lamp and the autofocus frame blink when the camera is not able to obtain proper focus for one of the following reasons. 1. The subject is too close. 2. The subject is difficult to autofocus. (See - Pentax UC-1 | UC-1 Manual - Page 18
result in "red-eye", the red dot in your subject's eye. This camera includes a red-eye reduction flash function, which reduces the red-eye phenomenon by . See page 20 and 39 for details. Flash effective ranges (Nega-color film used) When the red lamp is lit continuously, make sure that you are - Pentax UC-1 | UC-1 Manual - Page 19
HARD-TO-AUTOFOCUS SUBJECTS The autofocus system is highly precise, but not perfect. Some subjects may not focus as you wish. In such a case, use the focus-lock technique on a subject near the actual one and equidistant from the lens. (See page 16.) The subjects which may fool the autofocus system - Pentax UC-1 | UC-1 Manual - Page 20
FOCUS-LOCK SHOOTING X C If you shoot without positioning the autofocus frame (C)) on the main subject of the illustration as shown above, only the background will be in focus. When the main subject is off the autofocus frame in the center of the viewfinder, use the focus-lock technique. (Focus lock - Pentax UC-1 | UC-1 Manual - Page 21
I II 3 While depressing the shutter release button halfway down, re-aim the camera or recompose the picture, then release the shutter. Note: • You can release focus lock simply by lifting your finger from the shutter release button. 17 - Pentax UC-1 | UC-1 Manual - Page 22
the shade or use your body to shade the camera.) '44 ...O• • • • '94 g *I :GI 1am • '94 .c ..rf Zo• • 1 Rewinding the film After you have exposed the last frame of the roll, the lens retracts and the film rewinds automatically. Then, the motor stops, and ( 0 ) blinks as shown to indicate - Pentax UC-1 | UC-1 Manual - Page 23
3 seconds. ( ) appears on the LCD panel, indicating that the mid-roll film rewinding mode has been set. 2 While holding down the drive mode button, depress the shutter release button. Film rewinding starts. When the roll of film is rewound to its end, the motor stops and ( (.1) blinks, indicating - Pentax UC-1 | UC-1 Manual - Page 24
(HOW TO SELECT MODES/RED-EYE TAKING BETTER PHOTOGRAPHS REDUCTION FLASH MODE) To set various exposure modes, depress the mode button 0. Auto DaylightSync 4 Slow -Shutter speed (Flash-OFF) 4 Slow-speedsync photography Bulb $, a B Bulb-sync B 040,0, (1) I. DAT I O Open the lens protector. - Pentax UC-1 | UC-1 Manual - Page 25
is released, the Auto and Single-Frame modes will return respectively. • Holding down the Drive Button 0 for more than three seconds sets the mid-roll rewinding mode (See page 19.). 21 - Pentax UC-1 | UC-1 Manual - Page 26
DAYLIGHT-SYNCHRO SHOOTING Depress the Mode --94 Button until the ( ) symbol app- C 7A0 0 0 ILVA,,m0 OAT 0 OJ ears on the LCD panel. The flash will discharge in both dark and bright conditions. When a portrait is taken with the subject in a backlight situation, the front of the subject may - Pentax UC-1 | UC-1 Manual - Page 27
useful for a natural existing light effect in low ambient light photography. Note : • When shooting in low light, the shutter speed gets slower, and camera shake is likely to blur your picture. Use of a tripod is recommended. Slow-Speed- ; Synchro Shooting (Flash- "VAD =WAAL, DATE On) Depress - Pentax UC-1 | UC-1 Manual - Page 28
useful for long exposures required for shooting fireworks and night scences, for instance. When using this mode, the camera should be mounted on a tripod so that the camera will be steady. A-7! aTAITE Bulb mode, approx. 3-sec. (ISO100) g I Bulb-synchro mode ( B ) 'itt:LEA, a 0 0 PAINED DATE - Pentax UC-1 | UC-1 Manual - Page 29
on the LCD panel. Notes on the Self-Timer shooting • Keep in mind that when starting the Self- Timer while standing in front of the camera, the camera may not focus the sub- ject. • To cancel the Self-Timer at any time after it's been activated, depress any one of the buttons - Pentax UC-1 | UC-1 Manual - Page 30
modes. The Self-Timer shooting mode cannot be used in this case. • Use the Remote Control to take pictures in the Bulb mode to avoid camera shake. While the Remote Control's shutter release button is held down, the shutter remains open up to a max. of 5 minutes. 26 - Pentax UC-1 | UC-1 Manual - Page 31
blinks slowly, indicating that you can take pictures with the aid of a Remote Control. • When the camera is set in the Remote Control Shooting mode and left unused for 5 minutes, the lens automatically retracts itself to save battery power and Single-frame will be set. Remote control transmitter 27 - Pentax UC-1 | UC-1 Manual - Page 32
• The Self-Timer lamp blinks rapidly for 3 sec- onds and then the shutter is released. If the shutter is released by the camera's release button, pictures will be taken in the ordinary 0 shooting mode. • Focus cannot be locked when the Remote Control is in use. The subject framed - Pentax UC-1 | UC-1 Manual - Page 33
does not work while the built-in flash is being charged. Battery life on the Remote Control About 30,000 commands can be issued using the Remote Control with a battery installed. If the battery is exhausted, please have it replaced at your local Pentax Service center (there is a charge for this - Pentax UC-1 | UC-1 Manual - Page 34
the roll by moving the panorama mode switch. The panoramic format picture allows horizontally positioned dynamic pictures to be taken (13 X 36mm on film). 1 Switching to the panoramic format picture Move the panorama mode selector switch to (P) to select the panoramic format mode. • When the format - Pentax UC-1 | UC-1 Manual - Page 35
selected. NOTES ON THE DEVELOPMENT OF PANORAMIC FORMAT PICTURES • When developing the film, if you have taken only panoramic format pictures on the entire roll of film, tell the clerk at the processing lab to develop the film with only the panoramic format. If there are both panoramic and standard - Pentax UC-1 | UC-1 Manual - Page 36
. Please consult the processing lab for more details. • Panoramic format processing facilities differ depending on the area and requirements. Your local film processor or camera dealers will advise you on all the options available to yor. • With panoramic format pictures, only the middle area of the - Pentax UC-1 | UC-1 Manual - Page 37
DATE MODEL '9 t 3 O If you purchased the DATE model, read this section. The DATE model records dates up to the year 2030 on pictures. O DATE Select button Adjust button Mode button Switching the Mode Press the Date button 0 with your Year Month Day finger, the mode on the LCD panel switches as - Pentax UC-1 | UC-1 Manual - Page 38
DATE (1E. Select button Adjust button (increase) Mode button (decrease) • The- -- -bar marks will appear after replacing the battery. • For correction after replacing the battery, the Year digits will blink if the button 0 is depressed only once, unnecessary to depress it for 3 seconds. Follow the - Pentax UC-1 | UC-1 Manual - Page 39
in that corner. • The data may not be imprinted correctly if the pictures are taken more than the specified number of frames indicated on the film canis- ter. * The date in the picture above is simulated. 35 - Pentax UC-1 | UC-1 Manual - Page 40
no operations can be performed. Battery life (using 24-exposure film rolls) : Approx. 30 rolls Using flash 50% of the time (using the CR123A battery and under Pentax testing conditions) (The CR123A battery was used under Pentax testing conditions. Actual battery life/performance may vary drastically - Pentax UC-1 | UC-1 Manual - Page 41
the lens protector) 1 Removing the battery chamber cover Remove the battery chamber cover by turning the cover lock in the direction of the arrow with the strap clamp. 2 Installing the battery (Use one 3V lithium battery CR-123A or the equivalent) Insert one lithium battery with the plus / minus - Pentax UC-1 | UC-1 Manual - Page 42
2 The data is initialized to 94 1 1, 1 0:00 and the . -- - - marks appear on the LCD panel when the battery chamber is opened. (See page 34 for correcting data.) 3 Closing the battery chamber cover e ) To close the battery chamber cover, first make sure that the dot is facing the ( mark on the - Pentax UC-1 | UC-1 Manual - Page 43
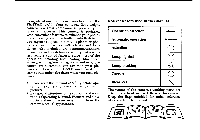
OTHER THAN ISO 100,200 or 400 AND RED-EYE PHENOMENON IN FLASH PHOTOGRAPHY The correct camera-to subject distances when using films other than ISO 100, 200 or 400 are indicated in the table below. ISO Distance 25 0.3-1.9m 50 0.3-2.6m 800 0.5*-11.3m 1600 0.7 *-16.0m - Pentax UC-1 | UC-1 Manual - Page 44
or splashing water, wipe it off immediately with a dry soft cloth. • Do not drop the camera or allow it to hit a solid object. If the camera suffers a severe shock or impact, take it to a Pentax service center for inspection. • Be careful not to subject it to strong vibrations, shock or pressure - Pentax UC-1 | UC-1 Manual - Page 45
water, dirt or dust at points of electrical contact. Also check for battery leakage, traces of dirt or grease, or corrosion due to salinity or gas. If you cannot correct the problem, have your camera inspected at a Pentax service center. Repairs of this nature are not covered under the terms of the - Pentax UC-1 | UC-1 Manual - Page 46
PRACTICAL SHOOTING GUIDE j i Flash photography Taking a picture of people in low light situations p.12 Minimizing the picture of a red-eye effect p.20 Taking a portrait picture whose face is - Pentax UC-1 | UC-1 Manual - Page 47
p.23 Taking a picture of night scenery p.24 Taking a picture of people with night scenery in background p.24 W Others Taking a picture at a distant place from the camera p.26 Imprinting data on a picture p.33 43 - Pentax UC-1 | UC-1 Manual - Page 48
TROUBLESHOOTING What appears troublesome may be easily remedied. Here are some problems that may occur and their remedies. Symptoms 1.The shutter cannot he released. Causes and Remedies • Is the lens protector closed? If so, open it. (See page 4.) • Is the battery you leave the camera unused for - Pentax UC-1 | UC-1 Manual - Page 49
being charged. Wait until it fully charges. (See page 29.) 5. The ( H ) or ( L ) mark is displayed on the LCD panel. • If either mark disappears when the camera is ready for use. The camera may be defective if either mark appears often. 45 - Pentax UC-1 | UC-1 Manual - Page 50
roll. Auto stop upon completion of rewinding. Rewinding time : approx 20 sec. with 24-exposure film. Rewinding in mid-roll provided. Automatic readout of successive frame numbers in ascending order when shooting, and descending order when rewinding. Pentax 32mm f/3.5 3 elements in 3 groups, Angle of - Pentax UC-1 | UC-1 Manual - Page 51
film used). Approx. 3 sec. under Pentax testing conditinos. range : Remote control : Infrared wireless remote control, Effective range : 5m when projected from the camera's front. Power source for Remote : Size & weight for One lithium battery CR1620 (replaced by the Pentax Service facility - Pentax UC-1 | UC-1 Manual - Page 52
the equipment does not show evidence of impact, sand or liquid damage, mishandling, tampering, battery or chemical corrosion, operation contrary to operating instructions, or modification by an unauthorized repair shop. The manufacturer or its authorized representatives shall not be liable for any - Pentax UC-1 | UC-1 Manual - Page 53
approved repair shops, unless you are sending it directly to the manufacturer. Always obtain a quotation for the service charge, and only after you accept the quoted service charge, instruct the service station to proceed with the servicing. This warranty policy does not apply to Pentax products - Pentax UC-1 | UC-1 Manual - Page 54
NAMES OF WORKING PARTS i t 0 a 0 50 ® Panorama mode selector switch (p.30) e0 Viewfinder eyepiece Green lamp indication (p.11) ®0 Red lamp indication (p.11) Film information window e Back cover release lever (p.7) e49 Tripod socket Battery chamber cover ® (p.37) Back cover (p.7) J - Pentax UC-1 | UC-1 Manual - Page 55
will not actually appears simultaneously as shown. ...„„ 'Ele Be!BB 69 Bulb (p.24) Q Data Information (p.33) e Exposure Counter (p.8) Battery Exhaustion Warning (p.36) e Film Rewind mode (p.19) Self-Timer (p.25) (9 Remote Control Shooting mode (p.27) Red-eye Reduction Flash mode (p.20) Slow-Speed - Pentax UC-1 | UC-1 Manual - Page 56
Europe n.v. Weiveldlaan 3-5, 1930 Zaventem, BELGIUM &Max Handelsgesellschaft mbH. Julius-Vosseler-Strasse, 104, D-22527 Hamburg, GERMANY I Pentax U.K. Limited. Pentax House, Heron Drive, Langley, Slough SL3 8PN, U.K. PeMax France S.A. Z.I. Argenteuil, 12, rue Ambroise Croizat, 95100 Argenteuil
-
 1
1 -
 2
2 -
 3
3 -
 4
4 -
 5
5 -
 6
6 -
 7
7 -
8
-
9
-
10
-
11
-
12
-
13
-
14
-
15
-
16
-
17
-
18
-
19
-
20
-
21
-
22
-
23
-
24
-
25
-
26
-
27
-
28
-
29
-
30
-
31
-
32
-
33
-
34
-
35
-
36
-
37
-
38
-
39
-
40
-
41
-
42
-
43
-
44
-
45
-
46
-
47
-
48
-
49
-
50
-
51
-
52
-
53
-
54
-
55
-
56
 |
 |
PENTAX
®
PAN
RAM
OPERATING
MANUAL
TJC-1