Pfaff 16 Owner's Manual
Pfaff 16 Manual
 |
View all Pfaff 16 manuals
Add to My Manuals
Save this manual to your list of manuals |
Pfaff 16 manual content summary:
- Pfaff 16 | Owner's Manual - Page 1
I 9L- - Pfaff 16 | Owner's Manual - Page 2
also provided for greater clarity and understanding of these instructions. Moreover, your attention is drown particularly to chapters 1, 2 and 5. After reading these you will have become thoroughly ocquointed with the work ing principle of your sewing machine; you will look upon it as a living thing - Pfaff 16 | Owner's Manual - Page 3
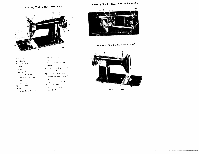
The Sewing Machine Head (Front View) The Sewing Machine Head (View of Underside) 0,, I BcrIpIc,i 7 R',l,lcl,' Sl,rl' 9 i'dlc Plr,i fl,,, 6 Prnsce, 7 0, c', Il'' 0, R'r A1 Sc, cv, ' P cc,', Prof in r3,1l 0, IIrr,IIc Cl 7 II,, errl I,3r lf 3 Rrqclrlcc S 14 Ac, 17 lJpp TI,, cccl Ie,, 16 S pr - Pfaff 16 | Owner's Manual - Page 4
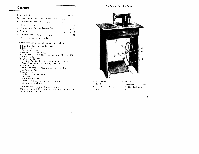
824 - a little wider) 1 Feller No, GK 823 '1 Quilting Guide No. 101; 1 Holder No. Z-l016 1 Feed Cover Plate for Darning, No. GK 4465 5 Bobbins No. 828 1 Packet of assorted Machine Sewing Needles, System No. 705 2 Sci'ewdi'ivers 1 Battle Sewing Machine Oil 1 Oil Can 1 Threader No, 188 1 Thread Take - Pfaff 16 | Owner's Manual - Page 5
, place the belt under the belt shifter, turn the eLse belt mount hondwheel the wheel, over When towards wishing you, and to drop let the Sewing Machine Head out of the way turn the bandwheel aver towards you, and, at the same time, press the belt to tfie right so thol it - Pfaff 16 | Owner's Manual - Page 6
Threading Plcice a reel of cotton on the spool pin (Fig. 2), and draw the thread through guide ii, then down and to the left between the tension discs b, then under the regulator spring the bobbin the sew Fiq 3 - Pfaff 16 | Owner's Manual - Page 7
in Fig. 7. The shuttle is pro. perly threaded if the thread con be drawn out freely. Replacing the Shuttle When returning the Shuttle to the machine make sure that the small spring is on top, and turned towards you. the point Drawing the Under Thread through the Needle Plate Hold the - Pfaff 16 | Owner's Manual - Page 8
knob by turning it in a clockwise direction. If you wish to do reverse sewing you must first push the lever passed '0" and right up to the top. Regulating the Thread Tensions The upper the Work from the Machine 3tMtbhh'aeeorvlnoenleniexfgetttehdrelsa,eet.wnatneiNhnedegod.wldbearacstwkeoveoitrtfhs - Pfaff 16 | Owner's Manual - Page 9
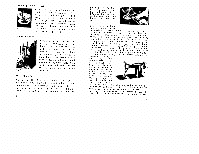
h ansi run the raised cecirn once more through the feller, sewing the edge clove flat. Qajilting Standard Presser Foot No. 552; Quilting Guide No. 101; Holder No, Z-1016 (Fig. 16). Padded mater icil con be sewn effectively with the aid of quilting guide No. 101, which enables you to lay pcrrollel 13 - Pfaff 16 | Owner's Manual - Page 10
.o Fix the quilter guide support over the presser bar so that it is immedia tely above the foot and encircles it. Now push the straight guide rod from right to line of stitches about /r from the left edge of the hale. Work the machine fast and with an even rhythm, and, at the some time, move the - Pfaff 16 | Owner's Manual - Page 11
stitch regulating lever for a short stitch, aid place the sritch lines close together, moving the lever up and down to obtain alternately Imward and reverse sewing. 16 5. Cleaning and oiling To keep the machine at a high pitch of efficiency good care must be taken of it. Mere dusting of the - Pfaff 16 | Owner's Manual - Page 12
of parafhn to the lubrication points. Then work the machine apidly (see above>, wipe all ports, and apply a film of lresh oil, All points marked thus "a on the a 1 aced nt illustrations must be cleaned and - Pfaff 16 | Owner's Manual - Page 13
- tighten the screw (see page 10: "Regulating the Thread Tensians"). 4. The hole in needle plate has developed a rough edge, and catches the thread - consult a sewing machine expert. Stitches are skipped 1. The needle has been set either too high or too low, or it is bent or blunt - straighten it or - Pfaff 16 | Owner's Manual - Page 14
for your purpose change the thread. 4. The needle used is not of the system marked on the bedplate stide of your machine - obtain the correct needle from the suppliers of your machine. The Needle breaks 1 The needle is wrongly inserted, or it is bent - change it (see page 5: "Setting the Needle - Pfaff 16 | Owner's Manual - Page 15
If you hove ony trouble with your sewing mochine, in spite of the (oct thot you hove corefully corned out the directions conjoined in this book, then pleose get in touch with the suppliers of your mochine. They will olwoys be glod to help you.
-
 1
1 -
 2
2 -
 3
3 -
 4
4 -
 5
5 -
 6
6 -
 7
7 -
8
-
9
-
10
-
11
-
12
-
13
-
14
-
15
 |
 |
9L-
I