Pfaff 16 Owner's Manual - Page 6
Attaching, Presser, Upper, Threading
 |
View all Pfaff 16 manuals
Add to My Manuals
Save this manual to your list of manuals |
Page 6 highlights
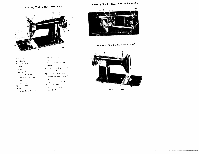
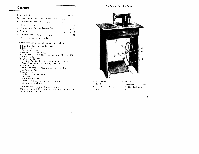
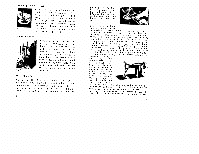
Attaching the Presser Foot For all normal sewing work use the stan dard presser loot No. 552, (Fig. 1). Raise the needle to its highest point, and lift the presser bar lifter. Take the presser foot with your right hand and Ii orn be low push it on to the presser bar, against the screw. First tighten the screw with F1ç 1 your left hand, and then use a screw driver for finol lightening. Upper Threading Plcice a reel of cotton on the spool pin (Fig. 2), and draw the thread through guide ii, then down and to the left between the tension discs b, then under the regulator spring r and up, hen from front to buck through the thread take-up lever d, down and behind thread guide e, through the eyelet I on needle clamp, and finally from left to right through the eye of the needle Under Threading Removing the Shuttle and Bobbin: Pullout the berlplote slide to the front, as for as it will go. Turn the balance wheel over towards you until the shuttle is right in front of you. Press to the right the small latch fitted to the shuttle coi ncr (Fig. 3), thus releasing the shuttle and 1) llowiiig it to rise slight ly. In this raised position Ihe shuttle can easily be tciFen out. Turn the shuttle op-side-down, and let the bobl,in fall into your hand. Before winding the thread an to the bobbin the sew Fiq 3 mWsTottbtdcliheuuhoinhyeenrrrgoheoenoaenseswtniuhirenonmsetolgonnehgfhlieftaidnhtncootiigethitffsnch,hejwatgeuehrnatittlitehchheinnisfntesversdedhmmegsceeemarrrhars t oteidhtolawmbhlep-all-he-lao,nuIelhsnisoacbtaoaetcmieunoromlneenitecbboswnsteeebtrFgiwareitoitrnhgiwphnndeoucetshhnoite,4entsenlr,hect,eoobealreteueoshwhlntwtbwrsehdiob,htfeiomhautiofhnropwgoubfrhuylhaoedyaproictbsisocelhutttsabheruhiereotrireiedfntnoitrs,hfwilwiowegsrofniTheifutintlioatnhthtdtntdiedwshesehgepdraaoratotbnirh,h.snododteirhdlnmsbocNr,bulleaaeopeitgabknfbhnnixtdhynedyee..t enable easy insertion of the bobbin. As soon as the bobbin has n been correctly posi tioned the bearing is 0 drown inwards by the act ion of a spring, thus firmly retaining the bobbin in position. Now press lever a, to bring the winder into contact with the ba Fg 4 rotnloeaausnwlttlcooyaemrredtohwstetihhcyeseaotelouflcp,y,oanamannnsnoedtcisotsocineoootnnmsctmhrwaeeseiwtnhlctamhettetuhesetrtrbeoshiotbneidttbcolriihena-tmgfig.oiosrhtmTitfoehuinnenllegydwbymilinonedtacueodhrrrenaddinsne.itrgsomFptosii.t 7
-
 1
1 -
 2
2 -
 3
3 -
 4
4 -
 5
5 -
 6
6 -
 7
7 -
 8
8 -
 9
9 -
 10
10 -
 11
11 -
 12
12 -
13
-
14
-
15
 |
 |
