Pfaff 16 Owner's Manual - Page 8
r-rzztEEE
 |
View all Pfaff 16 manuals
Add to My Manuals
Save this manual to your list of manuals |
Page 8 highlights
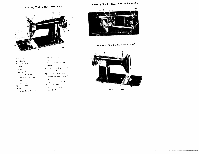
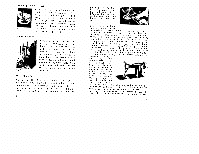
knob by turning it in a clockwise direction. If you wish to do reverse sewing you must first push the lever passed '0" and right up to the top. Regulating the Thread Tensions The upper threod tension is regulated by turning the thumb nut of the thread tension discs. Clockwise turning W 11i ucreuse the tension; anti-clockwise adlust ment will reduce ii. The under thread tension is regulated by turning the small screw ii (Fig. 7) with the aid of n screwdriver. Here, too, the tension incredses when adjusting clock wise, and dcci eases when o 1 ustid ng anti-clockwise. F1c tO r-rzztEEE Fig it Usually any incorrect tension will be experienced on the upper thread. Therefore, any necessary alteration should be carrier] out there first, but, should this not bring about (in imorOvCmcnt, the under thread tension should be a 1 ustc edl. Satisfactory stitching can ho ohtuinecf only ii upper and under thread tensions are correct. After you hrive sewn a few inches check the stitching on top and underneath. The tensions are satisfactory if both threads are drown in eualfy cind lock in tfse centre of the work (Fig. 10). 10 susmtti(InhhlFflniaoirrgdgceerhhc.keeaaioterlddw1ysnt1cieed)ltnltoiveoetbstcenhsikorosteowhfinffoebsiunsteapibtelethepycnetflehhtid,tretetiumstlreetre. hnlnacoleritbsot.neoeiiyooorgpaiipnnndsatu.elto,hdrocisnnenoIifitnnttatootghtniaoiohnsutfeiumtt-sheepcslberaeluoocvnstsckneosadmk,irudebewtaihrallulsyeineltssi,oddetsitefnchatodmhrgnarieeotudmrwefsetctrthydhititgibe/hoeoheeu(natF,uun.giwpngmiiv..pdotueheers7enkerrt). totLhewoenoisnpiloegsfnt.ftoobrymeinxtugcrensoisnnivgetotphuepopftehruthmethbrmeanadutteritoaenlnsi(toFening.s. ioC1n2o)rrdmeicsactys be the to Only if none of the above-named the stitch-forming, should the under tension, by turning the screw i/ (Fig. odtustments corrects thread be given more 7) to the right. Regulating the Pressure on Material AmspTfinoerhnegweuetnsniit-sndocpugnlsrrocesecarselkestxiiwwgrescehrfieqtsapouecbntitriaroioarenrdntddoylai.puslslamyTtsnomeeofdtdheientiueahnatmntevcsrryuneebwrodaaeorsuremreciagemahhsltausthtrstepedhtmareedpbamsyerptseerauserttfrsiueseeausrrelurinsdaewre.ledshw.Otihchcinhesellonygcwakrwdiewwlljaouhitsrbeeseknetr. Removing the Work from the Machine 3tMtbhh'aeeorvlnoenleniexfgetttehdrelsa,eet.wnatneiNhnedegod.wldbearacstwkeoveoitrtfhs etthhhemieghatphteersrreteisaasdlpesor,tionftlo,etoahtvre,ainisabgenodctkthh,ereemcalpderayaebrsosfueoorrtf 11
-
 1
1 -
2
-
 3
3 -
 4
4 -
 5
5 -
 6
6 -
 7
7 -
 8
8 -
 9
9 -
 10
10 -
 11
11 -
 12
12 -
 13
13 -
14
-
15
 |
 |
