Pfaff 16 Owner's Manual - Page 7
Sewmçj
 |
View all Pfaff 16 manuals
Add to My Manuals
Save this manual to your list of manuals |
Page 7 highlights
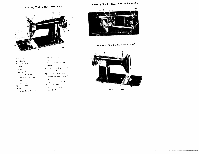
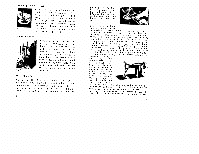
Fiq, S 8 Threading the Shuttle Tal
-
 1
1 -
 2
2 -
 3
3 -
 4
4 -
 5
5 -
 6
6 -
 7
7 -
 8
8 -
 9
9 -
 10
10 -
 11
11 -
 12
12 -
13
-
14
-
15
 |
 |

Threading
the
Shuttle
Tal<o
the
shuttle,
point
down,
into
your
left
hand
and
with
your
right
hand
insert
he
bobbin,
also
with
ts
point
down,
from
obove
into
the
shuttle,
so
that
the
thread
let
off
is
from
left
to
right
(Fig.
5).
Dra’N
the
thread
through
the
slot
a,
which
is
near
the
edge
of
the
shuttle,
and
then
to
the
delivery
hole
Ii
near
the
point
of
the
shuttle
—
see
Fig.
6.
From
there
take
the
tfsread
uncfer
the
spring
i
and
up
again,
as
shown
in
Fig.
7.
The
shuttle
is
pro.
perly
threaded
if
the
thread
con
be
drawn
out
freely.
Replacing
the
Shuttle
When
returning
the
Shuttle
to
the
machine
make
sure
that
the
small
spring
is
on
top,
and
the
point
turned
towards
you.
Drawing
the
Under
Thread
through
the
Needle
Plate
Hold
the
end
of
the
upper
thread,
leaving
the
thread
slack.
Turn
the
balance
wheel
over
towards
you
to
let
the
needle
travel
down
and
up
again
to
its
highest
point.
In
doing
so
it
will
loop
the
under
tfiread
and
draw
it
up
through
the
needle
pfate
(Fig.
8).
The
end
of
the
thread
can
then
be
drawn
out
fully,
and,
together
with
the
upper
thread,
be
placed
under
and
behind
the
pres
car
foot.
L
2
L
Sewmçj
0
eneral
Fr
all
normal
sewing
warts
use
standard
presser
foot,
F’Jo
552.
Move
the
thread
toke.up
lever
to
its
highest
point.
Place
the
material
under
the
presser
foot,
lower
the
presser
bar
lifter,
and
start
to
sew.
Do
not
pull
the
muterial,
but
only
guide
it.
Alter
you
hove
practised
sufficiently
on
some
reninants,
make
ci
few
stitch
runs
to
t
est
the
stitch
length
and
the
threcid
tension,
to
ensure
that
they
are
satisfactory
and
suitoble
for
the
fabric
to
be
sewn.
When
sewing
lioi
cI
or
thick
ports
of
the
mnteriol,
or
when
stitching
aci
oss
seams,
assist
the
needle
by
carefully
turning
the
balance
wheel
with
your
hand.
This
will
pro.
vent
the
needle
from
bending
or
breaking.
Before
sewing
the
corner
of
ci
seam
draw
with
a
hand
sewing
needle
a
thread
through
the
material,
and
then
sew
along
one
edge.
Turn
t
he
corner
(Ii
ft
the
presser
bai
before
turning,
and
then
lower
it
again),
and
continue
to
sew
while
hold.
ing
bath
ends
of
the
tacking
thread.
This
svciy
any
stop.
page
which,
otherwise,
can
easily
occur
will
be
prevented.
Adjusting
the
Lenqth
of
Stitch
The
machine
has
in
front—on
the
right
a
stitch
regulating
lever
ii
(Fig.
9)
to
“,hich
is
fitted
a
knob
b
with
which
the
rnquirerl
stitch
length
can
be
set
on
the
scale
r.
“0”
on
the
scale
mdi
cafes
neutral
position.
You
increase
the
shtch
by
turning
the
knob
anti.clockwise
aid
pushing
the
lever
downwards.
To
decrease
the
length
of
stitch
you
must
pull
the
lever
up
towards
“0”.
After
each
sctiiig
you
must
slightly
tighten
the
Fiq,
S
8
9