Pfaff 295-1 Owner's Manual - Page 10
the oobbin.
 |
View all Pfaff 295-1 manuals
Add to My Manuals
Save this manual to your list of manuals |
Page 10 highlights
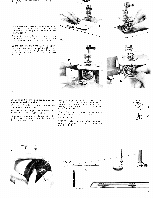
Balanced tensions are essential icr sewing Both tensions are correctly balanced f the needle and dobbin threads interlock .n the center of the material The bobbin thread tension is regulated by turning the small knurled screw on the bob bin case (Fig. 1). Turn this screw right (with your thumb nail) for a tighter tension, or left for a looser ten sion. the same size threacs are used n the needle and on the oobbin. there s no need to adlust the bobbin threaa tension. This tension s set correctly if a sight re sstance nas to be overcome when pulling the thread. 1 Numbers 0 to 10 indicate different degrees of tension on the upper tension dial (Fig 21 The higher the number, the tighter the ten sion For ordinary sewng operations, the ucper tension should be set between 3 and 5 Please note: Ease both :ensions somewnat for sewing Silk and other delicate fabrics. 16 The accessory box which belongs to your machine contains several sewing feet for special sewing operations, '7o change tne sewing foot. bring the needle to ts highest point and raise the foot T rn out screw ,l 16) until the sewing foot can be removed, tilting t sideways (see Figs. 1 & 2) foot is attached in the reverse ider. For, sewing elastic fabrics, attach ordinary sewing foot No. 93-838954-00 rather than clear-view sewing foot No 93-1001 79-00. 2 oottori 100 Upper tension too tight or lower tension too loose. bottom / top , Upper tension too .oose or lower tension too tignt. bottom top Both tensions correctly balanced .22 y 3 To change the needle, oring the needle bar to its highest point and lower the sewing foot. Loosen needle set screw (22) and pull lhe old needle out of the needle clamp. Insert new needle and push it up as far as it will go (Fig. 3), making sure that the flat side of its shank aces toward the back. Tighten screw (221 secureiy. Use system 130 needles as indicated in the table on the inside rort cover 17
-
 1
1 -
2
-
3
-
4
-
 5
5 -
 6
6 -
 7
7 -
 8
8 -
 9
9 -
 10
10 -
 11
11 -
 12
12 -
 13
13 -
 14
14 -
 15
15 -
16
-
17
-
18
-
19
-
20
-
21
-
22
-
23
-
24
-
25
-
26
-
27
-
28
 |
 |
