Pfaff 295-1 Owner's Manual - Page 8
Cpfafd
 |
View all Pfaff 295-1 manuals
Add to My Manuals
Save this manual to your list of manuals |
Page 8 highlights
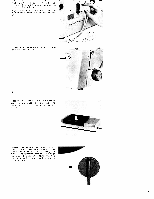
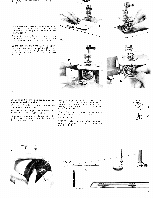
A B The sewing foot is raised and lowered by operating the presser bar lifter on the back of the machine (see ill.). A = Presser bar lifter up 8 - Presser bar lifter down To draw up the bobbin thread, hold the needle thread and lower the sewing foot Turn the balance wheel toward you a full turn. Pull the needle thread to draw up the bobbin thread. Place both threads back under the sewing foot after it has been raised again. 12 Fundamentals of machine operation Before you begin working your machine you should know the following: Turn utility-stitch control (5) clockwise (as indicated by arrows in Fig. 1) until the sym bol of the desired seam (straight stitch, zig zag stitch, etc.) is opposite the dot. For ordinary sewing, needle position lever (19) should be in its center position (Fig. 2). CPFAFD 2 Make sure take-up lever (2) is at its highest point before you begin and after you have completed a seam (Fig. 3). A'ways rotate balance wheel (8) toward you (see arrow). As you do this, check to make sure the stop motion knob is tightened firmly (Fig. 4). 3 4
-
 1
1 -
2
-
 3
3 -
 4
4 -
 5
5 -
 6
6 -
 7
7 -
 8
8 -
 9
9 -
 10
10 -
 11
11 -
 12
12 -
 13
13 -
14
-
15
-
16
-
17
-
18
-
19
-
20
-
21
-
22
-
23
-
24
-
25
-
26
-
27
-
28
 |
 |
