Pfaff expression 2048 Owner's Manual - Page 41
Deleting a pattern within the stitch sequence, Inserting a stitch into the stitch sequence
 |
View all Pfaff expression 2048 manuals
Add to My Manuals
Save this manual to your list of manuals |
Page 41 highlights
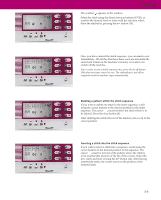
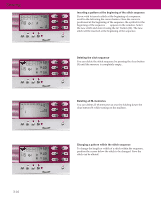
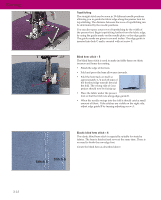
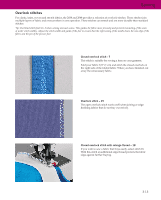
Sewing The symbol appears in the window. Select the stitch using the direct selection buttons (15-26), or scroll to the desired stitch or letter with the selection wheel. Store the stitches by pressing the m+ button (14). Once you have entered the stitch sequence, you can start to sew immediately. All stitches that have been sewn are automatically stored and remain in the machine's memory even after you switch off the machine. Tip: In order to sew a stitch sequence once, press the tie-off button (36) when you have started to sew. The embroidery is tied-off on completion and the machine stops automatically. Deleting a pattern within the stitch sequence If you wish to delete one stitch in the stitch sequence, scroll using the cursor buttons to the desired position in the stitch sequence. The cursor must be below the stitch which is to be deleted. Press the clear button (9). After deleting the stitch, the rest of the memory moves up to the cursor position. Inserting a stitch into the stitch sequence If you wish to insert a stitch into a sequence, scroll using the cursor buttons to the desired position in the sequence. The cursor must be in front of the pattern where the stitch is to be inserted (the position of the tip of the cursor). Select the new stitch and store it using the m+ button (14). After having inserted the stitch, the cursor moves to the position of the inserted stitch. 3:9
-
 1
1 -
2
-
3
-
4
-
5
-
6
-
7
-
8
-
9
-
10
-
11
-
12
-
13
-
14
-
15
-
16
-
17
-
18
-
19
-
20
-
21
-
22
-
23
-
24
-
25
-
26
-
27
-
28
-
29
-
30
-
31
-
32
-
33
-
34
-
35
-
 36
36 -
 37
37 -
 38
38 -
 39
39 -
 40
40 -
 41
41 -
 42
42 -
 43
43 -
 44
44 -
 45
45 -
 46
46 -
47
-
48
-
49
-
50
-
51
-
52
-
53
-
54
-
55
-
56
-
57
-
58
-
59
-
60
-
61
-
62
-
63
-
64
-
65
-
66
-
67
-
68
 |
 |
