Pfaff hobby 1132 Owner's Manual - Page 15
To remove the foot holder, To attach the foot holder, To remove the needle, To insert the needle,
 |
View all Pfaff hobby 1132 manuals
Add to My Manuals
Save this manual to your list of manuals |
Page 15 highlights
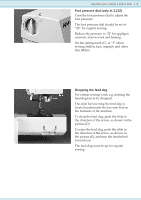
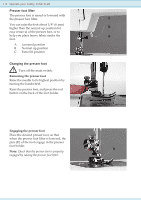
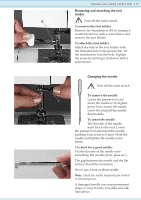
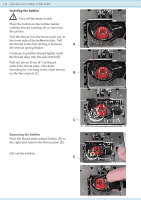
E F Operate your hobby 1132/1122 1:5 Removing and attaching the foot holder Turn off the main switch. To remove the foot holder Remove the thumbscrew (E) by turning it counterclockwise with a screwdriver and remove the foot holder. To attach the foot holder Match the hole in the foot holder with the threaded hole in the presser bar. Fit the thumbscrew into the hole. Tighten the screw by turning it clockwise with a screwdriver. Changing the needle Turn off the main switch. To remove the needle Lower the presser foot and move the needle to its highest point. Now loosen the needle screw (F) and pull the needle downwards. To insert the needle The Áat side of the needle must face to the rear. Lower the presser foot and insert the needle, pushing it up as far as it goes. Hold the needle and tighten the needle screw Àrmly. To check for a good needle: Put the Áat side of the needle onto something Áat (needle plate, glass etc.). The gap between the needle and the Áat surface should be consistent. Never use a bent or blunt needle. Note: Check the needle frequently for barbed or blunted points. A damaged needle can cause permanent snaps or runs in knits, Àne silks and silklike fabrics.
-
 1
1 -
2
-
3
-
4
-
5
-
6
-
7
-
8
-
9
-
 10
10 -
 11
11 -
 12
12 -
 13
13 -
 14
14 -
 15
15 -
 16
16 -
 17
17 -
 18
18 -
 19
19 -
 20
20 -
21
-
22
-
23
-
24
-
25
-
26
-
27
-
28
-
29
-
30
-
31
-
32
-
33
-
34
-
35
-
36
-
37
-
38
-
39
-
40
-
41
-
42
-
43
-
44
-
45
-
46
-
47
-
48
-
49
-
50
-
51
-
52
-
53
-
54
-
55
-
56
 |
 |
