Pfaff hobby 1132 Owner's Manual - Page 38
To open the buttonhole - test
 |
View all Pfaff hobby 1132 manuals
Add to My Manuals
Save this manual to your list of manuals |
Page 38 highlights
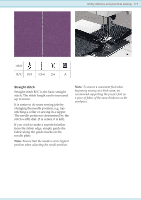
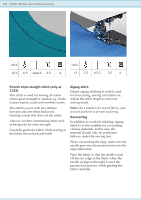
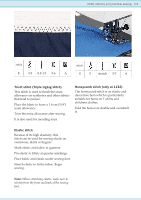
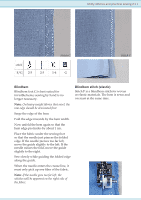
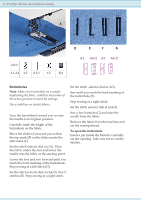
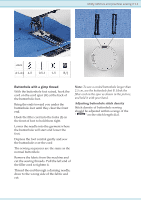
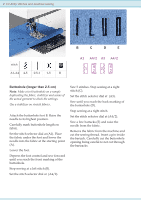
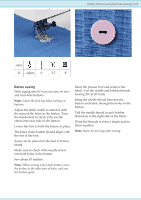
2:12 Utility stitches and practical sewing A C B stitch A1-A4 4-5 0.5-1 1-5 B/J D E F G A1 A4/2 A3 A4/2 Buttonholes Note: Make a test buttonhole on a sample duplicating the fabric, stabilizer and seams of the actual garment to check the settings. Use a stabilizer on stretch fabrics. Turn the handwheel toward you to raise the needle to its highest position. Carefully mark the length of the buttonhole on the fabric. Move the slider (A) toward you so that the top mark (B) on the slider meets the start mark (C). Set the stitch selector dial at (A1). Place the fabric under the foot and lower the needle into the fabric at the starting point. Lower the foot and sew forward until you reach the front marking of the buttonhole. Stop sewing at a left stitch (D). Set the stitch selector dial at (A4/2). Sew 5 stitches (E). Stop sewing at a right stitch. Set the stitch selector dial at (A3). Sew until you reach the back marking of the buttonhole (F). Stop sewing at a right stitch. Set the stitch selector dial at (A4/2). Sew a few bartacks (G) and raise the needle from the fabric. Remove the fabric from the machine and cut the sewing thread. To open the buttonhole Insert a pin inside the bartack. Carefully cut the opening. Take care not to cut the stitches.
-
 1
1 -
2
-
3
-
4
-
5
-
6
-
7
-
8
-
9
-
10
-
11
-
12
-
13
-
14
-
15
-
16
-
17
-
18
-
19
-
20
-
21
-
22
-
23
-
24
-
25
-
26
-
27
-
28
-
29
-
30
-
31
-
32
-
 33
33 -
 34
34 -
 35
35 -
 36
36 -
 37
37 -
 38
38 -
 39
39 -
 40
40 -
 41
41 -
 42
42 -
 43
43 -
44
-
45
-
46
-
47
-
48
-
49
-
50
-
51
-
52
-
53
-
54
-
55
-
56
 |
 |
