Pfaff hobbylock 4762 Owner's Manual
Pfaff hobbylock 4762 Manual
 |
View all Pfaff hobbylock 4762 manuals
Add to My Manuals
Save this manual to your list of manuals |
Pfaff hobbylock 4762 manual content summary:
- Pfaff hobbylock 4762 | Owner's Manual - Page 1
hobbylock 4762 _Li 'ii Instruction manual - Pfaff hobbylock 4762 | Owner's Manual - Page 2
For easier understanding of this instruction manual please fold this or the last page out correspon ding colour code. The plug must never be used without fuse cover. Spare fuse covers are available from electrical suppliers or the PFAFF agencies. Please also observe the general safety notes on - Pfaff hobbylock 4762 | Owner's Manual - Page 3
awey from all moving parts. Special care is required around the sewing machine needle. 1 2. Always use the proper needle plate. The sewing machine from the electric outlet when removing covers, lubrica ting, or when making any other user servicing adjustments mentioned in the instruction manual - Pfaff hobbylock 4762 | Owner's Manual - Page 4
- Pfaff hobbylock 4762 | Owner's Manual - Page 5
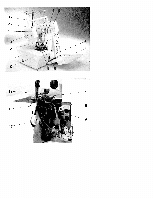
Parts of the hobbylock 4762 1 Thread tension dial/left needle 2 Thread tension dial/right needle 3 Carrying handle 4 Thread tension dial/right looper 5 Thread tension dial/left looper 6 Converter 7 Looper cover 8 Sewing foot 9 Needle plate 1 0 Detachable work support 11 Accessory box 1 2 Needle - Pfaff hobbylock 4762 | Owner's Manual - Page 6
shock, do not open the machine. There are no parts inside the machine which the user can repair. This is solely the responsibility of our qualified ser vice staff. 11. Be sure to use only original PFAFF parts. 11. Be sure to use only original PFAFF parts. 1 2. The machine is designed for a mains - Pfaff hobbylock 4762 | Owner's Manual - Page 7
provides unique advantages. Your new hobbylock 4760 can take any material in its stride and will sew, trim and neaten up for you in one operation. Your PFAFF hobbylock features the very latest in design and technology, and it is just as easy to use as this instruction manual is to follow. If you - Pfaff hobbylock 4762 | Owner's Manual - Page 8
Lint box Looper cover Lubricating the machine Machine cover Machine maintenance Mains switch Mounting the converter Needle position Program summary Setting the bed slide for stitch width chaining land Sewing foot lift Sewing foot pressure Sewing problems and their solutions. . Shirring foot Special - Pfaff hobbylock 4762 | Owner's Manual - Page 9
. Thread spool net Thread unreeling disc Threading/guide wires Threading right overedge looper (red) Threading left overedge looper (yellow) Threading right needle A (green) Threading left needle B (blue) Thread reel change on threaded machine Thread chain cutter Thread table for 2-, 3- and 4-thread - Pfaff hobbylock 4762 | Owner's Manual - Page 10
i W 4 W; t e j II? A I I - Pfaff hobbylock 4762 | Owner's Manual - Page 11
5 Cleaning brush 8 Lower knife 7 Thread unreeling discs (4x) 8 Thread spool nets (4x) 9 Machine oil Machine Cover The machine cover protects the machine against dust and dirt. After each use push in telescopic thread guide 21. Thread spool stand 24 with or without thread spool must be pushed against - Pfaff hobbylock 4762 | Owner's Manual - Page 12
= half speed Position 44 = full speed Mains switch The sewing light lights up when mains switch 28 is switched on. The machine is now ready for operation. Notes on safety This appliance has modify the plug in any way. Foot control sewing machine, foot controller type AE 033 has to be used. 8 - Pfaff hobbylock 4762 | Owner's Manual - Page 13
Ykk I 4 4 PIAFF hobbYkCk 4762 Lint box Insert the upper tabs of lint box 34 into the upper slots of looper cover 7. Press against the lower part of the contai ner until the lower tabs snap into the lower slots of the looper cover. For removal of the lint box, use the reverse sequence - Pfaff hobbylock 4762 | Owner's Manual - Page 14
Extend telescopic thread guide 21 upwards. To ensure optimum thread take-off, the two upper telescopes must be rotated slowly until their locking balls are heard to lock into place. Thread spool net The thread spool net included in the accessories should be used for synthetic yarns which unwind - Pfaff hobbylock 4762 | Owner's Manual - Page 15
needle, retaining screw B to the left overedge needle. In this instructions manual the various needle positions are shown in a schematic drawing of the X 705, Cat. Nr. 2002 are required for this machine. Lower the sewing foot with the sewing foot lift and turn the handwheel until the needle is - Pfaff hobbylock 4762 | Owner's Manual - Page 16
is to be found behind the looper cover, i.e. inside the machine. Thread the individual threads - as shown - following steps ito green 4. Left needle = blue H I Threading/guide wires Place the thread spools on thread spool stands 25. Use cone adapters 26 only with conical spools. Further - Pfaff hobbylock 4762 | Owner's Manual - Page 17
/right overedge looper (red) Thread by following steps ito 9. Note: To facilitate threading, use the tweezers included in the accessory box. J31 I 5- tnsert the thread along the path marked in red through guides 5 to 8. Insert the thread from the front through the eye in overedge looper 9. Pull - Pfaff hobbylock 4762 | Owner's Manual - Page 18
the arrow you until overedge looper 15 is positioned at the extreme right. I 'I Insert the thread by following steps ito 10. Note: To facilitate threading, use the tweezers included in the accessory box. 14 - Pfaff hobbylock 4762 | Owner's Manual - Page 19
4 Insert the thread along the path marked in yellow through guides 4 to 8. The diagrams to be found behind the looper cover illustrate the principles of threading. Lay the thread from the looper. Pull about 10 cm of thread through the looper and lay it to the left underneath the sewing foot. 15 - Pfaff hobbylock 4762 | Owner's Manual - Page 20
by following steps 1 to 9. I Note: The thread must run through the upper slot in guide 7. Pull about 10 cm of thread through the looper and lay it to the left underneath the sewing foot. Note: To facilitate threading of the needle eye, use the tweezers included in the accessory box and lower the - Pfaff hobbylock 4762 | Owner's Manual - Page 21
steps ito 7. Note: The thread must run through the lower slot in guide 5. Pull about 10 cm of thread through the needle eye and lay it to the left under neath the sewing foot. Note: To facilitate threading of the needle eye, use the tweezers included in the accessory box and lower the - Pfaff hobbylock 4762 | Owner's Manual - Page 22
the needle(s). Thread reel change on threaded machine Cut the threads close to the thread spool and set place. Tie together the threads still in the machine and the new threads, and pull the threads the knots are about 15 cm past the last thread guide before the needles. Cut the knots off and pull - Pfaff hobbylock 4762 | Owner's Manual - Page 23
Switch off at the mains switch To remove: Raise the needle(s) to the highest position and lift the sewing foot. Press the white lever at the rear of the sewing foot holder. The sewing foot will be released automatically from the holder and can be removed to the left. To do this, lift - Pfaff hobbylock 4762 | Owner's Manual - Page 24
Disengaging the upper knife Switch off at the mains switch Raise upper knife 19 to its upppermost position by rotating the handwheel. Detach the lint box and open the looper cover. Now slide the holder of the mova ble upper knife fully towards the right. Turn the head of the upper knife away from - Pfaff hobbylock 4762 | Owner's Manual - Page 25
open the looper cover. Converter 6 is located in the front of the machine housing. Pull it out. Rotate the handwheel until the right overedge looper is overedge looper. Rotate the converter towards the left and press the upper part slightly to the rear so that the tip of the converter locks into - Pfaff hobbylock 4762 | Owner's Manual - Page 26
rolled seams. 5,2rnm O24) Note: The seam width adjustments between 3.0 mm and 4.5 mm apply to the right needle only. For the left needle, the set value is increased by 2.3 mm, i.e. the seam width can be continuously adjusted from 5.2 mm to 6.7 mm. 22 - Pfaff hobbylock 4762 | Owner's Manual - Page 27
set at 3 mm. When working with close-knit fabrics, set I the adjustment knob to 4 mm. 3 Sewing toot pressure The machine's factory-set sewing foot pressure is suitable for medium-heavy fabrics. The sewing foot pressure does not need to be changed for most fabrics. If lighter or heavier fabrics - Pfaff hobbylock 4762 | Owner's Manual - Page 28
feed also depends on the stitch lenght selected and the type of fabric used. A If differential feed adjustment lever 30 is set to 0.5, the , the fabric is stretched, This prevents the seam from becoming gathered when sewing very delicate fabrics such as silk and taffeta. The result is a smooth - Pfaff hobbylock 4762 | Owner's Manual - Page 29
also be intro duced in this way, such as the gather effect when using very delicate fabrics (D). The following table indicates possible settings for the differential feed. However, you should always perform a sewing test on your fabric before starting work. Fabric type/Effects Differential feed - Pfaff hobbylock 4762 | Owner's Manual - Page 30
Reattach the lint box. The free arm is particularly useful for sewing tubular items such as trouser legs and sleeves. Insert the article over the free arm. Reattaching the work support Position the detachable work support so that it is level with the machine cover, then slide it to the right until - Pfaff hobbylock 4762 | Owner's Manual - Page 31
seams: Set the bed slide for chaining land 18 to position S. .- Chaining land A will be pushed forward All standard overlock seams can be sewn with this adjustment. I 4 For rolled hems Set the bed slide for chaining land 18 to position R. Chaining land A will be pushed - Pfaff hobbylock 4762 | Owner's Manual - Page 32
seam (narrow) tsLsLt;\ Serging lightweight (easily-frayed) fabrics 3-thread decorative seam \ 3-thread decorative seam Serging medium-heavy fabrics. As flatlock seam for sewing together stretch fabrics and as a decorative finished edge [.oj Serging medium-heavy fabrics. As flatlock seam for - Pfaff hobbylock 4762 | Owner's Manual - Page 33
Needle thread tension The settings are for medium-heavy fabrics and normal polyester yarn Stitch length blue green red yellow Stitchwidth Position of bed slide for chaining land Converter S = with D = with- out N -2 -2 -1 3 3.5 S D N -2 -1 3 3.5 S D N -2 -1 3 3.5 S D N - Pfaff hobbylock 4762 | Owner's Manual - Page 34
to medium-heavy fabrics. Decorative finished edges. Needle position =Ieft 2!J = right 2-thread oeredge seam (wide) FLATLOCK Serging medium-heavy fabrics. As flatlock seam for sewing together stretch fabncs 2-thread o FLATLOCK •je seam (narrow> Serging lightweight fabrics. As flatlock seam for - Pfaff hobbylock 4762 | Owner's Manual - Page 35
Needle thread tension The settings are for meddium-heavy fabrics and normal polyester yarn Stitch length blue green red yellow Stitch width Position of bed slide for chaining land Converter 1 = with D = with- out -2 N +3 F R R D -4 -4 +25 3 35 S I +2 3 3.5 S S N N -4 -1 - Pfaff hobbylock 4762 | Owner's Manual - Page 36
wheel until the dot marker is at the desired setting. PFAFF hobbylock The settrngs for adjusting thread tension are recommendations, Fabric type, yarn quality and needle gsuc' will influence seam results. For this reason it is always best to sew a test seam to cnc the interlocking of threads. It - Pfaff hobbylock 4762 | Owner's Manual - Page 37
The left needle thread (blue) is too loose. Increase the tension of the blue thread, The right needle thread (green) is too loose. Increase the tension of the green thread. The right looper thread (red) is visible on the reverse side of the fabric. ncrease the tension of the red thread and/or - Pfaff hobbylock 4762 | Owner's Manual - Page 38
3-thread overedge seam [ Jwide blue green N red -2 yellow -1 The needle thread is too loose. Increase the tension of the respective needle thread. I T I blue green red yellow [narrow N -2 -1 The right tooper thread (red) s visible on the reverse side of the fabric, Increase the tension of - Pfaff hobbylock 4762 | Owner's Manual - Page 39
thread is too loose. Increase the tension of the respective needle thread. blue narrow green N red j yellow -5 +4 The right looper thread - Pfaff hobbylock 4762 | Owner's Manual - Page 40
3-thread decorative seam serging, FLATL.OCK I blue I green red j yellow j wide -4,5 N +2 The needle thread is too tight. Reduce the tension of the respective needle thread. 1 blue I green red I yellow narrow N j +2 The right looper thread (red) is visible on the reverse side of the - Pfaff hobbylock 4762 | Owner's Manual - Page 41
3-thread rolled hem - - blue green red +2 yellow -1 The right needle thread (green) is too loose. Increase the tension of the green thread. The right looper thread (red> is visible on the reverse side of the fabric. Increase the tension of the red thread and/or reduce the tension of the - Pfaff hobbylock 4762 | Owner's Manual - Page 42
green red -2 j N yellow ÷3 The right needle thread (green) is too oose. Increase the tension of the green thread. The right looper thread (red) only partly loops around the edge of the fabric. Reduce the tension of the red thread and/ or increase the tension of the yellow thread. The left - Pfaff hobbylock 4762 | Owner's Manual - Page 43
24hread overedge seams FLATLOCK [ red yellow + blue green red yellow narrow )- I -4 +2 Note: Attach the converter (see page 21) for sewrng 2thread overedge seams 1 FLATLOCK). The needle thread is too loose or the left looper thread (yellow) is too tight. Increase the tension of the respective - Pfaff hobbylock 4762 | Owner's Manual - Page 44
seam I wide blue I I green red I yellowl I N I I I narrow blue I green I N red yellow Ij_3,5JI Note: Attach the converter (see page 21) for sewing 2-thread serging seams (FLATLOCK). The needle thread is too loose. Increase the tension of the respective needle thread and/or reduce the - Pfaff hobbylock 4762 | Owner's Manual - Page 45
2-thread rolled hem Note: Attach the converter (see page 21) for sewing 2-thread rolled hems The right needle thread (green) is too tight. Reduce the tension of the green thread and/or increase the tension of the - Pfaff hobbylock 4762 | Owner's Manual - Page 46
Folded 2-thread rolled hem [ blue green red elloj Note: Attach the converter (see page 21) for sewing 2-thread rolled hems. The right needle thread (green) is too loose. Increase the tension of the green thread and/or reduce the tension of the - Pfaff hobbylock 4762 | Owner's Manual - Page 47
- The left needle thread (blue) is too loose. Increase the tension of the blue thread. Note: Attach the converter (see page 21) for sewing 2-needle, 3-thread overedge closing seams. face side face side reverse side reverse side The right needle thread (green) is too loose, Increase the - Pfaff hobbylock 4762 | Owner's Manual - Page 48
sewing foot. Use the lint brush from the accessories to remove lint from the needle plate, the upper and lower knives and looper area. Lubricating the machine every time the machine is cleaned. One or two drops of PFAFF sewing machine oil are sufficient. All other parts are manufactu red from - Pfaff hobbylock 4762 | Owner's Manual - Page 49
the mains switch Removal: Detach the lint box and open the looper cover. Disengage the upper knife and move the needle(s) to the uppermost position. Use the arge screw driver from the accessories to loosen lower knife retaining screw A. Remove the screw and the lower knife. Insertion: Insert a new - Pfaff hobbylock 4762 | Owner's Manual - Page 50
light) Switch off at the mains switch Use the large screwdriver from the acces sories to loosen the retaining screw of sewing light cover 1 3 until the latter can be removed. Push the bulb into the socket, give it a half-turn in a counter-clockwise direction and remove it. - Pfaff hobbylock 4762 | Owner's Manual - Page 51
from your hobbylock 4762. By using these sewing feet, you can perform various sewing steps in one, thus saving time and ensu ring perfect sewing results. The special accessories can be purchased from your PFAFF dealer. Special accessory Blindstitch sewing foot String thread sewing foot Elastic - Pfaff hobbylock 4762 | Owner's Manual - Page 52
the edge protrudes approx. 1 cm. Position the seam under the sewing foot so that the folded seam part 3 lies beneath edge guide 2. Crease 4 must thereby run along the edge of guide N 4 2. N ) Loosen set screw 1 and adjust edge guide 2 so that upon penetration only one thread of the upper - Pfaff hobbylock 4762 | Owner's Manual - Page 53
or curtains. Setting the machine Set your machine to folded 3-thread rol - led hem. Jorking laise the needle to its uppermost position nd insert the string sewing foot. Insert he gimp thread into guide 1 and pull it hrough hole 2 into lateral guide 3. Then y the thread under guides 4 and 5 so hat it - Pfaff hobbylock 4762 | Owner's Manual - Page 54
Elastic tape sewing foot This sewing foot is used for sewing on elastic tape. in the same operation, the fabric is trimmed and serged, and also gathered by the contracting elastic tape. Setting the machine Set your machine to 4-thread overedge seam. The seam width is determined by the width of the - Pfaff hobbylock 4762 | Owner's Manual - Page 55
Set your machine to 4-thread overedge seam and the differential feed to 2. Working Raise the needle to its uppermost position and insert the shirring foot. Lift the sewing foot and insert the fabric ply to be shirred (face side up>. Insert the second fabric ply (face side down> under the sewing foot - Pfaff hobbylock 4762 | Owner's Manual - Page 56
Cording foot This sewing toot allows you to sew toge ther two fabric plies, with a cording tape between them, in one operation. Ideal for casual wear, sports bags and upholstery covers. Setting the machine Set your machine to 4-thread overedge seam and seam width 4,5 mm. Working Raise the needle to - Pfaff hobbylock 4762 | Owner's Manual - Page 57
Bead sewing foot This sewing foot is used for sewing on beads, sequins, strass bands, lead and ordinary cords. Setting the machine Set your machine to 3-thread overedge seam (narrow or wide depending on bead size). Stitch length should be between 3 and 4. Working 2 Raise the needle to its - Pfaff hobbylock 4762 | Owner's Manual - Page 58
the machine 8 Set your machine to 3-thread overedge seam (narrow) and select a stitch length between 1 .5 and 2.0. V 1 2 Working Raise the needle to its uppermost position and insert the lace sewing foot. Use the large screwdriver from the accessories to loosen screw 1 and adjust guide 2 so - Pfaff hobbylock 4762 | Owner's Manual - Page 59
Thread chart for 2-, 3- and 4-thread overedge seam Fabric Faden Stichlänge Lightweight fabrics: Organdy, light-knit fabric, taffeta, silk, lining fabrics Cotton Synthetic yarn No. 50 - 70 No. 70 - 140 2.0 - 4,0 mm Medium-heavy fabrics: Cotton, tricot, linnen. dress materials Cotton - Pfaff hobbylock 4762 | Owner's Manual - Page 60
problems and their solutions These machines have been developed for ease of operation and no difficult adjustments must be made. Sewing problems of the kind described below may occur due to minor adjustment and operating errors. They can be easily corrected by following the instruc tions. Problem - Pfaff hobbylock 4762 | Owner's Manual - Page 61
Problem Cause Solution Machine will not operate, although mainns switch is on Power supply interrupted Close looper cover (see page 9). Fabric not neatly trimmed Sewing lint between upper and lower knife Clean knifes Lower knifeis blunt Replaces lower knife (see page 45). Puckered seams - Pfaff hobbylock 4762 | Owner's Manual - Page 62
(length x height x width) Weight 1300 stitches per minute 3 - 6.7 mm F (' 1 mm) - 4 mm hinged manual 4.5 mm 1 .5 mm EL X 705, Cat. No. 2002 80/11, 90/14 2. 3. 4 300 x 285 x 275 mm 6,5 kg Contents of cardboard box 1 machine 1 foot control 1 instruction manual/guarantee certificate 1 lint box - Pfaff hobbylock 4762 | Owner's Manual - Page 63
44 - Pfaff hobbylock 4762 | Owner's Manual - Page 64
hobbylock 4762 parts 20 Thread guides with colour coding 21 Telescopic thread guide 22 Set screw for adjusting sewing foot pressure 23 Thread chain cutter 24 Thread spool stand 25 Spool pin 26 Cote adapter 27 Machine socket, foot control with mains cord 28 Mains switch 29 Handwheel 30 Adjustment - Pfaff hobbylock 4762 | Owner's Manual - Page 65
-
 1
1 -
 2
2 -
 3
3 -
 4
4 -
 5
5 -
 6
6 -
 7
7 -
8
-
9
-
10
-
11
-
12
-
13
-
14
-
15
-
16
-
17
-
18
-
19
-
20
-
21
-
22
-
23
-
24
-
25
-
26
-
27
-
28
-
29
-
30
-
31
-
32
-
33
-
34
-
35
-
36
-
37
-
38
-
39
-
40
-
41
-
42
-
43
-
44
-
45
-
46
-
47
-
48
-
49
-
50
-
51
-
52
-
53
-
54
-
55
-
56
-
57
-
58
-
59
-
60
-
61
-
62
-
63
-
64
-
65
 |
 |

hobbylock
4762
‘ii
_i
L
Instruction
manual