Philips 42FD9954 User manual - Page 3
English - stand
 |
UPC - 037849924549
View all Philips 42FD9954 manuals
Add to My Manuals
Save this manual to your list of manuals |
Page 3 highlights
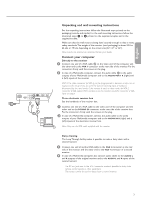
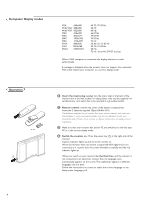
English Unpacking and wall mounting instructions For the unpacking instructions follow the illustrated steps printed on the packaging (outside and inside). For the wall mounting instructions follow the illustrated steps ' to § printed on the separate template and in the supplied booklet. Make sure that the wall mount is being fixed securely enough so that it meets safety standards.The weight of the monitor (excl. packaging) is about 53 Lbs 66 Lbs or 79 Lbs, depending on the screen size (32", 37" or 42"). Note: stands are optional acccessories. Consult your dealer. Connect your computer Directly to the monitor & Connect one end of a VGA cable 1 to the video card of the computer and the other end to the VGA 1 connector at the rear side of the monitor. Fix the connectors firmly with the screws on the plug. é In case of a Multimedia computer, connect the audio cable 2 to the audio outputs of your Multimedia computer and to the AUDIO VGA 1 R (right) and L (left) inputs of the monitor. ~ MAINS RS232 L R DVI-D VGA 2 VGA 1 AUDIO VGA 1 VGA 1 VGA 2 RC-OUT DVI-D L R Y/C S-VHS AUDI AV2 VGA 2: The video connector for VGA 2 can be programmed to become an input or an output via the Setup menu, see p. 8. The function of being input or output is determined by the used mode. If the monitor is used in video mode, the VGA 2 connector is VGA output. If the monitor is used in monitor mode,the connector is VGA input or output. To an electronic receiver box See the handbook of the receiver box. 1 2 & Connect one end of a VGA cable to the video card of the computer and the other end to the PC/MAC IN connector at the rear side of the receiver box. Fix the connectors firmly with the screws on the plug. é In case of a Multimedia computer, connect the audio cable to the audio outputs of your Multimedia computer and to the AUDIO IN R (right) and L (left) inputs of the electronic receiver box. Note: Only use the VGA cable supplied with the monitor. Daisy chaining The Loop Through facility makes it possible to make a daisy chain with a second monitor. " Connect one end of another VGA cable to the VGA 2 connector at the rear side of the monitor and the other end to the VGA 1 connector of a second monitor. ' In case of a Multimedia computer, also connect audio cables to the AUDIO L and R outputs of the original monitor and to the AUDIO L and R inputs of the second monitor. The RC out jack next to the VGA 2 connector makes it possible to daisy chain remote control signals to other equipment. This output cannot be used to daisy chain a second monitor. 3
-
 1
1 -
 2
2 -
 3
3 -
 4
4 -
 5
5 -
 6
6 -
 7
7 -
 8
8 -
 9
9 -
10
-
11
-
12
 |
 |
