Philips 42FD9954 User manual - Page 6
Operation - remote
 |
UPC - 037849924549
View all Philips 42FD9954 manuals
Add to My Manuals
Save this manual to your list of manuals |
Page 6 highlights
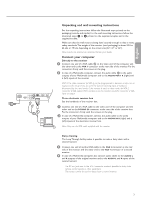
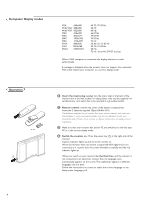
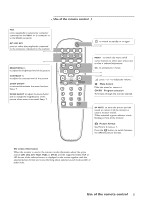
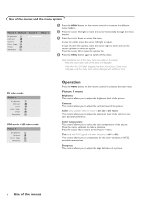
Use of the menus and the menu system Picture 1 Picture 2 Brightness G Contrast H (Color) C Color temp. @ (Tint) è Sharpness à Sound M Setup º & Press the MENU button on the remote control to summon the different menu headers. é Press the cursor left/right to move the cursor horizontally through the menu headers. " Press the cursor down to access the menu. In case of a slider, move the cursor left/right to adjust. In case of a list with options, move the cursor right to enter and use the cursor up/down to select an option. Press the cursor left to leave the options list. ' Press the MENU button again to switch off the menu. Note: Sometimes not all the menu items are visible on the screen. Press the cursor down until all the items are displayed. Only when the US English language has been selected (see Setup menu, Language, p. 8), the menu items will be displayed with additional icons. SD video-mode Picture 1 Brightness G Contrast H Color C Color temp. @ (Tint) è Sharpness à VGA-mode + HD video mode Picture 1 Brightness G Contrast H Color temp. @ Sharpness à Operation Press the MENU button on the remote control to summon the main menu. Picture 1 menu Brightness This control allows you to adjust the brightness level of the picture. Contrast This control allows you to adjust the contrast level of the picture. Color (only available when the source is AV1, AV2 or AV3 YCbCr) This control allows you to adjust the saturation level of the colors to suit your personal preference. Color temperature This control allows you to select the color temperature of the picture. Move the cursor up/down to make a selection. Press the cursor left to return to the Picture 1 menu. Tint (only with NTSC signals and when the source is AV1 or AV2) This control allows you to compensate for the color variations in NTSC encoded transmissions. Sharpness This control allows you to adjust the edge definition of a picture. 6 Use of the menus
-
 1
1 -
 2
2 -
 3
3 -
 4
4 -
 5
5 -
 6
6 -
 7
7 -
 8
8 -
 9
9 -
 10
10 -
 11
11 -
 12
12
 |
 |
