Philips DVDR520H User manual - Page 25
One-touch recording, DV recording, Use Guide Menu to record DV signal
 |
View all Philips DVDR520H manuals
Add to My Manuals
Save this manual to your list of manuals |
Page 25 highlights
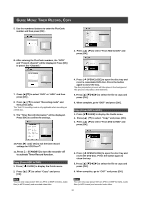
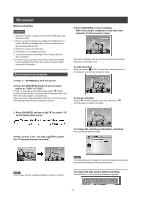
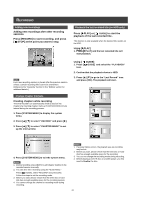
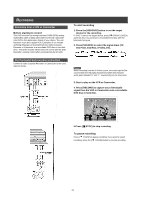
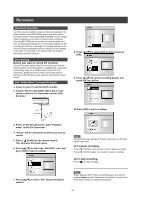
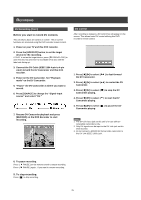
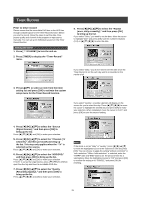
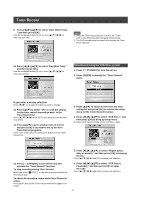
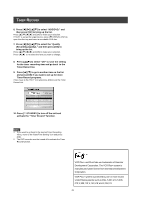
RECORDING One-touch recording Use "One-touch recording" to start recording immediately in 30minute blocks. Press [RECORD] twice to start a 30-minute recording session. Press [RECORD] repeatedly to record longer timed recordings, up to 6 hours in thirty-minute increments. Pressing [RECORD] when the timed recording exceeds the 6hour constraint automatically sets "one-touch recording"off. For recording on DVD discs, the length of recording depends on the current recording mode/speed and the amount of time available on the disc. For recording on the built-in HDD, the length of recording is 6 hours maximum. DV recording Before you start to record DV contents This DVD recorder allows basic DV control functions with the remote control. The DVD recorder is equipped with a camcorder control (Play, Stop, FF or REW) feature via the DV Link connection. Simply move the screen cursor to the desired function on the DV input screen and press [OK] on the remote control. Use "Guide Menu" to record DV signal 1. Power on your TV and this DVD recorder. 2. Connect the DV cable (IEEE-1394 4-pin to 4-pin cable) to both the DV Camcorder and the DVDRecorder. 8. Press [p] [q] to select HDD or DVD and press [OK]. 9. Press [p] [q] to set the recording quality, and press [OK] to confirm. 10.Press [OK] to start recording. 3. Power on the DV Camcorder. Start "Playback mode" on the DV Camcorder. 4. "Pause" the DV Camcorder at where you want to record. 5. Press [ GUIDE] on the remote control. This activates the Guide menu. 6. Press [p] [q] to select the "RECORD" icon, and press [OK] to start recording. Notes: This DVD-Recorder will stay in "Pause" mode when no DV input signal is detected. 11.To pause recording. Press [ PAUSE ] on the remote control to pause recording. Press [ PAUSE ] again, if you want to resume recording. 12.To stop recording. Press [ ] to stop recording. 7. Press [p] [q] to select "DV" and press [OK] to confirm. Note: Before playing a DVD+R disc on another player, you will first need to finalize the disc. Reference the "finalize" function in the "Disc Tools" section for additional information. 24
-
 1
1 -
2
-
3
-
4
-
5
-
6
-
7
-
8
-
9
-
10
-
11
-
12
-
13
-
14
-
15
-
16
-
17
-
18
-
19
-
 20
20 -
 21
21 -
 22
22 -
 23
23 -
 24
24 -
 25
25 -
 26
26 -
 27
27 -
 28
28 -
 29
29 -
 30
30 -
31
-
32
-
33
-
34
-
35
-
36
-
37
-
38
-
39
-
40
-
41
-
42
-
43
-
44
-
45
-
46
-
47
 |
 |
