Philips FWR88 User manual - Page 9
Connecting a subwoofer, Digital audio connections, Analog audio connections, English
 |
View all Philips FWR88 manuals
Add to My Manuals
Save this manual to your list of manuals |
Page 9 highlights
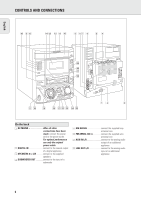
INSTALLATION English SUBWOOFER AM AERIAL FM AERIAL 300 Ω SUBWOOFER OUT DIGITAL IN L AUX IN R L LINE OUT R ~ AC MAINS SPEAKERS 6 Ω L R TAPE RECORDER CD PLAYER Analog audio connections AUX IN L/R It is possible to use an additional appliance, e.g. tape recorder, TV or VCR, with the unit. 1 Insert the red plug of a cinch cable to the red jack AUX IN R and insert the white plug to the white jack AUX IN L. 2 Connect the other end of the cinch cable to the audio outputs of the additional appliance. 3 Press DIGITAL / ANALOG AUX repeatedly to select the analog input for the appliance. yAUX Analog is displayed. Digital audio connections DIGITAL IN You can use this coaxial input for recordings from any digital audio equipment with a digital coaxial output e.g. CD player or DVD player. 1 Use a coaxial cable to connect the coaxial output of the additional appliance with DIGITAL IN on the unit. 2 Press DIGITAL / ANALOG AUX repeatedly to select the digital input for the appliance. yAUX Digital is displayed. 3 Operate your appliance as usual. 4 Operate your appliance as usual and adjust volume and sound with the unit. Note: It is not possible to connect a turntable directly to AUX IN L/R. If you wish to use a turntable with the unit, you have to connect an amplifier to AUX IN L/R on the unit. Then connect the turntable to the amplifier. LINE OUT L/R You can use these outputs for playback or recording on any analog audio equipment e.g. amplifier or tape recorder. Connecting a subwoofer A subwoofer can be used to enhance the bass performance of your unit dramatically. 1 Use a cinch cable to connect the input of the subwoofer with SUBWOOFER OUT at the unit. 2 Follow the instructions supplied with the subwoofer. • Use a cinch cable to connect the analog audio inputs of the additional appliance with LINE OUT L/R on the unit and operate your appliance as usual. 9
-
 1
1 -
2
-
3
-
 4
4 -
 5
5 -
 6
6 -
 7
7 -
 8
8 -
 9
9 -
 10
10 -
 11
11 -
 12
12 -
 13
13 -
 14
14 -
15
-
16
-
17
-
18
-
19
-
20
-
21
-
22
-
23
-
24
-
25
-
26
-
27
-
28
-
29
-
30
-
31
-
32
 |
 |
