Philips TSU500 User manual
Philips TSU500 Manual
 |
UPC - 077703566348
View all Philips TSU500 manuals
Add to My Manuals
Save this manual to your list of manuals |
Philips TSU500 manual content summary:
- Philips TSU500 | User manual - Page 1
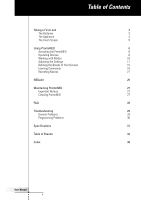
the Brands of Your Devices 15 Learning Commands 18 Recording Macros 21 NEOedit 25 Maintaining ProntoNEO 27 Important Notices 27 Cleaning ProntoNEO 27 FAQ 28 Troubleshooting 29 General Problems 29 Programming Problems 30 Specifications 31 Table of Brands 32 Index 38 User - Philips TSU500 | User manual - Page 2
learn IR codes from your existing remote controls. ProntoNEO can receive and store the IR codes by means guide you through the process. In the future NEOedit will also allow you to upgrade your ProntoNEO. You can find NEOedit on the included CD-ROM and on the Philips website http://www.pronto.philips - Philips TSU500 | User manual - Page 3
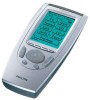
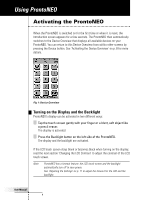
on. After a few seconds, ProntoNEO starts up automatically and an Introduction screen appears. ProntoNEO beeps twice to indicate that it has started up successfully. User Manual 3 - Philips TSU500 | User manual - Page 4
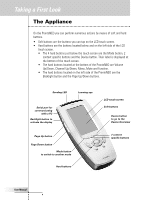
button to switch to another mode Hard buttons LCD touch screen Soft buttons Device button to go to the Device Overview 2 context specific buttons User Manual 4 - Philips TSU500 | User manual - Page 5
; · the battery level indicator. With these soft buttons you operate your device. These are the labels of the 4 hard buttons below the touch screen. User Manual 5 - Philips TSU500 | User manual - Page 6
the backlight automatically turn off to save power. See 'Adjusting the Settings' on p. 11 to adjust the timeout for the LCD and the backlight. User Manual 6 - Philips TSU500 | User manual - Page 7
ProntoNEO To adjust the LCD contrast on the touch screen: 1 Press and hold the Backlight button. The screen lights up. 2 While still holding the Backlight button, press the Page Up button once to increase the LCD contrast Page Down button, the LCD contrast will only change one level. User Manual 7 - Philips TSU500 | User manual - Page 8
, DVD, PreAmp and so on. Activating the Device Overview Press the Device button. The Device Overview appears, showing the available devices in the ProntoNEO. User Manual Fig. 2: The Device button 8 - Philips TSU500 | User manual - Page 9
screen. Note You can operate the soft buttons in the same way you operate hard buttons on a conventional remote control. When you keep the soft button pressed instead of tapping it, ProntoNEO keeps sending the IR command programmed at will. By default, it activates the Device Overview. User Manual 9 - Philips TSU500 | User manual - Page 10
the Brands of Your Devices' on p. 15 for more details. Learn mode For learning commands from other remote controls. See 'Learning Commands' on p. 18 for more details. Macro mode For recording macros. You can 2 Press and hold the Mode button for 3 seconds. The Mode screen appears. User Manual 10 - Philips TSU500 | User manual - Page 11
the appropriate setup page. First Setup Page On the first setup page you can adjust: • the LCD timeout; • the backlight timeout; • the beep volume. User Manual 11 - Philips TSU500 | User manual - Page 12
seconds up or down. Note When the settings for the LCD timeout and the backlight timeout are high, the battery lifetime may be reduced. User Manual 12 - Philips TSU500 | User manual - Page 13
rapidly. The time will increase or decrease per 30 minutes. The ProntoNEO will immediately reflect the time change at the top of the screen. User Manual 13 - Philips TSU500 | User manual - Page 14
ProntoNEO, all customization is lost permanently. You loose all ProntoNEO settings, defined brands, learned codes and recorded macros. By tapping the Revert button the ProntoNEO will be reverted to the default . ProntoNEO switches to this mode. See also 'Working with Modes' on p. 10. User Manual 14 - Philips TSU500 | User manual - Page 15
remote controls ProntoNEO uses infrared (IR) codes to activate devices. The ProntoNEO is set by default to operate Philips devices. If the brand of your devices is Philips screen appears. 4 Tap Brand on the Mode screen. An instruction screen appears indicating you can set the brand for the selected - Philips TSU500 | User manual - Page 16
the code set is displayed. -or- Press Cancel to exit Brand mode. 6 Enter the code set brands use several code sets for the same device. The code sets in the second code set of the brand. Try out all code sets code set is correct, you will hear a confirmation beep. The IR codes of the selected - Philips TSU500 | User manual - Page 17
Using ProntoNEO If you entered an incorrect code set, you hear an error beep. A message screen appears. 1 Press OK. ProntoNEO returns to the code set screen where the incorrect code set is displayed. 2 Look up the correct code set and repeat instructions 6 and 7. User Manual 17 - Philips TSU500 | User manual - Page 18
code or a brand is not in the database, you can program ProntoNEO commands by transmitting IR signals from your existing remote controls to ProntoNEO's learning eye. To do this, place ProntoNEO and the device's remote and hold the Mode button for 3 seconds. The Mode screen appears. User Manual 18 - Philips TSU500 | User manual - Page 19
commands from an existing remote control. The ProntoNEO will wait for 5 seconds to receive an IR code from another remote control. Note When a hold the button on the existing remote control you want to learn to the ProntoNEO. When the ProntoNEO receives an IR code: • You hear a confirmation beep - Philips TSU500 | User manual - Page 20
Using ProntoNEO When the ProntoNEO does not receive an IR code in 5 seconds: • You will hear an error beep; Down buttons. Repeat steps 6 and 7 until you have copied all the commands of the existing remote control. 9 Press Done when you have finished learning commands to the buttons of your choice. - Philips TSU500 | User manual - Page 21
screen with the Macro label appears. With the Page Up and Page Down buttons you can go to other screens of the selected device. User Manual 21 - Philips TSU500 | User manual - Page 22
go to the Extra screen with delays and beeps. 8 Tap the button of the device you want to go to. The device screen appears. User Manual 22 - Philips TSU500 | User manual - Page 23
, tap the Beep button. 3 Press the Device button to go to the Device Overview again. 12 Press Stop to stop recording. A message screen appears. User Manual 23 - Philips TSU500 | User manual - Page 24
Mode screen without saving the macro. The button retains its previous command. 14 Set the ProntoNEO in Use mode to test the recorded macro. N User Manual 24 - Philips TSU500 | User manual - Page 25
can find more information and updates of the software on http://www.pronto.philips.com. NEOedit is the visual editor for creating and configuring ProntoNEO • save, duplicate and share NCFs, devices, buttons, bitmaps or codes with another ProntoNEO; • preview the NCF on the NEOemulator; • Manual 25 - Philips TSU500 | User manual - Page 26
up automatically. If not, you can install NEOedit by double-clicking the NEOeditSetup.exe file on the CD-ROM. 2 Follow the instructions on screen that will guide you through the installation procedure. The first time you run NEOedit, you have to accept the license agreement. Otherwise NEOedit will - Philips TSU500 | User manual - Page 27
with a soft cloth moistened with a diluted window-cleaning solution. Do not use a corrosive detergent or an abrasive sponge. Avoid the use of abundant water. User Manual 27 - Philips TSU500 | User manual - Page 28
is calibrated when it leaves the factory. You only have to calibrate the LCD touch screen when you upgrade ProntoNEO's software in the future. User Manual 28 - Philips TSU500 | User manual - Page 29
Troubleshooting User Manual General Problems The display stays blank or becomes black • Make sure the ProntoNEO and the existing remote control is between 1 and 4 inches (2 to 10 cm). See 'Learning Commands' on p. 18. • Do not learn commands directly under fluorescent lights. • Do not learn - Philips TSU500 | User manual - Page 30
Troubleshooting ProntoNEO is not recognized cable in another serial port. • Try to connect multiple times. Programming Problems Buttons are not sending the correct commands • Check if you have defined p. 25. • Go to the Philips website http://www.pronto.philips.be for more information. User Manual 30 - Philips TSU500 | User manual - Page 31
Interface 3-wire (RS232) serial port connector Software Database with IR codes to operate different brands Built-in Philips RC codes Total number of devices limited only by memory Infrared (IR) Infrared by UEI Technology Licensed under U.S. Patent 5,689,353 Portions © UEI 1999 User Manual 31 - Philips TSU500 | User manual - Page 32
Table of Brands User Manual PreAmp Carver Curtis Mathes GE JVC Linn Magnavox Marantz Optimus Philips Pioneer Polk Audio RCA Signal Sprucer Starcom Stargate Starquest TV86 Teleview Tocom Toshiba Tusa Unika United Artists Universal Viewstar Zenith Zentek 0027 0180, 0332, 0344 0171, 0560, 0904 0427 - Philips TSU500 | User manual - Page 33
of Brands User Manual Linn 0184 MCS 0056 MTC 0447 Magnavox 0184, 0332 Marantz 0184, 0653, 0056, 0207 Mission 0184 NSM 0184 Nikko 0201 Onkyo 0128, 0895 Optimus 0059, 0495, 0447, 0206, 0464, 0332, 1090, 0027, 0064, 0172 Panasonic 0056, 0330 Parasound 0447 Philips 0184, 0653 - Philips TSU500 | User manual - Page 34
Magnavox 0749, 0751 Memorex 0751 Next Level 0896 Panasonic 0728 Philips 1103 , 0749, 0751 Primestar 0654, 0388 RCA 0593, 0170, 0419, 0882 Radio Shack 0896 Samsung 1136 Sony 0666 Star Choice 0896 Toshiba 0776, 0817 Uniden 0751, 0749 Zenith 0883 User Manual - Philips TSU500 | User manual - Page 35
Manual 0083 MGA 0177, 0046, 0057, 0205 MTC 0087, 0057, 0046, 0083 Magnavox 0081, 0057, 0206, 1281 Majestic 0043 Marantz 0081, 0057 Matsushita 0277 0083, 0183, 0774 Philco 0172, 0046, 0057, 0081, 0490 Philips 0081 Pilot 0046, 0057 Pioneer 0193, 0706 Portland 0046, 0119 - Philips TSU500 | User manual - Page 36
of Brands User Manual Wards 0081, 0070, 0267 MGN Technology 0267 MTC 0027, 0267 Magnasonic 0305 Magnavox 0062, 0108, 0027, 0066, 0176 Magnin 0267 Marantz 0108 0064, 0069, 0065 Pentax 0069 Philco 0062, 0236, 0506 Philips 0108, 0062, 0645 Pilot 0064 Pioneer 0094 Polk Audio - Philips TSU500 | User manual - Page 37
0236, 0506 DVD Apex Denon Fisher GE Hitachi Hiteker JVC Kenwood Konka Magnavox Marantz Mitsubishi Onkyo Optimus Oritron Panasonic Philips Pioneer Proscan RCA Samsung Sharp Sony Technics Theta Digital Toshiba Yamaha Zenith , 0598 0600 0657 0560 0517 0598 0530 0517, 0572 0618, 0530 User Manual 37 - Philips TSU500 | User manual - Page 38
Index User Manual A activating a device, 8 Device Overview, 8 ProntoNEO, 6 adjusting backlight timeout, 12 beep volume, 13 date, 13 LCD contrast, 7 LCD timeout, 12 settings, 11 time, 13 B backlight switching - Philips TSU500 | User manual - Page 39
, 12 Learn mode, 18 learning commands from existing remote controls, 18 distance, 18 eye, 4, 18 M P page number, 10 Page Up/Page Down buttons, 4, 10 Philips website, 2 powering battery status, 8 installing the batteries, 3 6 display, 6 ProntoNEO, 6 U Use mode, 10 W website, 2 User Manual 39 - Philips TSU500 | User manual - Page 40
© Royal Philips Electronics NV All rights are reserved. Reproduction in whole or in part is prohibited without the prior written consent of the copyright owner.
-
 1
1 -
 2
2 -
 3
3 -
 4
4 -
 5
5 -
 6
6 -
 7
7 -
8
-
9
-
10
-
11
-
12
-
13
-
14
-
15
-
16
-
17
-
18
-
19
-
20
-
21
-
22
-
23
-
24
-
25
-
26
-
27
-
28
-
29
-
30
-
31
-
32
-
33
-
34
-
35
-
36
-
37
-
38
-
39
-
40
 |
 |

User Manual
1
Taking a First Look
2
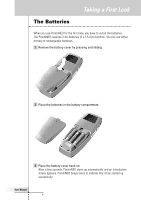
The Batteries
3
The Appliance
4
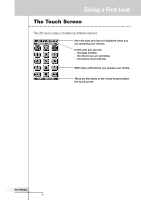
The Touch Screen
5
Using ProntoNEO
6
Activating the ProntoNEO
6
Operating Devices
8
Working with Modes
10
Adjusting the Settings
11
Defining the Brands of Your Devices
15
Learning Commands
18
Recording Macros
21
NEOedit
25
Maintaining ProntoNEO
27
Important Notices
27
Cleaning ProntoNEO
27
FAQ
28
Troubleshooting
29
General Problems
29
Programming Problems
30
Specifications
31
Table of Brands
32
Index
38
Table of Contents