Pioneer 9000 Owner's Manual - Page 69
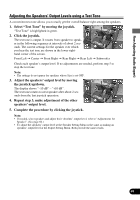
Adjusting the Speakers' Output Levels using a Test Tone
 |
UPC - 012562585574
View all Pioneer 9000 manuals
Add to My Manuals
Save this manual to your list of manuals |
Page 69 highlights
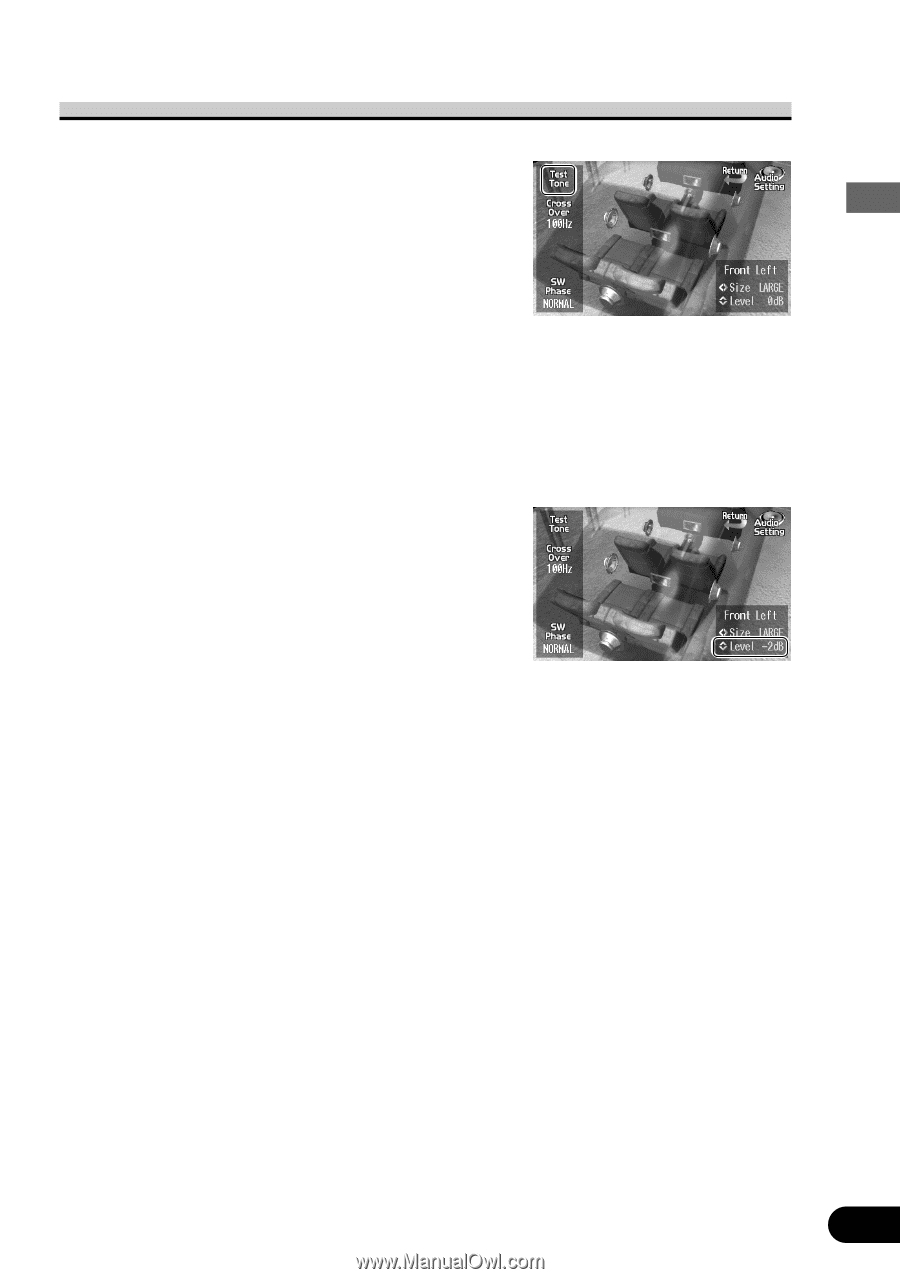
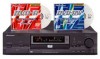
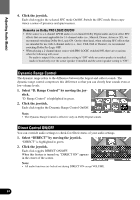
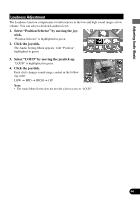
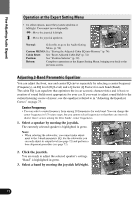
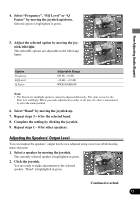
Fine Adjusting Audio (Expert) Adjusting the Speakers' Output Levels using a Test Tone A convenient test tone allows you to easily get the overall balance right among the speakers. 1. Select "Test Tone" by moving the joystick. "Test Tone" is highlighted in green. 2. Click the joystick. The test tone is output. It rotates from speaker to speaker in the following sequence at intervals of about 2 seconds. The current settings for the speaker over which you hear the test tone are shown in the lower righthand corner of the screen. Front Left = Center = Front Right = Rear Right = Rear Left = Subwoofer Check each speaker's output level. If no adjustments are needed, perform step 5 to stop the test tone. Note: • The settings do not appear for speakers whose Size is set OFF. 3. Adjust the speakers' output level by moving the joystick up/down. The display shows "-10 dB" - "+10 dB". The test tone rotates to next speaker after about 2 seconds from the last joystick operation. 4. Repeat step 3, make adjustment of the other speakers' output level. 5. Complete the procedure by clicking the joystick. Note: • If needed, select speakers and adjust their 'absolute' output level, refer to "Adjustments for Speaker". (See page 60.) • To adjust the speakers' output level at the Speaker Setting Menu is the same as making an speakers' output level at the Expert Setting Menu. Both provide the same results. 68
-
 1
1 -
2
-
3
-
4
-
5
-
6
-
7
-
8
-
9
-
10
-
11
-
12
-
13
-
14
-
15
-
16
-
17
-
18
-
19
-
20
-
21
-
22
-
23
-
24
-
25
-
26
-
27
-
28
-
29
-
30
-
31
-
32
-
33
-
34
-
35
-
36
-
37
-
38
-
39
-
40
-
41
-
42
-
43
-
44
-
45
-
46
-
47
-
48
-
49
-
50
-
51
-
52
-
53
-
54
-
55
-
56
-
57
-
58
-
59
-
60
-
61
-
62
-
63
-
 64
64 -
 65
65 -
 66
66 -
 67
67 -
 68
68 -
 69
69 -
 70
70 -
 71
71 -
 72
72 -
 73
73 -
 74
74 -
75
-
76
-
77
-
78
-
79
-
80
-
81
-
82
-
83
-
84
-
85
-
86
-
87
-
88
-
89
-
90
-
91
-
92
-
93
-
94
-
95
-
96
-
97
-
98
-
99
-
100
-
101
-
102
-
103
-
104
 |
 |