Pioneer AVHP4000DVD Owner's Manual - Page 13
For viewing LCD comfortably, What the marks on DVDs, indicate, Resetting the microprocessor, Before - install
 |
UPC - 012562883359
View all Pioneer AVHP4000DVD manuals
Add to My Manuals
Save this manual to your list of manuals |
Page 13 highlights
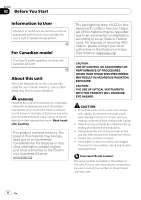
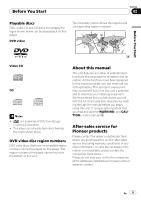
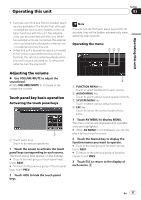
Before You Start Section 02 Before You Start For viewing LCD comfortably Due to its construction, the viewing angle of the LCD screen is limited. You can adjust it by changing either screen size or picture adjustment. Changing the wide screen size By changing the screen size from 4:3 to 16:9, you can adjust the screen so that the screen can fit to the video image you are playing. For details concerning operation, refer to Changing the wide screen mode on page 41. Changing the picture adjustment You can make the best adjustment to the picture display by changing BRIGHTNESS, CONTRAST, COLOR and HUE. You can also dim or enlight the overall picture image using DIMMER. For details concerning operation, refer to Changing the picture adjustment on page 41. What the marks on DVDs indicate The marks below may be found on DVD disc labels and packages. They indicate the type of images and audio recorded on the disc, and the functions you can use. Mark 2 2 3 16 : 9 LB 1 ALL Meaning Indicates the number of audio systems. Indicates the number of subtitle languages. Indicates the number of viewing angles. Indicates the picture size (aspect ratio: screen width-to-height ratio) type. Indicates the number of the region where playback is possible. When an operation is prohibited When you are watching a DVD and attempt to perform an operation, it may not be performed because of the programming on the disc. When this happens, the icon appears on the screen. ! The icon may not appear with certain discs. Resetting the microprocessor Pressing RESET lets you reset the microprocessor to its initial settings without changing the bookmark information. The microprocessor must be reset under the following conditions: ! Prior to using this unit for the first time after installation ! If the unit fails to operate properly ! When strange or incorrect messages ap- pear on the display 1 Turn the ignition switch OFF. 2 Press RESET with a pen tip or other pointed instrument. RESET button Note After completing connections or when you want to erase all memorized settings or return the unit to its initial (factory) settings, switch your engine ON or set the ignition switch to ACC ON before pressing RESET. En 13
-
 1
1 -
2
-
3
-
4
-
5
-
6
-
7
-
 8
8 -
 9
9 -
 10
10 -
 11
11 -
 12
12 -
 13
13 -
 14
14 -
 15
15 -
 16
16 -
 17
17 -
 18
18 -
19
-
20
-
21
-
22
-
23
-
24
-
25
-
26
-
27
-
28
-
29
-
30
-
31
-
32
-
33
-
34
-
35
-
36
-
37
-
38
-
39
-
40
-
41
-
42
-
43
-
44
-
45
-
46
-
47
-
48
-
49
-
50
-
51
-
52
-
53
-
54
-
55
-
56
-
57
-
58
-
59
-
60
-
61
-
62
-
63
-
64
-
65
-
66
-
67
-
68
-
69
-
70
-
71
-
72
-
73
-
74
-
75
-
76
-
77
-
78
-
79
-
80
-
81
-
82
-
83
-
84
-
85
-
86
-
87
-
88
-
89
-
90
-
91
-
92
-
93
-
94
-
95
-
96
-
97
-
98
-
99
 |
 |