Pioneer AVIC-X940BT Owner's Manual - Page 169
Quick Access
 |
View all Pioneer AVIC-X940BT manuals
Add to My Manuals
Save this manual to your list of manuals |
Page 169 highlights
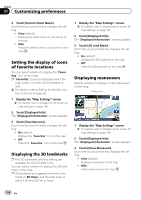
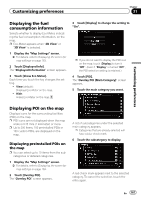
Customizing preferences Chapter 31 Customizing preferences 1 Display the "Map Settings" screen. = For details, refer to Displaying the screen for map settings on page 163. 2 Touch [Day/Night Display]. Each time you touch the key changes the setting. ! Automatic (default): You can change the colors of a map between daytime and nighttime according to whether the vehicle lights are on or off. ! Day: The map is always displayed with daytime colors. p To use this function with "Automatic", the orange/white lead of the navigation system must be connected correctly. Changing the road color You can set the road color to bluish or reddish. 1 Display the "Map Settings" screen. = For details, refer to Displaying the screen for map settings on page 163. 2 Touch [Road Color]. Each time you touch the key changes the setting. ! Blue (default): Changes to blue based road colors. ! Red: Changes to red based road colors. Changing the setting of navigation interruption screen You can set whether to automatically switch to the navigation screen from the AV screen when your vehicle approaches a guidance point such as an intersection. 1 Display the "Map Settings" screen. = For details, refer to Displaying the screen for map settings on page 163. 2 Touch [AV Guide Mode]. Each time you touch the key changes the setting. ! On (default): Switches from the AV operation screen to the map screen. ! Off: Does not switch the screen. p This setting is effective only when "Close Up View" is set to "On". Selecting the "Quick Access" menu Select items to display on the map screen. In the list displayed on screen, the items with red checks are displayed on the map screen. Touch the item you want to display and then touch [OK] when a red check appears. You can select up to five items. 1 Display the "Map Settings" screen. = For details, refer to Displaying the screen for map settings on page 163. 2 Touch [Quick Access Selection]. The "Quick Access Selection" screen appears. 3 Touch the item that you want to set in "Quick Access". You can select the following items: p Settings marked with an asterisk (*) show that these are default or factory settings. ! : Registration* Register information on the location indicated by the cursor to "Favorites". = For details, refer to Registering a location by scroll mode on page 50. ! : Vicinity Search* Find POIs (Points Of Interest) in the vicinity of the cursor. = For details, refer to Searching for a nearby POI on page 41. ! : Overlay POI* Displays icons for surrounding facilities (POI) on the map. En 169
-
 1
1 -
2
-
3
-
4
-
5
-
6
-
7
-
8
-
9
-
10
-
11
-
12
-
13
-
14
-
15
-
16
-
17
-
18
-
19
-
20
-
21
-
22
-
23
-
24
-
25
-
26
-
27
-
28
-
29
-
30
-
31
-
32
-
33
-
34
-
35
-
36
-
37
-
38
-
39
-
40
-
41
-
42
-
43
-
44
-
45
-
46
-
47
-
48
-
49
-
50
-
51
-
52
-
53
-
54
-
55
-
56
-
57
-
58
-
59
-
60
-
61
-
62
-
63
-
64
-
65
-
66
-
67
-
68
-
69
-
70
-
71
-
72
-
73
-
74
-
75
-
76
-
77
-
78
-
79
-
80
-
81
-
82
-
83
-
84
-
85
-
86
-
87
-
88
-
89
-
90
-
91
-
92
-
93
-
94
-
95
-
96
-
97
-
98
-
99
-
100
-
101
-
102
-
103
-
104
-
105
-
106
-
107
-
108
-
109
-
110
-
111
-
112
-
113
-
114
-
115
-
116
-
117
-
118
-
119
-
120
-
121
-
122
-
123
-
124
-
125
-
126
-
127
-
128
-
129
-
130
-
131
-
132
-
133
-
134
-
135
-
136
-
137
-
138
-
139
-
140
-
141
-
142
-
143
-
144
-
145
-
146
-
147
-
148
-
149
-
150
-
151
-
152
-
153
-
154
-
155
-
156
-
157
-
158
-
159
-
160
-
161
-
162
-
163
-
 164
164 -
 165
165 -
 166
166 -
 167
167 -
 168
168 -
 169
169 -
 170
170 -
 171
171 -
 172
172 -
 173
173 -
 174
174 -
175
-
176
-
177
-
178
-
179
-
180
-
181
-
182
-
183
-
184
-
185
-
186
-
187
-
188
-
189
-
190
-
191
-
192
-
193
-
194
-
195
-
196
-
197
-
198
-
199
-
200
-
201
-
202
-
203
-
204
-
205
-
206
-
207
-
208
-
209
-
210
-
211
-
212
-
213
-
214
-
215
-
216
-
217
-
218
-
219
-
220
-
221
-
222
-
223
-
224
-
225
-
226
-
227
-
228
-
229
-
230
-
231
-
232
-
233
-
234
-
235
-
236
-
237
-
238
-
239
-
240
 |
 |
