Pioneer AVIC-X940BT Owner's Manual - Page 185
Performing Auto EQ
 |
View all Pioneer AVIC-X940BT manuals
Add to My Manuals
Save this manual to your list of manuals |
Page 185 highlights
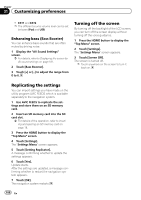
Customizing preferences Chapter 31 Customizing preferences ! Be sure to perform Auto EQ using the microphone for acoustical measurement (sold separately). Using another microphone may prevent measurement, or result in incorrect measurement of the vehicle's acoustics. ! To perform Auto EQ, the front speakers must be connected. ! When this navigation system is connected to a power amp with input level control, Auto EQ may not be able to be performed if the power amp's input level is set below the standard level. ! When this navigation system is connected to a power amp with an LPF, turn the LPF off before performing Auto EQ. Also, set the cut-off frequency for the built-in LPF of an active subwoofer to the highest frequency. ! The distance has been calculated by computer to provide the optimum delay to ensure accurate results. Do not change this value. - The reflected sound within the vehicle is strong and delays occur. - The LPF on active subwoofers or external amps delay the lower sounds. ! If an error occurs during measurement, a message appears and measurement is canceled. Check the following before measuring the vehicle's acoustics. - Front speakers (left/right) - Rear speakers (left/right) - Noise - Microphone for acoustical measurement (sold separately) - Low battery = For details, refer to Using balance adjustment on page 182. ! The equalizer curve switches to "Flat". = For details, refer to Using the equalizer on page 182. ! The front and rear speakers will automatically be adjusted to a high pass filter setting. p Previous settings for Auto EQ will be overwritten. p For AVIC-Z140BH users Do not press the h button to open or close the panel when you are using the microphone. 1 Stop the vehicle in a place that is quiet, close all the doors, windows and sun roof, and then turn the engine off. If the engine is left running, engine noise may prevent correct Auto EQ. p If driving restrictions are detected during measurement, measurement is canceled. 2 Fix the microphone for acoustical measurement (sold separately) in the center of the headrest of the driver's seat, facing forward. The Auto EQ may differ depending on where you place the microphone. If desired, place the microphone on the front passenger seat and perform Auto EQ. Performing Auto EQ p Auto EQ changes the audio settings as follows: ! "Auto EQ" on the "EQ Menu" screen is set to "On". = For details, refer to Using the auto-adjusted equalizer on the previous page. ! The fader/balance settings return to the center position. 3 Turn the ignition switch to ON or ACC. If the vehicle's air conditioner or heater is turned on, turn it off. Noise from the fan in the air conditioner or heater may prevent correct Auto EQ. En 185
-
 1
1 -
2
-
3
-
4
-
5
-
6
-
7
-
8
-
9
-
10
-
11
-
12
-
13
-
14
-
15
-
16
-
17
-
18
-
19
-
20
-
21
-
22
-
23
-
24
-
25
-
26
-
27
-
28
-
29
-
30
-
31
-
32
-
33
-
34
-
35
-
36
-
37
-
38
-
39
-
40
-
41
-
42
-
43
-
44
-
45
-
46
-
47
-
48
-
49
-
50
-
51
-
52
-
53
-
54
-
55
-
56
-
57
-
58
-
59
-
60
-
61
-
62
-
63
-
64
-
65
-
66
-
67
-
68
-
69
-
70
-
71
-
72
-
73
-
74
-
75
-
76
-
77
-
78
-
79
-
80
-
81
-
82
-
83
-
84
-
85
-
86
-
87
-
88
-
89
-
90
-
91
-
92
-
93
-
94
-
95
-
96
-
97
-
98
-
99
-
100
-
101
-
102
-
103
-
104
-
105
-
106
-
107
-
108
-
109
-
110
-
111
-
112
-
113
-
114
-
115
-
116
-
117
-
118
-
119
-
120
-
121
-
122
-
123
-
124
-
125
-
126
-
127
-
128
-
129
-
130
-
131
-
132
-
133
-
134
-
135
-
136
-
137
-
138
-
139
-
140
-
141
-
142
-
143
-
144
-
145
-
146
-
147
-
148
-
149
-
150
-
151
-
152
-
153
-
154
-
155
-
156
-
157
-
158
-
159
-
160
-
161
-
162
-
163
-
164
-
165
-
166
-
167
-
168
-
169
-
170
-
171
-
172
-
173
-
174
-
175
-
176
-
177
-
178
-
179
-
 180
180 -
 181
181 -
 182
182 -
 183
183 -
 184
184 -
 185
185 -
 186
186 -
 187
187 -
 188
188 -
 189
189 -
 190
190 -
191
-
192
-
193
-
194
-
195
-
196
-
197
-
198
-
199
-
200
-
201
-
202
-
203
-
204
-
205
-
206
-
207
-
208
-
209
-
210
-
211
-
212
-
213
-
214
-
215
-
216
-
217
-
218
-
219
-
220
-
221
-
222
-
223
-
224
-
225
-
226
-
227
-
228
-
229
-
230
-
231
-
232
-
233
-
234
-
235
-
236
-
237
-
238
-
239
-
240
 |
 |
