Pioneer AVIC-X950BH Installation Manual - Page 25
Installing the microphone, Installation
 |
View all Pioneer AVIC-X950BH manuals
Add to My Manuals
Save this manual to your list of manuals |
Page 25 highlights
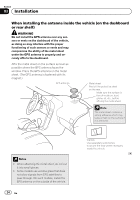
Installation Section 03 English Installing the microphone ! Install the microphone in a place where its direction and distance from the driver make it easiest to pick up the driver's voice. ! Make sure to connect the microphone to the navigation system after the system is turned off (ACC OFF). 2 Attach the microphone clip to the sun visor. Microphone clip Parts supplied Microphone Double-sided tape Mounting on the sun visor 1 Fit the microphone lead into the groove. Microphone lead Clamps Use separately sold clamps to secure the lead where necessary inside the vehicle. Install the microphone on the sun visor when it is in the up position. It cannot recognize the driver's voice if the sun visor is in the down position. Groove En 25
-
 1
1 -
2
-
3
-
4
-
5
-
6
-
7
-
8
-
9
-
10
-
11
-
12
-
13
-
14
-
15
-
16
-
17
-
18
-
19
-
 20
20 -
 21
21 -
 22
22 -
 23
23 -
 24
24 -
 25
25 -
 26
26 -
 27
27 -
 28
28 -
 29
29 -
 30
30 -
31
-
32
-
33
-
34
-
35
-
36
-
37
-
38
-
39
-
40
-
41
-
42
-
43
-
44
-
45
-
46
-
47
-
48
-
49
-
50
-
51
-
52
-
53
-
54
-
55
-
56
 |
 |

Installing the microphone
!
Install the microphone in a place where its
direction and distance from the driver
make it easiest to pick up the driver
’
s voice.
!
Make sure to connect the microphone to
the navigation system after the system is
turned off (ACC OFF).
Parts supplied
Microphone
Double-sided tape
Mounting on the sun visor
1
Fit the microphone lead into the
groove.
Microphone lead
Groove
2
Attach the microphone clip to the sun
visor.
Microphone clip
Clamps
Use separately sold clamps
to secure the lead where ne-
cessary inside the vehicle.
Install the microphone on the sun visor when
it is in the up position. It cannot recognize the
driver
’
s voice if the sun visor is in the down po-
sition.
En
25
English
Section
03
Installation