Pioneer BDP-52FD Owner's Manual - Page 41
Advanced settings
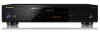 |
View all Pioneer BDP-52FD manuals
Add to My Manuals
Save this manual to your list of manuals |
Page 41 highlights
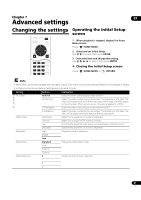
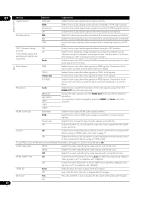
Chapter 7 07 Advanced settings Changing the settings Operating the Initial Setup screen 1 When playback is stopped, display the Home Menu screen. Press HOME MENU. 2 Select and set Initial Setup. Use / to select, then press ENTER. 3 Select the item and change the setting. Use to select, then press ENTER. Closing the Initial Setup screen Press HOME MENU or RETURN. Display Setting Note • Items that cannot be changed are indicated in gray. The items that can be selected depend on the player's status. • In Options, the factory default settings are indicated in bold. Setting Options Explanation TV Screen 16:9 Full Select this when connecting to a wide (16:9) TV. 16:9 Normal Select this when connecting to a 4:3 screen TV and playing a 16:9 video. The video will be played with the left and right sides of the image cut off to display on the 4:3 screen. (This function works if the disc is labeled for 4:3PS.) 4:3 Pan&Scan Select this when connecting to a conventional (4:3) TV. 4:3 Letterbox Select this when connecting to a 4:3 screen TV and playing a 16:9 video. The video will be played with black bands at the top and bottom. Video Adjust Brightness Select this to adjust the TV screen's brightness . Contrast Select this to adjust the TV screen's contrast. Hue Select this to adjust the color (green and red) balance of the TV screen. Saturation Select this to adjust the TV screen's saturation . Sharpness High Choose the level of sharpness. Middle Low Video Mode Standard Choose the video output mode. Vivid Cinema Custom Noise Reduction 0 Choose the level of noise reduction. 1 2 3 41 En
-
 1
1 -
2
-
3
-
4
-
5
-
6
-
7
-
8
-
9
-
10
-
11
-
12
-
13
-
14
-
15
-
16
-
17
-
18
-
19
-
20
-
21
-
22
-
23
-
24
-
25
-
26
-
27
-
28
-
29
-
30
-
31
-
32
-
33
-
34
-
35
-
 36
36 -
 37
37 -
 38
38 -
 39
39 -
 40
40 -
 41
41 -
 42
42 -
 43
43 -
 44
44 -
 45
45 -
 46
46 -
47
-
48
-
49
-
50
-
51
-
52
-
53
-
54
-
55
-
56
-
57
-
58
-
59
-
60
-
61
-
62
-
63
-
64
-
65
-
66
-
67
-
68
-
69
-
70
-
71
-
72
-
73
-
74
-
75
-
76
-
77
-
78
-
79
-
80
-
81
-
82
-
83
-
84
-
85
-
86
-
87
-
88
-
89
-
90
-
91
-
92
-
93
-
94
-
95
-
96
-
97
-
98
-
99
-
100
-
101
-
102
-
103
-
104
-
105
-
106
-
107
-
108
-
109
-
110
-
111
-
112
-
113
-
114
-
115
-
116
-
117
-
118
-
119
-
120
-
121
-
122
-
123
-
124
-
125
-
126
-
127
-
128
-
129
-
130
-
131
-
132
 |
 |
