Pioneer DJM-600 REFURBISHED Owner's Manual
Pioneer DJM-600 REFURBISHED Manual
 |
View all Pioneer DJM-600 REFURBISHED manuals
Add to My Manuals
Save this manual to your list of manuals |
Pioneer DJM-600 REFURBISHED manual content summary:
- Pioneer DJM-600 REFURBISHED | Owner's Manual - Page 1
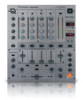
DJ MIXER DJM-600 Operating Instructions 1 - Pioneer DJM-600 REFURBISHED | Owner's Manual - Page 2
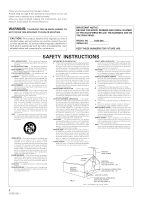
unless proper ventilation is provided or the manufacturer's instructions have been adhered to. POWER SOURCES - This to proper grounding of the mast and supporting structure, grounding of the lead-in fire or electric shock. GROUND CLAMP ELECTRIC SERVICE EQUIPMENT OBJECT AND LIQUID ENTRY - Never - Pioneer DJM-600 REFURBISHED | Owner's Manual - Page 3
exclamation point within an equilateral triangle is intended to alert the user to the presence of important operating and maintenance (servicing) instructions in the literature accompanying the appliance. [For Canadian model] This Class B digital apparatus complies with Canadian ICES-003. [Pour le - Pioneer DJM-600 REFURBISHED | Owner's Manual - Page 4
[For Canadian model] CAUTION: TO PREVENT ELECTRIC SHOCK DO NOT USE THIS (POLARIZED) PLUG WITH AN EXTENSION CORD. RECEPTACLE OR OTHER OUTLET UNLESS THE BLADES CAN BE FULLY INSERTED TO PREVENT BLADE EXPOSURE. ATTENTION: POUR PREVENIR LES CHOCS ELECTRIQUES NE PAS UTILISER CETTE FICHE POLARISEE AVEC UN - Pioneer DJM-600 REFURBISHED | Owner's Manual - Page 5
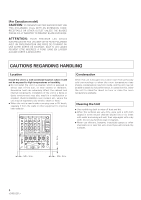
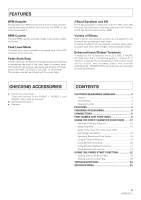
inserted in the PHONO 1, PHONO 2, and PHONO 3 terminals on the back. ÷ Operating instructions ÷ Warranty CONTENTS CAUTIONS REGARDING HANDLING 4 Location 4 Condensation 4 Cleaning the Unit 4 FEATURES Fader 23 Starting with the Cross Fader 23 TROUBLESHOOTING 24 SPECIFICATIONS 25 5 - Pioneer DJM-600 REFURBISHED | Owner's Manual - Page 6
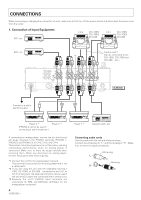
CONNECTIONS When connecting or changing the connection of units, make sure to first turn off the power switch and disconnect the power cord from the outlet. 1. Connection of Input Equipment DAT, etc. CD 2 CDJ-100S/ CDJ-700S/ CDJ-500 II CD 1 CDJ-100S/ CDJ-700S/ CDJ-500 II DAT, etc. *1 RL RL - Pioneer DJM-600 REFURBISHED | Owner's Manual - Page 7
CH - 4 SUBMIC XLR terminal polarity is as RL shown in the diagram below. *4 *6 *5 COLD (-) 23 1 HOT (+) GND DJM-600 Power amplifier (Supports XLR input) Cassette deck, etc. External effector *4 MASTER LEVEL ATT. (Master output-level attenuator knob) This knob is used to decrease the - Pioneer DJM-600 REFURBISHED | Owner's Manual - Page 8
PART NAMES AND FUNCTIONS Control Panel 1 2 3 6 8 MIC CH-1 CD1/LINE LINE PROFESSIONAL CH-2 CH-3 CD2/LINE PHONO 1 LINE PHONO 2 DJ MIXER DJM-600 CH-4 MASTER LINE SUB MIC /PHONO 3 MONO STEREO POWER MIC LEVEL - ∞ 0dB HI -12dB +12dB MID EQ -12dB +12dB LOW -12dB +12dB - Pioneer DJM-600 REFURBISHED | Owner's Manual - Page 9
HI: Adjusts high-tone input sounds. At the center position, sound will be flat. Turn to the right to increase sound (to +12dB at 13kHz). Turn to the left to decrease sound (to -26dB at 13kHz). MID: Adjusts mid-tone input sound. At the center position, sound will be flat. Turn to the right to - Pioneer DJM-600 REFURBISHED | Owner's Manual - Page 10
PART NAMES AND FUNCTIONS MIC CH-1 CD1/LINE LINE PROFESSIONAL CH-2 CH-3 CD2/LINE PHONO 1 LINE PHONO 2 DJ MIXER DJM-600 CH-4 MASTER LINE SUB MIC /PHONO 3 MONO STEREO POWER MIC LEVEL - ∞ 0dB HI -12dB +12dB MID EQ -12dB +12dB LOW -12dB +12dB TRIM dB 14 10 7 -∞ +9dB 4 - Pioneer DJM-600 REFURBISHED | Owner's Manual - Page 11
. (Selection indicated by orange light.) When using the tap switch to measure BPM, both LEDs for indicating the BPM measurement range will turn off and manual mode will go into effect (see page 15). ÷ Functions as the ON/OFF switch for sampler recording when SAMPLER REC has been selected (see page - Pioneer DJM-600 REFURBISHED | Owner's Manual - Page 12
, as was conventional, but also visually, enabling quicker, simpler mixing of music with different tempos. Use of the TAP switch to input the beat manually makes it possible to set BPM for music for which it is difficult to measure (a capella, improvisation, etc.). Beat Effector (Effects linked to - Pioneer DJM-600 REFURBISHED | Owner's Manual - Page 13
5. FILTER Changes the tone greatly by shifting the filter's frequency in units of 1/2, 1, 2, 4, 8, 16, and 32 beats. Example Frequency 1 cycle = 1/2, 1, 2, 4, 8, 16 or 32 beat 6. FLANGER Quickly and easily produces 1-cycle flanger effect for beats of 1/2, 1, 2, 4, 8, 16, or 32. Example Short delay 1 - Pioneer DJM-600 REFURBISHED | Owner's Manual - Page 14
for more than 2 seconds. * Depending on the music, it might not be possible to measure BPM with the auto BPM counter. In this case, use manual mode to make settings (see page 15). 4 Press auto BPM counter selector CH-1. ÷ LED "1" on the BPM display will light. ÷ The BPM of the music - Pioneer DJM-600 REFURBISHED | Owner's Manual - Page 15
selector switch restored to the original effect, the BPM value input will be displayed on the BPM display's upper counter. BPM can be input in manual mode if the music's BPM is known in advance. ÷ Change the effect/sampler selector switch to AUTO BPM and press the BPM measurement range selector - Pioneer DJM-600 REFURBISHED | Owner's Manual - Page 16
USING THE EFFECT/SAMPLER FUNCTIONS Delay, Echo, Auto Pan, Auto Trans, Filter, and Flanger Operations Items Set for Each Effect Effect DELAY ECHO PAN (Auto pan) TRANS FILTER FLANGER Effect/sampler parameter 1 (TIME) Delay time Setting range: 1 to 3500mSec, in 1msec steps Delay time Setting range: - Pioneer DJM-600 REFURBISHED | Owner's Manual - Page 17
BPM cannot be measured for more than 2 seconds. In this case, use manual mode to make settings (see page 15). 3 Set the parameter value. When BPM, the parameter value can be set using the beat display as a guide. Setting to Balance Original and Delayed Sound Levels ÷ The balance between original - Pioneer DJM-600 REFURBISHED | Owner's Manual - Page 18
USING THE EFFECT/SAMPLER FUNCTIONS Operating Reverb and Pitch Shifter Effector Settings Effect REVERB PITCH (Pitch Shifter) Effect/sampler parameter 1 (TIME) Reverb time (echo time) Setting range: 1 to 100%, in 1% steps Delay time Setting range: 0 to ±100%, in 1% steps Effect/sampler parameter - Pioneer DJM-600 REFURBISHED | Owner's Manual - Page 19
Precautions: ÷ If the channel has been changed with the effect/sampler channel selector switch when delay, echo (pages 16 and 17), reverb and similar effects have been turned on, all of the reverberation of the prior channel's effects will be output. ÷ Only operate the effect/sampler selector switch - Pioneer DJM-600 REFURBISHED | Owner's Manual - Page 20
be selected with the BPM measurement range selector switch. * LED will blink if BPM cannot be measured for more than 2 seconds. In this case, use manual mode to make settings (see page 15). 3 Set the recording time. ÷ Press the effect beat selector switch and "8" will light on the beat display. * To - Pioneer DJM-600 REFURBISHED | Owner's Manual - Page 21
be selected with the BPM measurement range selector switch. * LED will blink if BPM cannot be measured for more than 2 seconds. In this case, use manual mode to make settings (see page 15). 3 Set the playback time and playback level. ÷ Press the effect beat selector switch and "8" will light on the - Pioneer DJM-600 REFURBISHED | Owner's Manual - Page 22
USING THE FADER START FUNCTION If the separately sold CDJ-100S, CDJ700S and CDJ-500 II players are connected to CH-1 or CH-2, they can be started using the channel fader volume or cross fader volume control, as long as the control cables have been connected. In addition, the sound recorded with the - Pioneer DJM-600 REFURBISHED | Owner's Manual - Page 23
Starting with the Channel Fader 1 Turn on the fader start switch (CH-1 or CH-2) of the channel connected to the CD player to be controlled. 2 Push the channel fader volume control all the way to the bottom. 3 Set the cue point of the CD player and set the player to standby at it. 4 When you want to - Pioneer DJM-600 REFURBISHED | Owner's Manual - Page 24
If the trouble cannot be rectified even after checking the following items, contact your dealer or nearest PIONEER service center. Problem Possible other channels to approach 0dB. ÷ Press the TAP switch and set BPM manually. Measured BPM value differs from value indicated on CD. ÷ Because of - Pioneer DJM-600 REFURBISHED | Owner's Manual - Page 25
320 (W) x 372 (D) x 107 (H) mm 12-19/32 (W) x 14-5/8 (D) x 4-7/32 (H) in Weight 6.6kg 14lbs 9oz Accessories ÷ Short-circuit pin plug 6 ÷ Operating instructions 1 ÷ Warranty 1 For improvement purposes, specifications and design may be subject to modification without notice. 25 - Pioneer DJM-600 REFURBISHED | Owner's Manual - Page 26
26 - Pioneer DJM-600 REFURBISHED | Owner's Manual - Page 27
27 - Pioneer DJM-600 REFURBISHED | Owner's Manual - Page 28
Published by Pioneer Corporation. Copyright © 1999 Pioneer Corporation. All rights reserved. PIONEER CORPORATION 4-1, Meguro 1-Chome, Meguro-ku, Tokyo 153-8654, Japan PIONEER NEW MEDIA TECHNOLOGIES, INC. Multimedia and Mass Storage Division: 2265 East 220th Street, Long Beach, CA 90810, U.S.A. TEL:
-
 1
1 -
 2
2 -
 3
3 -
 4
4 -
 5
5 -
 6
6 -
 7
7 -
8
-
9
-
10
-
11
-
12
-
13
-
14
-
15
-
16
-
17
-
18
-
19
-
20
-
21
-
22
-
23
-
24
-
25
-
26
-
27
-
28
 |
 |

Operating Instructions
DJ MIXER
DJM-600