Pioneer DJM-600 REFURBISHED Owner's Manual - Page 9
Headphones Cue And Auto Bpm Counter
 |
View all Pioneer DJM-600 REFURBISHED manuals
Add to My Manuals
Save this manual to your list of manuals |
Page 9 highlights
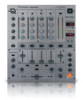
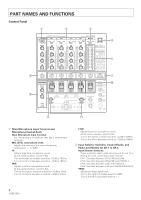
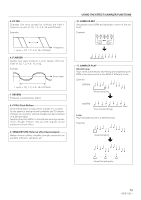
HI: Adjusts high-tone input sounds. At the center position, sound will be flat. Turn to the right to increase sound (to +12dB at 13kHz). Turn to the left to decrease sound (to -26dB at 13kHz). MID: Adjusts mid-tone input sound. At the center position, sound will be flat. Turn to the right to increase sound (to +12dB at 1kHz). Turn to the left to decrease sound (to -26dB at 1kHz). LOW: Adjusts low-tone input sound. At the center position, sound is flat. Turn to the right to increase sound (to +12dB at 70Hz). Turn to the left to decrease sound (to -12dB at 70Hz). Peak Level Meter: Displays peak level, held for 2 seconds. Displays level before it is subjected to the channel fader. Display range: -24dB to +14dB. 3 MONO/STEREO (Master Output Monaural/ Stereo Selection Switch) Used to select either MONO or STEREO for master output. 4 POWER (Power Supply Switch) 5 MASTER LEVEL (Master Level Meter) Displays the output level following master volume adjustment, held for 2 seconds. Display range: -24dB to +14dB. 6 TALK OVER Press this switch and the sound level for everything other than the main microphone will decrease to around 14dB, and a red LED will light. To restore original status, press this switch again. Caution:Pressing this switch will cause sudden, major changes in the volume. 7 HEADPHONES CUE and AUTO BPM COUNTER SELECTOR HEADPHONES CUE: Used to select the source (CH-1 to CH-4, MASTER, or EFFECTS/SAMPLER) to be monitored with headphones. Press it again to cancel the selection. Pressing multiple buttons makes it possible to derive mixed sound from the selected sources. AUTO BPM COUNTER SELECTOR: When AUTO BPM has been selected with the effect/ sampler selector switch (^), the BPM of the selected channel (CH-1 to CH-4) will be displayed on the BPM display ($). BPM will not be displayed correctly if 2 or more channels have been selected. PART NAMES AND FUNCTIONS 8 Headphone Terminal and Headphone Output Control Panel MONO SPLIT/STEREO (mono split/stereo selector switch): Used to select whether to split monitor sound on the left and right of the headphones or to keep sound in stereo form. MONO SPLIT will change headphone output to monaural. The left channel will be for the sound from the channel selected with HEADPHONES CUE, and the right channel will be the sound output from the master. (This applies only when the master was selected using HEADPHONES CUE.) MIXING (mixing adjustment knob): Adjusts headphone monitor sound. Turn all the way to the right for master output sound. (This applies only when the master was selected using HEADPHONES CUE.) Turn all the way to the left for the sound from the channel (other than the master) selected with HEADPHONES CUE. At the center position, the levels for master output and the sound selected with HEADPHONES CUE will be even. LEVEL (level adjustment knob): Adjusts headphone monitor sound. When CH-1 to CH-4 has been selected, the level is not affected by master volume (0) or master balance (@). PHONES (headphone terminal) 9 Channel Fader Volume Adjusts the volume for CH-1 to CH-4. 0 Master Fader Volume Adjusts the master output sound level. Signals from the channels selected with the ASSIGN switch (-) will be output using channel fader volume (9) and cross fader volume (!), while signals from other channels will be output using channel fader volume. - CROSS FADER ASSIGN A, CROSS FADER ASSIGN B Selects signals assigned to A and B when the cross fader is used with 2 sources (A and B). THRU: Select when not using the cross fader. 1 to 4: Select what channels (CH-1 to CH-4) to assign to A and B. Channels not assigned to A or B are output without passing through the cross fader. SAMPLER: Select when using the cross fader to output sound sampled using this unit's effect function, when SINGLE (not STRETCH or LOOP) has been selected with the effect/ sampler selector switch (^). 9
-
 1
1 -
2
-
3
-
 4
4 -
 5
5 -
 6
6 -
 7
7 -
 8
8 -
 9
9 -
 10
10 -
 11
11 -
 12
12 -
 13
13 -
 14
14 -
15
-
16
-
17
-
18
-
19
-
20
-
21
-
22
-
23
-
24
-
25
-
26
-
27
-
28
 |
 |
